License for Use of "Physicians' Current Procedural Terminology", (CPT) Fourth Edition
End User/Point and Click Agreement: CPT codes, descriptions and other data only are copyright 2009 American Medical Association (AMA). All Rights Reserved (or such other date of publication of CPT). CPT is a trademark of the AMA.
You, your employees and agents are authorized to use CPT only as contained in the following authorized materials including but not limited to CGS fee schedules, general communications, Medicare Bulletin, and related materials internally within your organization within the United States for the sole use by yourself, employees, and agents. Use is limited to use in Medicare, Medicaid, or other programs administered by the Centers for Medicare & Medicaid Services (CMS). You agree to take all necessary steps to insure that your employees and agents abide by the terms of this agreement.
Any use not authorized herein is prohibited, including by way of illustration and not by way of limitation, making copies of CPT for resale and/or license, transferring copies of CPT to any party not bound by this agreement, creating any modified or derivative work of CPT, or making any commercial use of CPT. License to use CPT for any use not authorized here in must be obtained through the AMA, CPT Intellectual Property Services, 515 N. State Street, Chicago, IL 60610. Applications are available at the AMA website.
This product includes CPT which is commercial technical data and/or computer data bases and/or commercial computer software and/or commercial computer software documentation, as applicable which were developed exclusively at private expense by the American Medical Association, 515 North State Street, Chicago, Illinois, 60610. U.S. Government rights to use, modify, reproduce, release, perform, display, or disclose these technical data and/or computer data bases and/or computer software and/or computer software documentation are subject to the limited rights restrictions of DFARS 252.227-7015(b)(2)(June 1995) and/or subject to the restrictions of DFARS 227.7202-1(a)(June 1995) and DFARS 227.7202-3(a)June 1995), as applicable for U.S. Department of Defense procurements and the limited rights restrictions of FAR 52.227-14 (June 1987) and/or subject to the restricted rights provisions of FAR 52.227-14 (June 1987) and FAR 52.227-19 (June 1987), as applicable, and any applicable agency FAR Supplements, for non-Department Federal procurements.
AMA Disclaimer of Warranties and Liabilities.
CPT is provided "as is" without warranty of any kind, either expressed or implied, including but not limited to, the implied warranties of merchantability and fitness for a particular purpose. AMA warrants that due to the nature of CPT, it does not manipulate or process dates, therefore there is no Year 2000 issue with CPT. AMA disclaims responsibility for any errors in CPT that may arise as a result of CPT being used in conjunction with any software and/or hardware system that is not Year 2000 compliant. No fee schedules, basic unit, relative values or related listings are included in CPT. The AMA does not directly or indirectly practice medicine or dispense medical services. The responsibility for the content of this file/product is with CGS or the CMS and no endorsement by the AMA is intended or implied. The AMA disclaims responsibility for any consequences or liability attributable to or related to any use, non-use, or interpretation of information contained or not contained in this file/product. This Agreement will terminate upon notice if you violate its terms. The AMA is a third party beneficiary to this Agreement.
CMS Disclaimer
The scope of this license is determined by the AMA, the copyright holder. Any questions pertaining to the license or use of the CPT must be addressed to the AMA. End Users do not act for or on behalf of the CMS. CMS DISCLAIMS RESPONSIBILITY FOR ANY LIABILITY ATTRIBUTABLE TO END USER USE OF THE CPT. CMS WILL NOT BE LIABLE FOR ANY CLAIMS ATTRIBUTABLE TO ANY ERRORS, OMISSIONS, OR OTHER INACCURACIES IN THE INFORMATION OR MATERIAL CONTAINED ON THIS PAGE. In no event shall CMS be liable for direct, indirect, special, incidental, or consequential damages arising out of the use of such information or material.
This license will terminate upon notice to you if you violate the terms of this license. The AMA is a third party beneficiary to this license.
POINT AND CLICK LICENSE FOR USE OF "CURRENT DENTAL TERMINOLOGY", ("CDT")
THE LICENSE GRANTED HEREIN IS EXPRESSLY CONDITIONED UPON YOUR ACCEPTANCE OF ALL TERMS AND CONDITIONS CONTAINED IN THIS AGREEMENT. BY CLICKING BELOW ON THE BUTTON LABELED "I ACCEPT", YOU HEREBY ACKNOWLEDGE THAT YOU HAVE READ, UNDERSTOOD AND AGREED TO ALL TERMS AND CONDITIONS SET FORTH IN THIS AGREEMENT.
IF YOU DO NOT AGREE WITH ALL TERMS AND CONDITIONS SET FORTH HEREIN, CLICK BELOW ON THE BUTTON LABELED "I DO NOT ACCEPT" AND EXIT FROM THIS COMPUTER SCREEN.
IF YOU ARE ACTING ON BEHALF OF AN ORGANIZATION, YOU REPRESENT THAT YOU ARE AUTHORIZED TO ACT ON BEHALF OF SUCH ORGANIZATION AND THAT YOUR ACCEPTANCE OF THE TERMS OF THIS AGREEMENT CREATES A LEGALLY ENFORCEABLE OBLIGATION OF THE ORGANIZATION. AS USED HEREIN, "YOU" AND "YOUR" REFER TO YOU AND ANY ORGANIZATION ON BEHALF OF WHICH YOU ARE ACTING.
Subject to the terms and conditions contained in this Agreement, you, your employees, and agents are authorized to use CDT-4 only as contained in the following authorized materials and solely for internal use by yourself, employees and agents within your organization within the United States and its territories. Use of CDT-4 is limited to use in programs administered by Centers for Medicare & Medicaid Services (CMS). You agree to take all necessary steps to ensure that your employees and agents abide by the terms of this agreement. You acknowledge that the ADA holds all copyright, trademark and other rights in CDT-4. You shall not remove, alter, or obscure any ADA copyright notices or other proprietary rights notices included in the materials.
Any use not authorized herein is prohibited, including by way of illustration and not by way of limitation, making copies of CDT-4 for resale and/or license, transferring copies of CDT-4 to any party not bound by this agreement, creating any modified or derivative work of CDT-4, or making any commercial use of CDT-4. License to use CDT-4 for any use not authorized herein must be obtained through the American Dental Association, 211 East Chicago Avenue, Chicago, IL 60611. Applications are available at the American Dental Association website.
Applicable Federal Acquisition Regulation Clauses (FARS)\Department of Defense Federal Acquisition Regulation Supplement (DFARS) Restrictions Apply to Government use. Please click here to see all U.S. Government Rights Provisions.
ADA DISCLAIMER OF WARRANTIES AND LIABILITIES. CDT-4 is provided "as is" without warranty of any kind, either expressed or implied, including but not limited to, the implied warranties of merchantability and fitness for a particular purpose. No fee schedules, basic unit, relative values or related listings are included in CDT-4. The ADA does not directly or indirectly practice medicine or dispense dental services. The sole responsibility for the software, including any CDT-4 and other content contained therein, is with (insert name of applicable entity) or the CMS; and no endorsement by the ADA is intended or implied. The ADA expressly disclaims responsibility for any consequences or liability attributable to or related to any use, non-use, or interpretation of information contained or not contained in this file/product. This Agreement will terminate upon notice to you if you violate the terms of this Agreement. The ADA is a third-party beneficiary to this Agreement.
CMS DISCLAIMER. The scope of this license is determined by the ADA, the copyright holder. Any questions pertaining to the license or use of the CDT-4 should be addressed to the ADA. End users do not act for or on behalf of the CMS. CMS DISCLAIMS RESPONSIBILITY FOR ANY LIABILITY ATTRIBUTABLE TO END USER USE OF THE CDT-4. CMS WILL NOT BE LIABLE FOR ANY CLAIMS ATTRIBUTABLE TO ANY ERRORS, OMISSIONS, OR OTHER INACCURACIES IN THE INFORMATION OR MATERIAL COVERED BY THIS LICENSE. In no event shall CMS be liable for direct, indirect, special, incidental, or consequential damages arising out of the use of such information or material.
The license granted herein is expressly conditioned upon your acceptance of all terms and conditions contained in this agreement. If the foregoing terms and conditions are acceptable to you, please indicate your agreement by clicking below on the button labeled "I ACCEPT". If you do not agree to the terms and conditions, you may not access or use the software. Instead, you must click below on the button labeled "I DO NOT ACCEPT" and exit from this computer screen.
The Fiscal Intermediary Standard System (FISS) is the claims processing system that Medicare Administrative Contractors (MACs) use to process Medicare Part A, home health, and hospice billing transactions.
Direct Data Entry (DDE) is an online system that providers can use to:
Key and submit original claims to FISS.
Determine a claim’s status in FISS.
Research claim errors and submit corrections to FISS.
Verify beneficiary eligibility information on the Common Working File (CWF).
DDE Availability
Monday – Friday, 6 am – 9 pm ET (5 am – 8 pm CT)
Saturday, 6 am – 6 pm ET (5 am – 5 pm CT)
Not available on Sunday or federal holidays.
Note: This schedule may vary due to nightly cycles, quarterly releases, or other technical reasons.
For questions or assistance, please contact the EDI Help Desk:
J15 HHH: 1.877.299.4500 (option 2)
J15 Part A Kentucky/Ohio: 1.866.590.6703 (option 2)
Connectivity Vendor: You must also contract with a vendor to establish direct connection to the Enterprise Data Center (EDC) for DDE access through a connectivity product.
The EDI Help Desk doesn’t provide support for your connectivity product. Please contact your connectivity vendor for any issues related to your direct connection.
Annual DDE Recertification: To maintain access, you must complete the Annual DDE PPTN Recertification form each year. CGS will post notifications on our website and send electronic mailing list messages with details.
Use the function keys on your keyboard to navigate within the DDE system. Each screen lists the specific functions available at the bottom of the page.
F1
Help
On a claim page, the reason code description displays.
F2
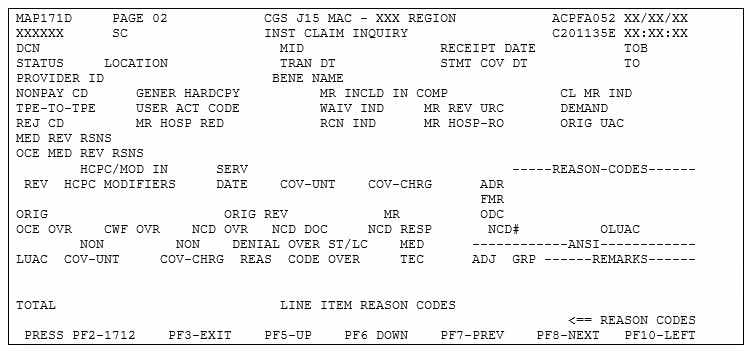
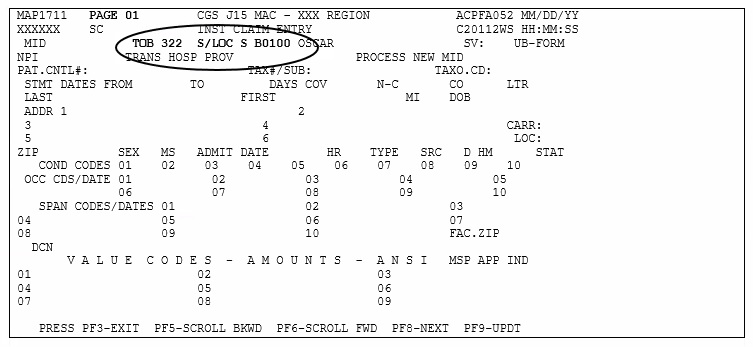
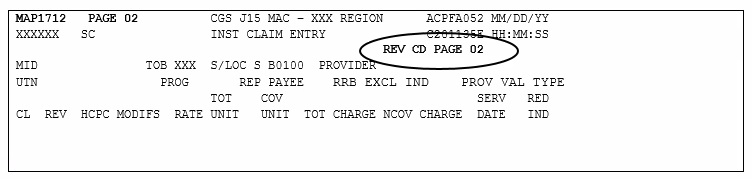
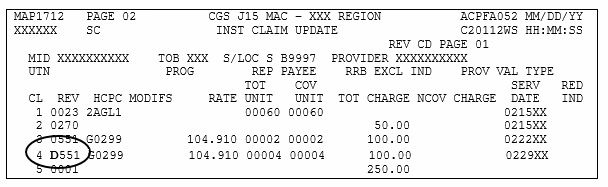
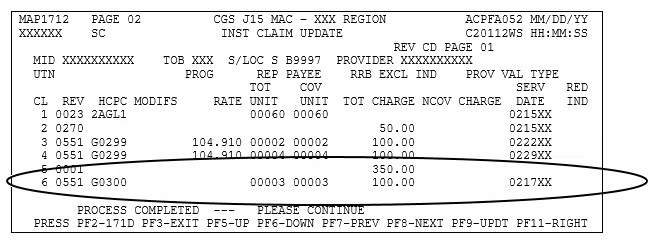
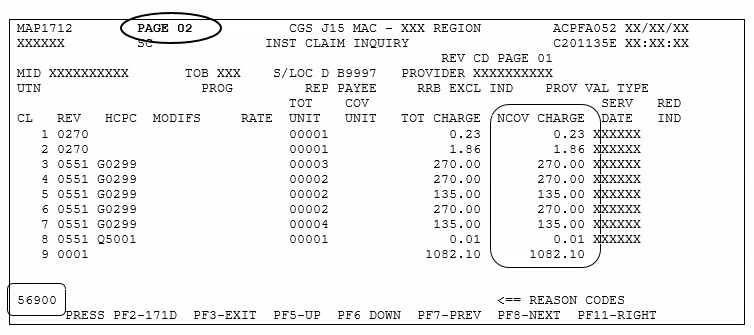
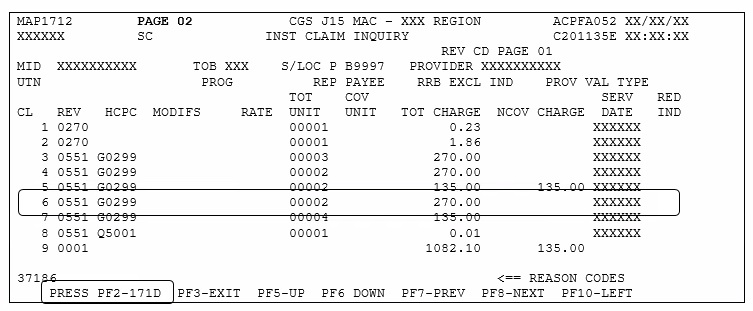
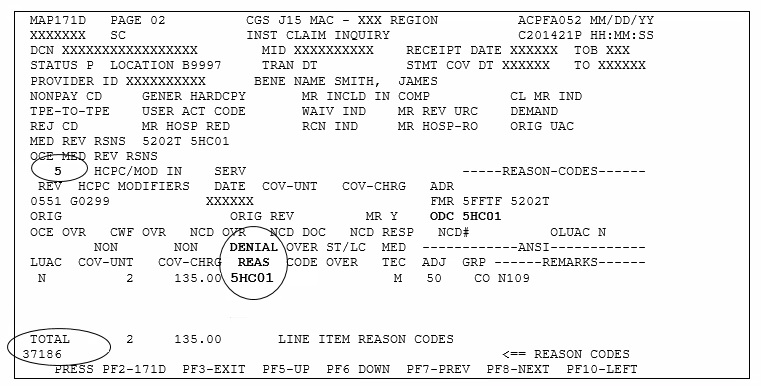
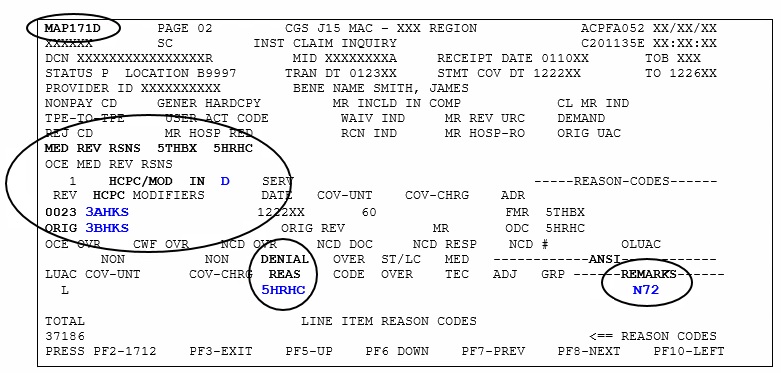
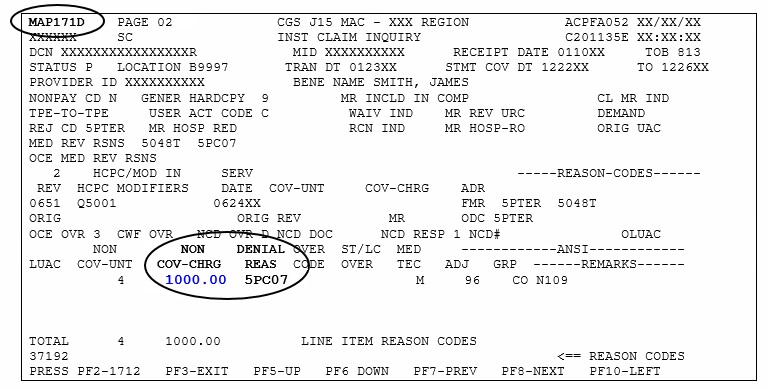
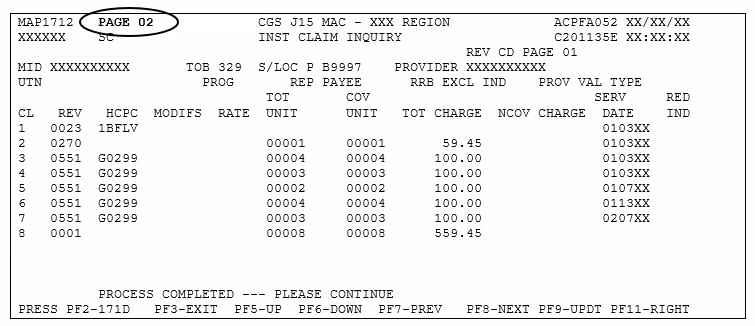
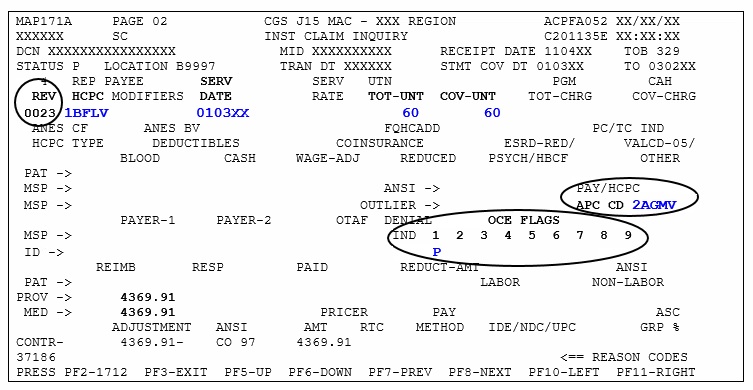
171D or 1712
Toggle between claim page 02 and MAP171D (contains line item details, including reason codes assigned at the revenue code line level).
F3
Exit
Exit to prior screen or to end session.
F5
Up/Scroll Backward
Scroll up (backward) on the page.
F6
Down/ Scroll Forward
Scroll down (forward) on the page.
F7
Previous
Go back to the prior page.
F8
Next
Go to the next page.
F9
Update
Submit claim.
If information is missing or incorrect, a reason code will display. Make any necessary corrections and press F9 again.
F10
Left
Go one page to the left.
F11
Right
Go one page to the right.
Note: If your results vary, please contact your connectivity vendor for assistance in mapping your keyboard.
The Fiscal Intermediary Standard System (FISS) is the claims processing system that Medicare Administrative Contractors (MACs) use to process Medicare Part A, home health, and hospice billing transactions.
Direct Data Entry (DDE) is an online system that providers can use to:
Key and submit original claims to FISS.
Determine a claim’s status in FISS.
Research claim errors and submit corrections to FISS.
Verify beneficiary eligibility information on the Common Working File (CWF).
DDE Availability
Monday – Friday, 6 am – 9 pm ET (5 am – 8 pm CT)
Saturday, 6 am – 6 pm ET (5 am – 5 pm CT)
Not available on Sunday or federal holidays.
Note: This schedule may vary due to nightly cycles, quarterly releases, or other technical reasons.
For questions or assistance, please contact the EDI Help Desk:
J15 HHH: 1.877.299.4500 (option 2)
J15 Part A Kentucky/Ohio: 1.866.590.6703 (option 2)
Connectivity Vendor: You must also contract with a vendor to establish direct connection to the Enterprise Data Center (EDC) for DDE access through a connectivity product.
The EDI Help Desk doesn’t provide support for your connectivity product. Please contact your connectivity vendor for any issues related to your direct connection.
Annual DDE Recertification: To maintain access, you must complete the Annual DDE PPTN Recertification form each year. CGS will post notifications on our website and send electronic mailing list messages with details.
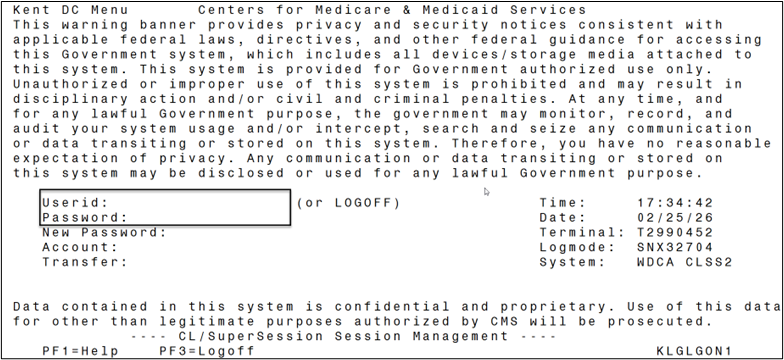
User ID & Password
Once connection is established, EDI will issue a user ID and password required to log in (instructions below).
For security issues or password resets, please contact the CGS Security Administration Team:
KLKNA10 CREDENTIAL NOT AUTHORIZED error message: The user ID or password is invalid.
To change your password:
Type your user ID and press Tab.
Type your current password and press Tab.
Type a new password and press Enter.
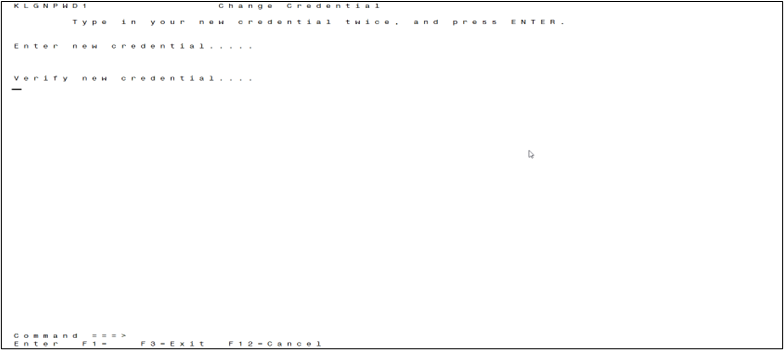
If your password expires or you change your password: Type your new password twice and press Enter.
KLKNA105 NEW CREDENTIAL INVALID error message: The new password is invalid.
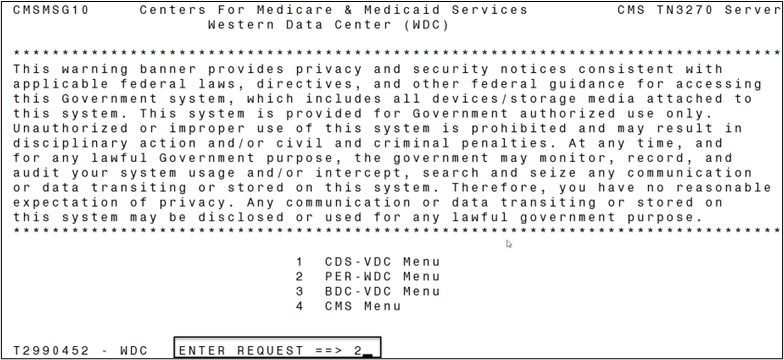
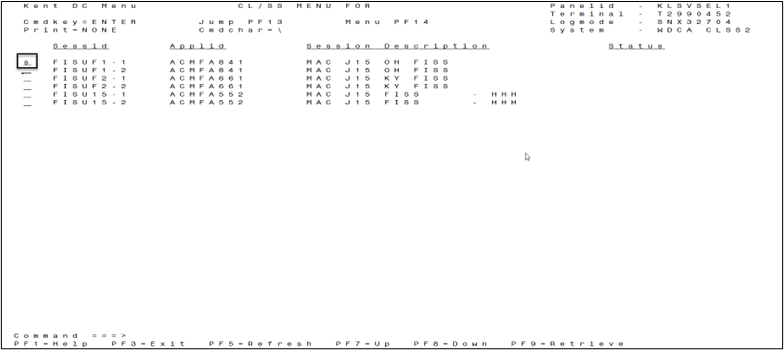
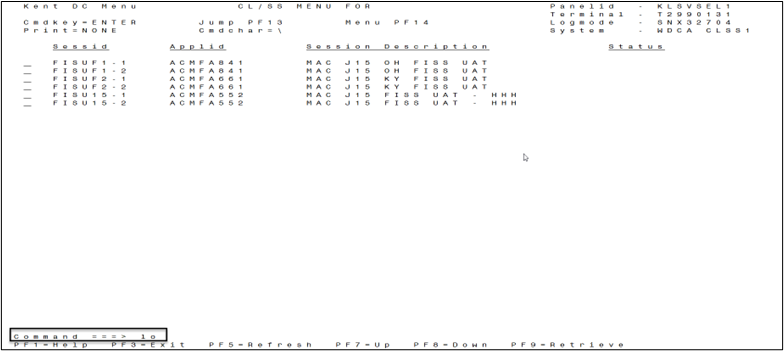
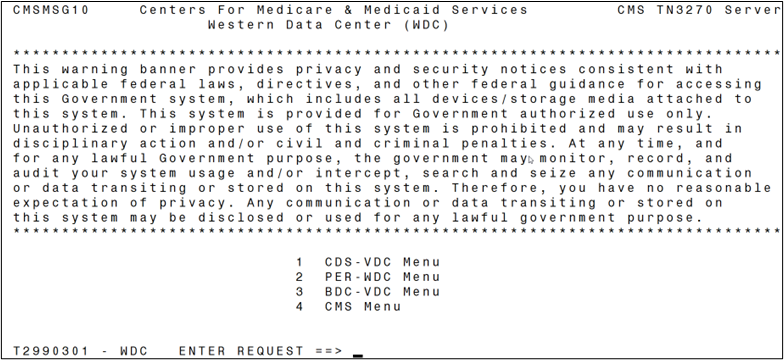
Options to select a session:
Place your cursor anywhere on the session line and press Enter.
Tab to a session line, type s (blank field left of Sessid), and press Enter.
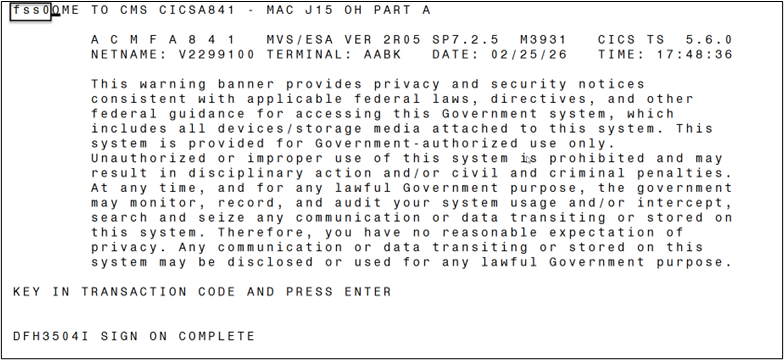
Type fss0 and press Enter.
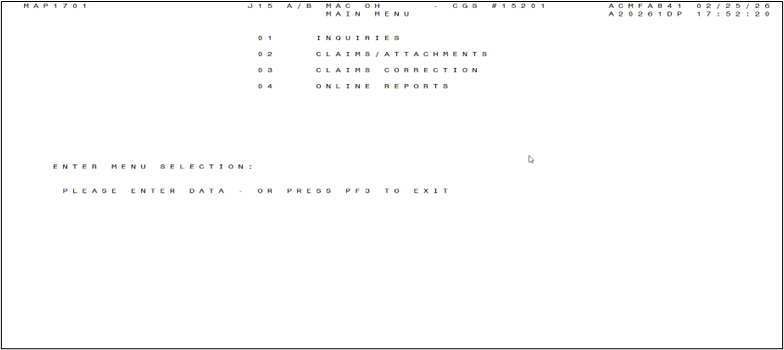
The Main Menu displays.
DDE Navigation
Use the function keys on your keyboard to navigate within the DDE system. Each screen lists the specific functions available at the bottom of the page.
F1
Help
On a claim page, the reason code description displays.
F2
171D or 1712
Toggle between claim page 02 and MAP171D (contains line item details, including reason codes assigned at the revenue code line level).
F3
Exit
Exit to prior screen or to end session.
F5
Up/Scroll Backward
Scroll up (backward) on the page.
F6
Down/ Scroll Forward
Scroll down (forward) on the page.
F7
Previous
Go back to the prior page.
F8
Next
Go to the next page.
F9
Update
Submit claim.
If information is missing or incorrect, a reason code will display. Make any necessary corrections and press F9 again.
F10
Left
Go one page to the left.
F11
Right
Go one page to the right.
Note: If your results vary, please contact your connectivity vendor for assistance in mapping your keyboard.
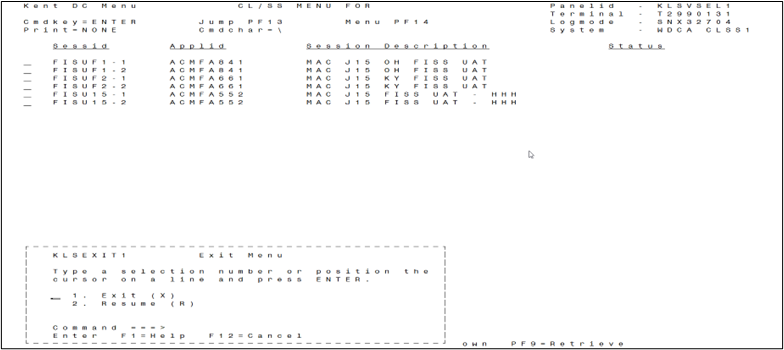
Session Time Out
If the session remains inactive, the CL/SS Menu will display. You can:
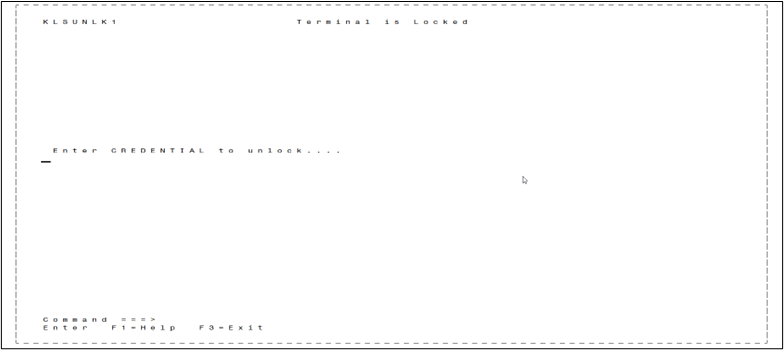
Temporarily lock your screen.
Resume or exit.
To temporarily lock your screen, type LO on the Command line, and press Enter.
To unlock the screen, type your password, and press Enter.
To resume or exit:
Press F3 to display the pop-up Exit Menu.
To exit:
Place your cursor on the Exit line; press Enter.
Or, type X on the Command line; press Enter.
To resume:
Place your cursor on the Resume line; press Enter.
Or, type R on the Command line; press Enter.
If you don’t do anything, the CL/SS Menu will time out, and the initial login screen will display.
Status/Location Codes
When you submit a claim, FISS assigns it to an initial status/location (S/LOC). With each nightly cycle, FISS may assign the claim to a different S/LOC to apply certain edits. This process continues until all applicable system edits are applied and the claim reaches a final location.
S/LOC codes contain a letter (status) and 5 alphanumeric characters (location). The table below describes status codes.
Status
Description
D (Denied)
Automated medical policy edits, medical review contractor determinations, demand bills, or informational only claims
I (Inactive)
Aged or suppressed RTP claim waiting on final system purge
P (Processed or Paid)
Payment floor, approved for payment, or post-payment review
R (Rejected)
Information reported on the claim doesn’t correspond with the Common Working File (CWF).
S (Suspense)
Still processing, Additional Documentation Request (ADR), requires Medicare staff intervention, or system issue
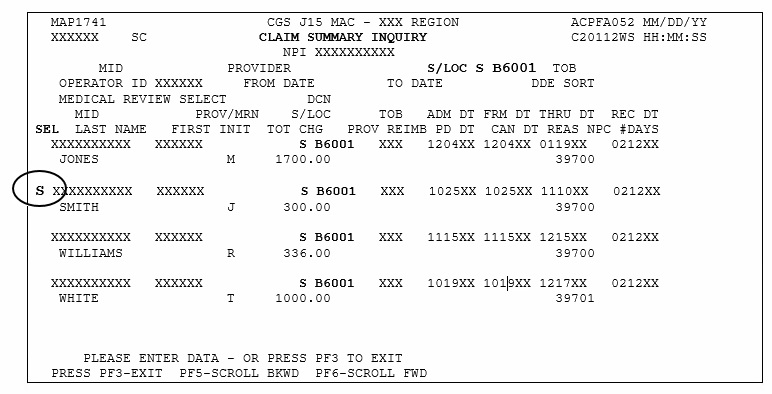
For ADRs (S B6001), please respond within 45 days.
Before calling Customer Service, please review the Claim Payment Alerts webpage or wait until the claim remains in the same location for 30 days (original claims) or 60 days (adjustment or MSP claims).
T (Return to Provider/RTP)
Pending for the provider to correct missing or incorrect information
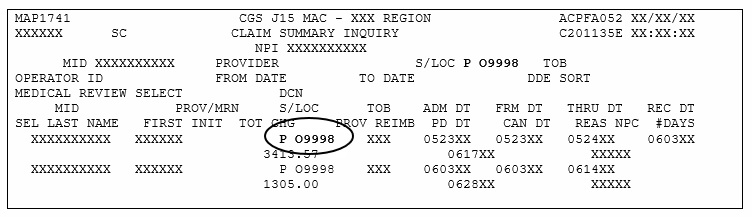
Based on volume, we can’t publish every possible S/LOC code. The table below describes the most common.
Final location; processed or paid (full or partial)
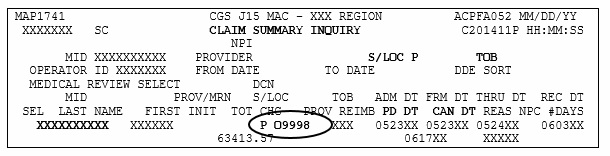
P O9998
Final location; offline
R B75XX
Suspended for MSP prepayment review; will remain for up to 75 days before it moves to a final location.
R B9997
Final location; all services rejected
S B0100
Suspended for processing
S B6001
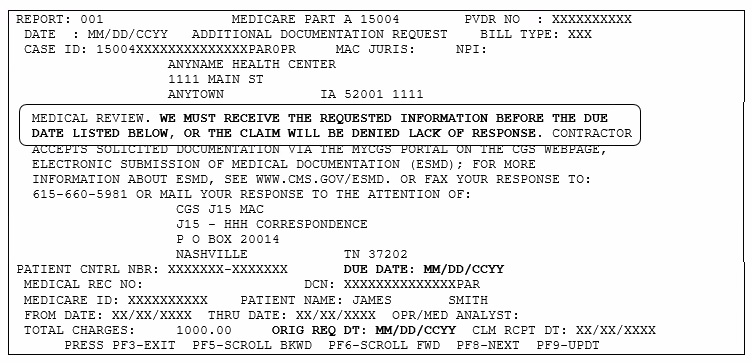
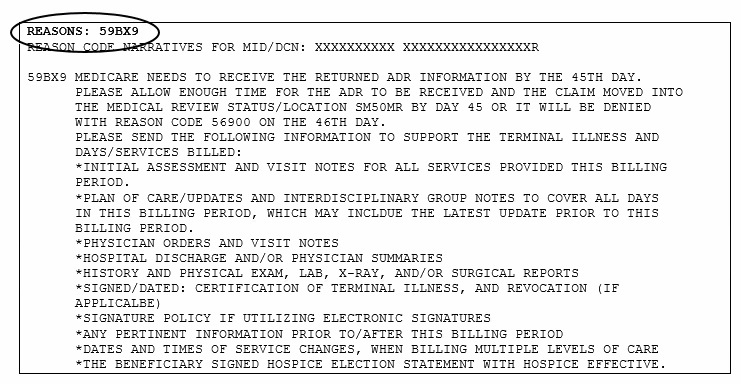
Additional Documentation Request (ADR)
If you don’t respond within 45 days, the claim will deny.
S B90XX
Suspended for Common Working File (CWF) edits
S MXXXX
Suspended for Medicare staff intervention or due to a system issue
Before calling Customer Service, please review the Claim Payment Alerts webpage or wait until the claim remains in the same location for 30 days (original claims) or 60 days (adjustment or MSP claims).
S M50MR
Suspended for medical review of documentation received in response to an ADR (up to 30 days)
S M5CLM
Suspended for additional processing after the medical review is complete
Hospice only: Suspended for review of an untimely NOE exception request (Remarks field)
S M8877
Hospice only: Suspended to wait for documentation that supports an untimely NOE exception request (day 30 – receipt of documentation or day 45)
If documentation isn’t received by day 46, the claim is released to process as billed; see Requesting an Exception for an Untimely NOE.
S MRADJ
Suspended to process an MSP adjustment claim
T B9997
Return to Provider (RTP): Pending for the provider to correct missing or incorrect information
Error processing SSI file
Error processing SSI file
Error processing SSI file
Error processing SSI file
Error processing SSI file
Error processing SSI file
Error processing SSI file
Error processing SSI file
Error processing SSI file
Error processing SSI file
Error processing SSI file
CMS terminated the Common Working File (CWF) queries (e.g., ELGA, ELGH, HIQA, HIQH, HUQA) because they weren't HIPAA compliant.
To access beneficiary eligibility information, please refer to Chapter 3 - Inquiry Menu Options, Beneficiary/CWF (Option 10).
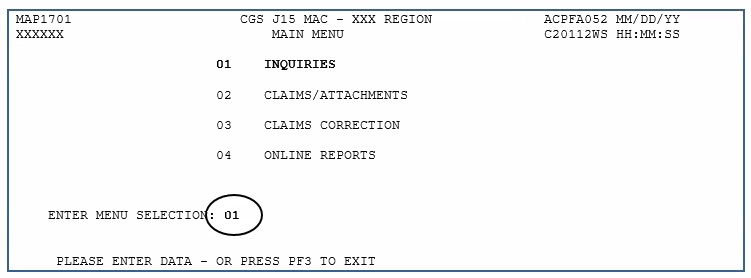
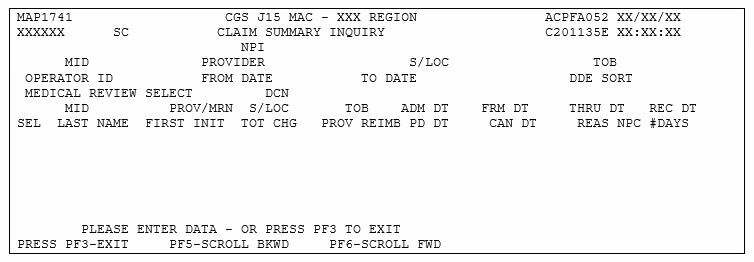
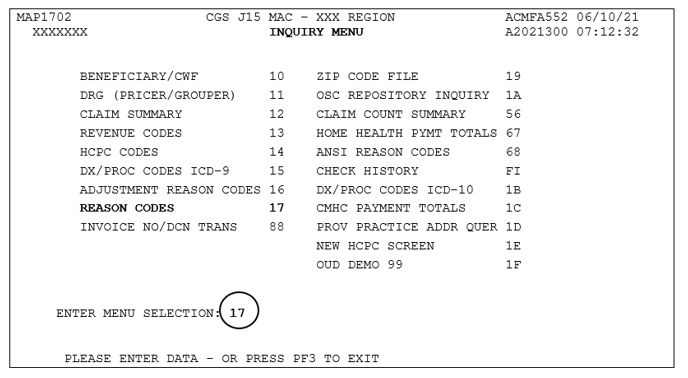
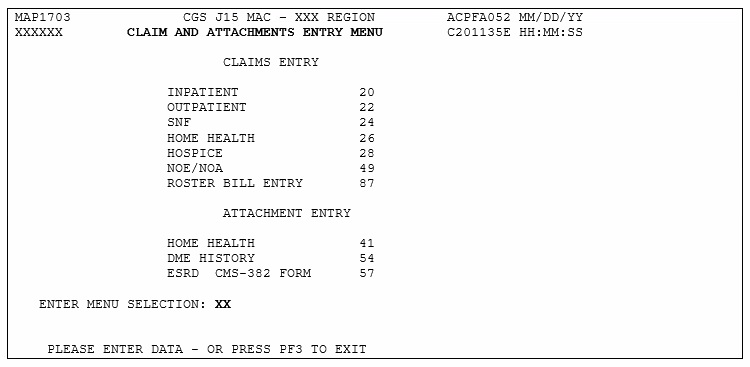
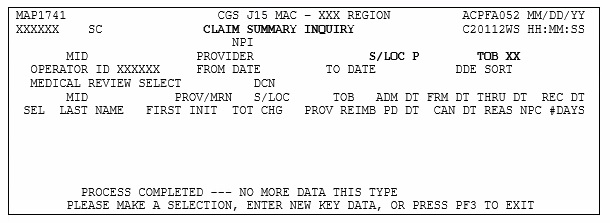
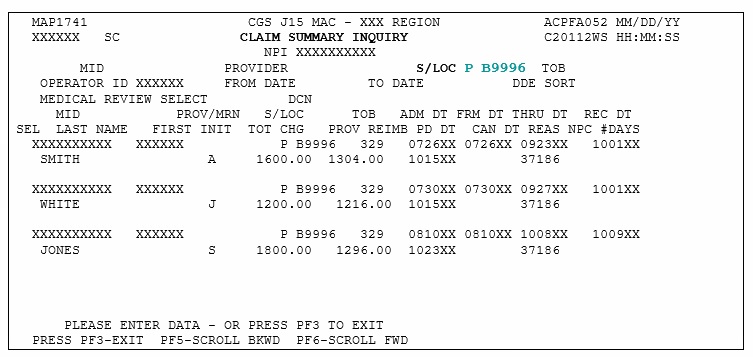
The Inquiries option (FISS Main Menu option 01) allows you to:
Check the status of submitted billing transactions
Locate claims in an ADR (Additional Development Request) status
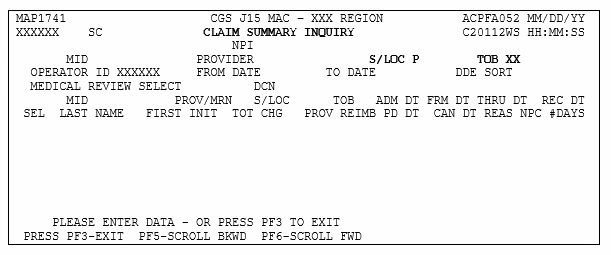
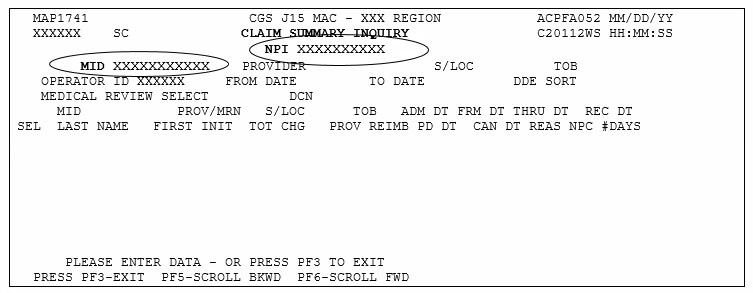
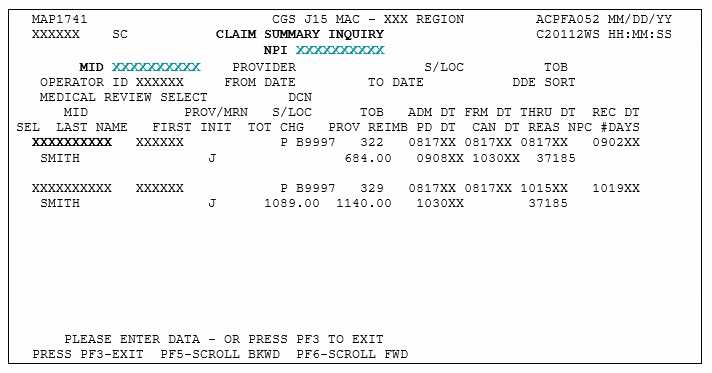
View a summary of all claims currently being processed in the system
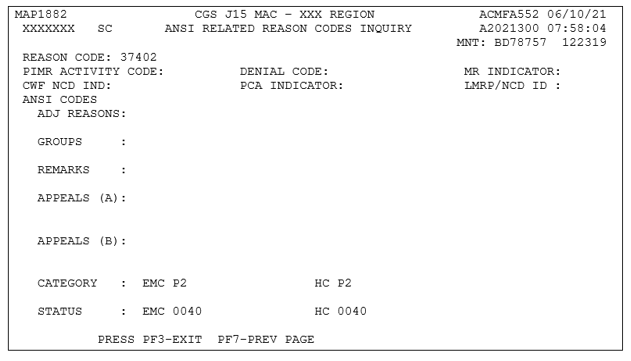
Verify revenue codes, diagnosis codes, HCPCS codes, adjustment reason codes, reason codes, and ANSI (American National Standards Institute) codes
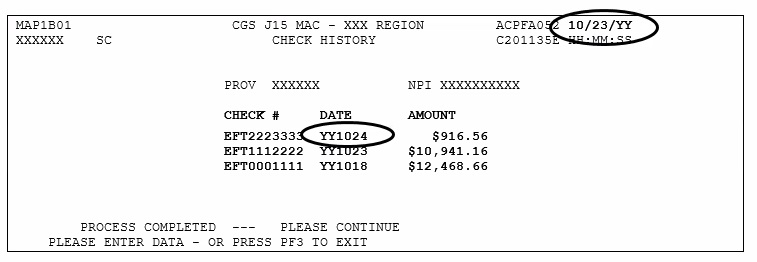
View the amount and payment date of the last three checks issued to your facility
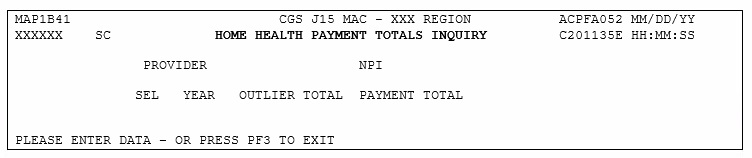
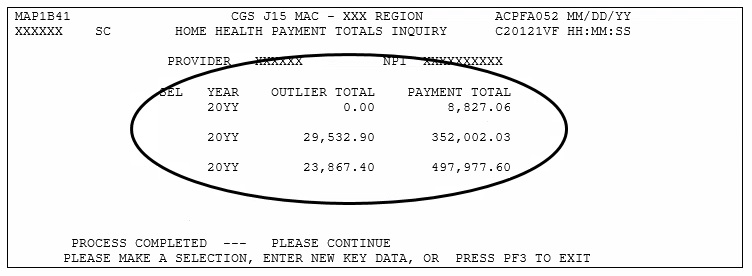
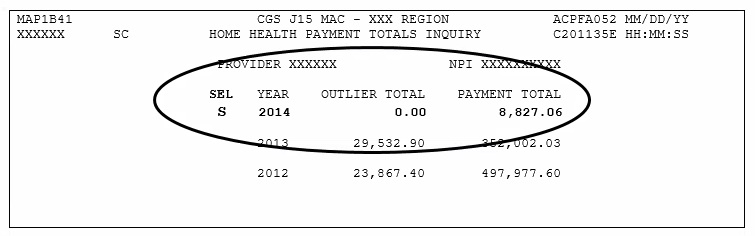
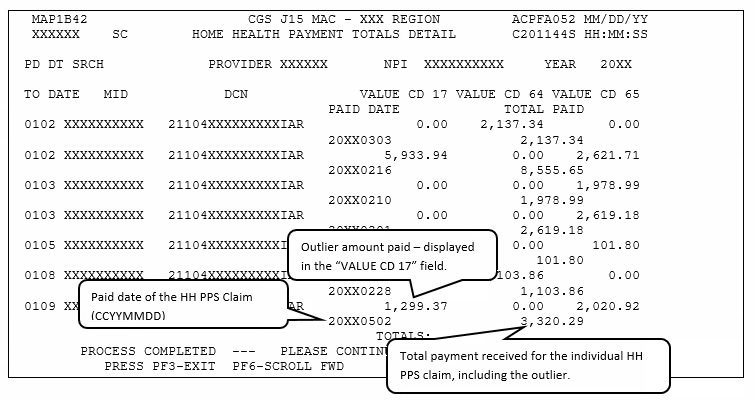
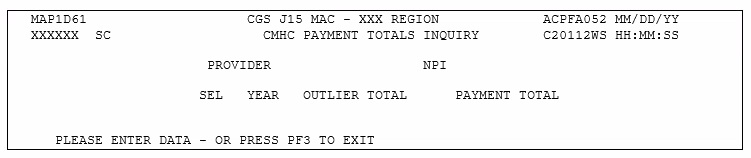
Monitor total Home Health Prospective Payment System (HH PPS) payments and outlier payments made in a calendar year
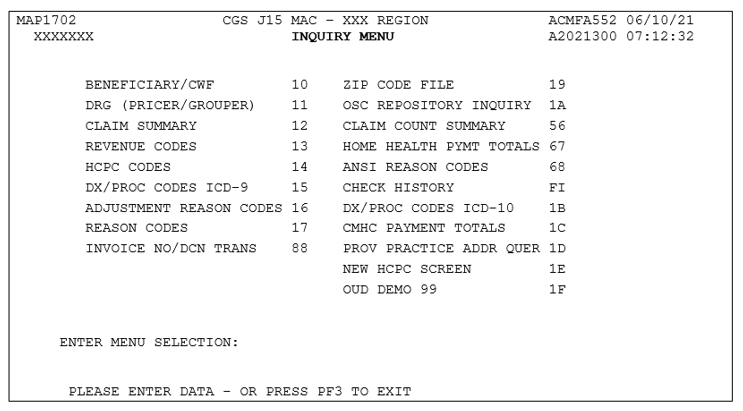
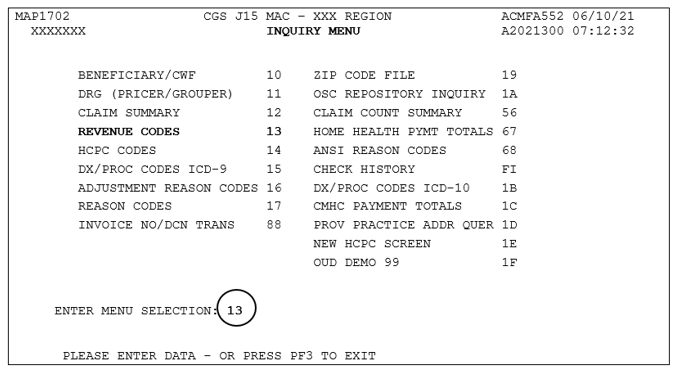
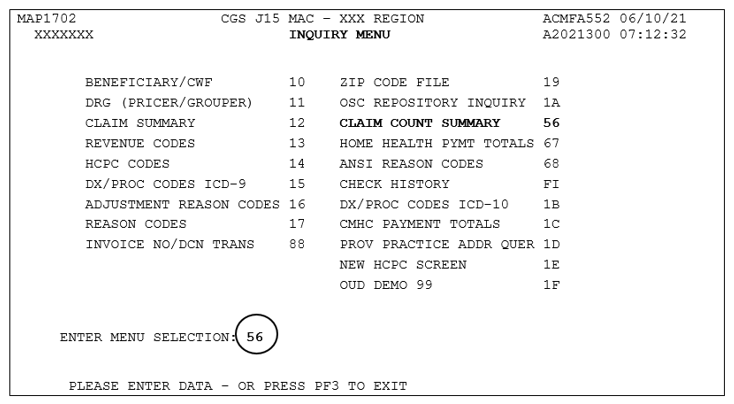
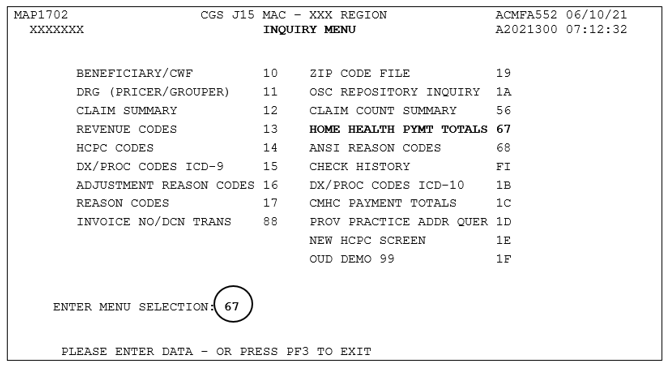
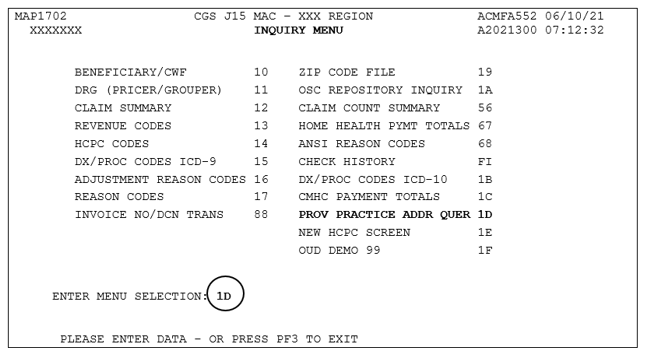
Access the Inquiry Menu
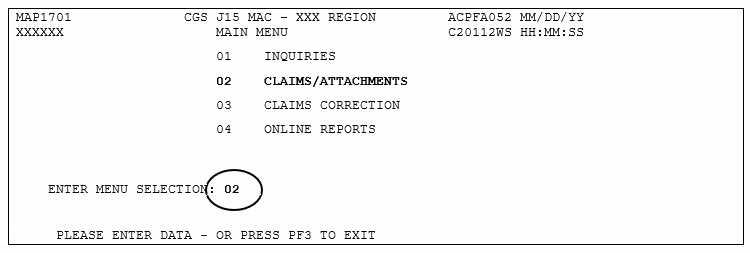
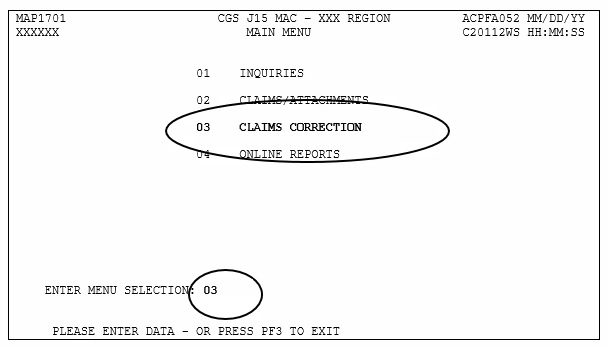
From the FISS Main Menu (Map 1701), type 01 in the Enter Menu Selection field and press Enter.
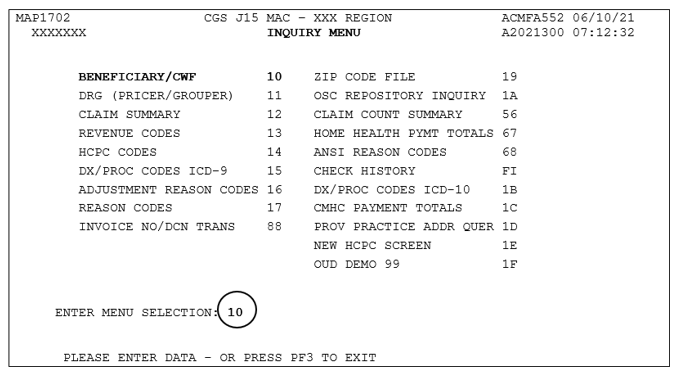
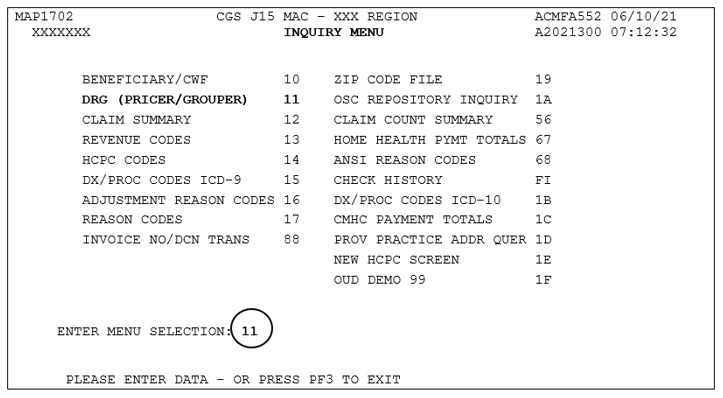
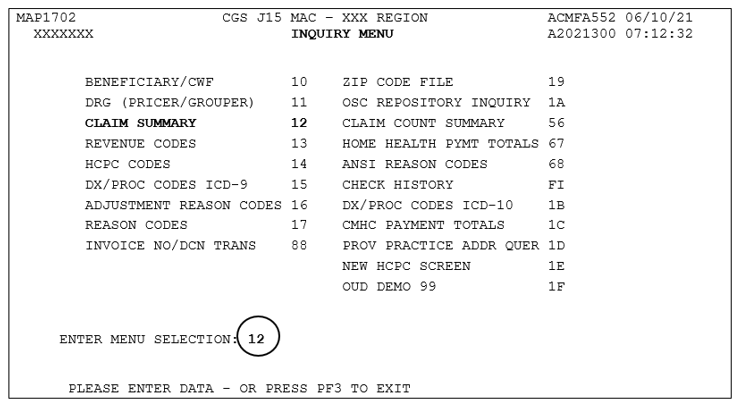
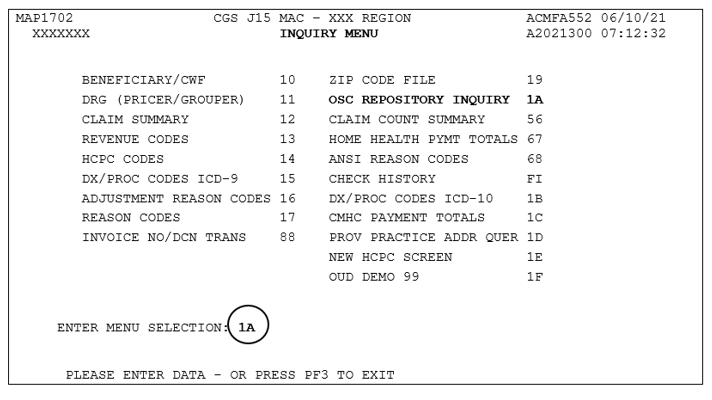
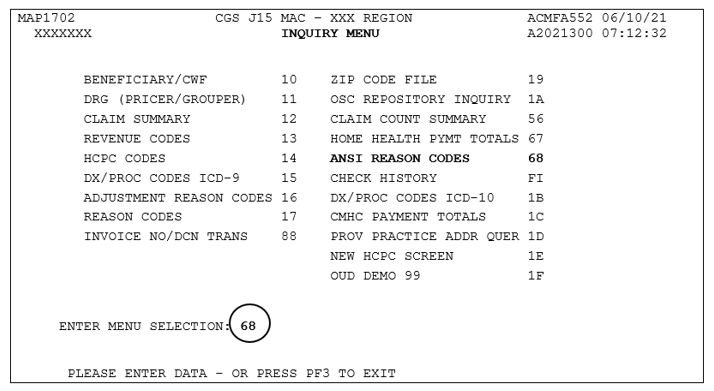
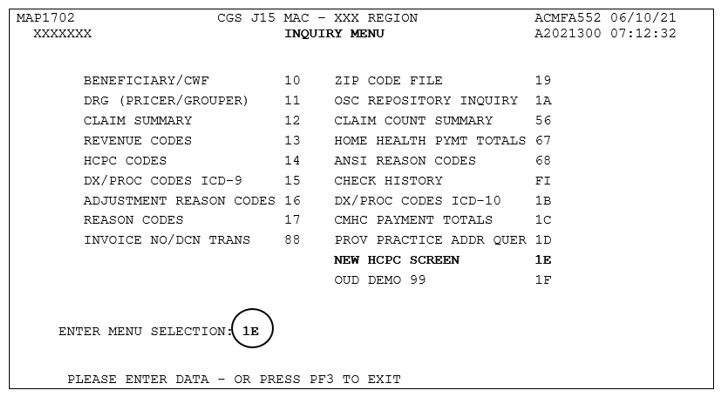
The Inquiry Menu (Map 1702) appears:
Enter the two-characters for the inquiry option you want to access and press Enter. All of the options are described in this chapter.
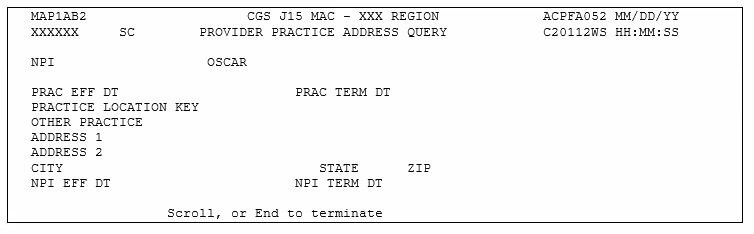
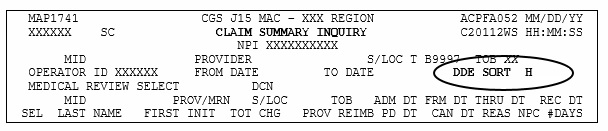
All FISS direct data entry (DDE) screens display two lines of information in the top right corner that identifies the region (ACPFA052), the current date, release number (e.g., C20112WS) and the time of day. This information is for internal purposes only and is used to assist CGS staff in researching issues when screen prints are provided.
This option allows you need to view the beneficiary's address. The beneficiary's address is not available on the CWF (Common Working File) eligibility screens, ELGA and ELGH, but is available by using this option.
From the Inquiry Menu, type 10 in the Enter Menu Selection field and press Enter.
This option includes several screen pages with eligibility information. Medicare eligibility is also available in the myCGS website portal, or the CGS Interactive Voice Response (IVR) system. For additional information about myCGS, refer to the myCGS User Manual on the CGS website. Eligibility information is also available from the Medicare Health Insurance Portability and Accountability Act (HIPAA) Eligibility Transaction System (HETS). For information about HETS, refer to the CMS website.
You may also access this screen by typing 10 in the SC field if you are in an inquiry or claim entry screen.
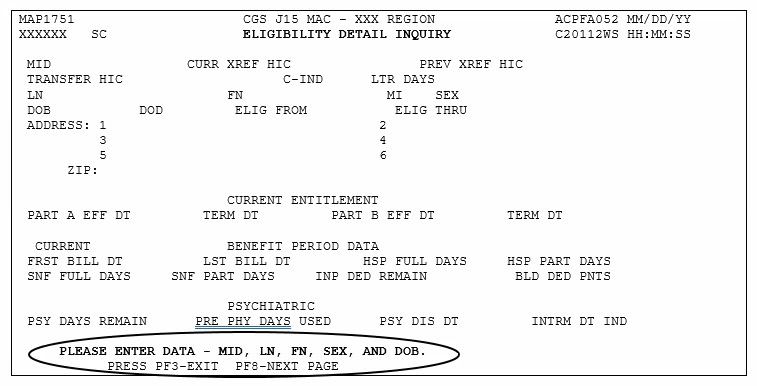
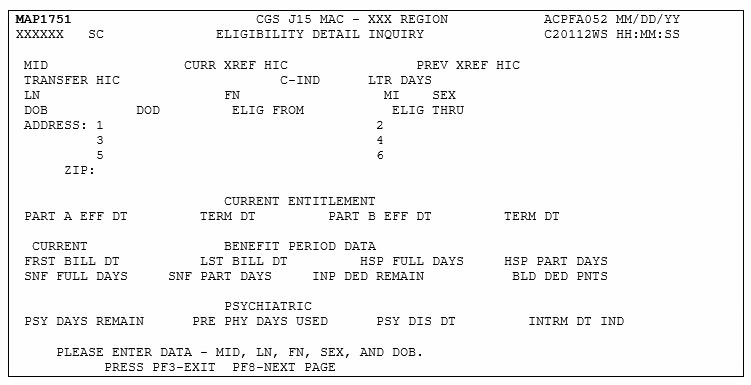
The Eligibility Detail Inquiry screen (Map 1751) appears:
As indicated at the bottom of the Map 1751, you must have the following five pieces of information about the beneficiary to access information:
Medicare ID number (e.g., Medicare Beneficiary Identifier (MBI)) Last Name First Name sex Date of Birth (MMDDCCYY format)
You can use the following function keys to move around the screens:
F3 – Exit (return to the Inquiry Menu)
F7 – Move one page back
F8 – Move one page forward
Start by entering the beneficiary's Medicare ID number as it appears on their Medicare card in MID field.
Tab to the LN field. Type the beneficiary's last name as it appears on their Medicare card.
Tab to the FN field. Type the beneficiary's first name as it appears on their Medicare card.
Tab to the SEX field. Type the sex of the beneficiary. M = male; F = female
The cursor will automatically move to the DOB field. Type the beneficiary's date of birth (MMDDCCYY).
The cursor will automatically move to the ELIG FROM field and then the ELIG THRU field. Type the from date of service in the ELIG FROM field, and type the through date of service, or the current date in the ELIG THRU field. Press Enter.
After you press Enter, the system will search for the beneficiary's eligibility file. If a match is found, additional information will display on Map 1751. If no match is found, verify that you have entered the correct information, make any necessary corrections, and press Enter again.
Information will only display if CGS has processed a claim for the beneficiary. If no match is found, a claim for the beneficiary has not been submitted/processed in FISS by CGS.
Once a match is found with the beneficiary information entered, the beneficiary's eligibility information will display.
Press F8 to access additional eligibility screens. Screen descriptions follow.
PressF3 to exit and return to the Inquiry Menu.
Field Descriptions for Option 10 – Beneficiary/CWF Screen
Map 1751 (Page 1) Screen Example
Map 1751 Field Descriptions
MID
The beneficiary's Medicare ID number.
CURR XREF HIC
If the Medicare number has changed, this field represents the most recent number.
PREV XREF HIC
Not used.
TRANSFER HIC
Not used.
C-IND
Century Indicator – Identifies if the beneficiary's date of birth is in the 19th or 20th century.
LTR DAYS
Not applicable to home health and hospice.
LN
Last name of the beneficiary.
FN
First name of the beneficiary.
MI
Middle initial of the beneficiary.
SEX
Sex of the beneficiary.
F Female M Male
DOB
Date of birth of the beneficiary (MMDDCCYY format).
DOD
Date of death of the beneficiary (MMDDCCYY format).
ELIG FROM
Enter the date of service as the eligibility from date (MMDDCCYY format).
ELIG THRU
Enter the through date of service or the current date as the eligibility through date (MMDDCCYY format).
ADDRESS (1-6)
Beneficiary's street address, city and state.
ZIP
Zip code for beneficiary's residence.
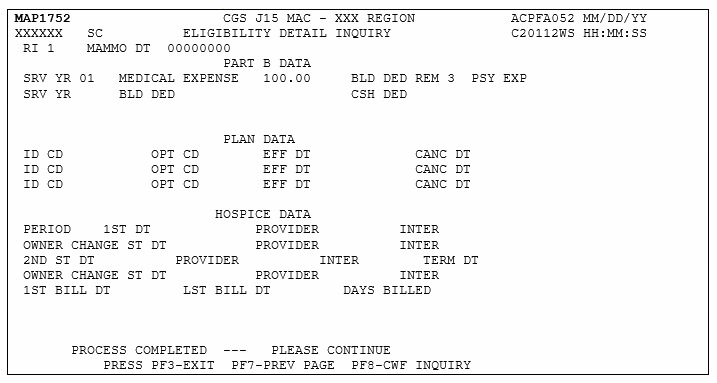
Map 1752 Screen Example
Map 1752 Field Descriptions
RI
This identifies the CWF inquiry type
MAMMO DT
The date of the last mammogram
SRV YR
The calendar year for current Medicare Part B services that are associated with the cash deductible amount entered in the Medical Expense field and Blood Deductible field.
MEDICAL EXPENSE
The amount of cash deductible that has been satisfied by the beneficiary for the specific service year.
BLD DED REM
The number of blood pints deductible remaining to be met for Part B services, for the specific service year.
PSY EXP
The dollar amount associated with psychiatric services
SRV YR
The calendar year for current Medicare Part B services
BLD DED
Not used.
CSH DED
Not used.
PLAN DATA
ID CD
The Plan Identification Code for a beneficiary who is enrolled in a Medicare Advantage (MA) Plan. The structure of the code is:
Position 1
H
Position 2 & 3
State Code
Positional 4 & 5
Plan number within state
OPT CD
The current Plan services are restricted or unrestricted. The valid values are:
Unrestricted
1 – Medicare contractor to process all Part A and B provider claims
2 – Plan to process claims for directly provided service and for services from providers with effective arrangements.
Restricted
A – Medicare contractor to process all Part A and B provider claims
B – Plan to process claims only for directly provided services
C – Plan to process all claims
EFF DT
Effective date of the Plan benefits.
CANC DT
Termination date of the Plan benefits.
HOSPICE DATA
PERIOD
Specific hospice election period. Valid values are: 1 – The first time a beneficiary uses Hospice benefits
2 – The second time a beneficiary uses Hospice benefits.
1ST DT
First hospice start date.
PROVIDER
The hospice's six-digit Medicare provider number
INTER
The Medicare contactor number for the hospice provider
OWNER CHANGE ST DT
Displays the start date of a change of ownership within the period for the first provider.
PROVIDER
The Medicare hospice provider
INTER
The Medicare contactor number for the hospice provider
2ND ST DATE
The start date for of the 2nd period with the hospice provider
PROVIDER
The hospice's six-digit Medicare provider number
INTER
The Medicare contactor number for the hospice provider
TERM DT
The termination date for hospice services for this hospice provider
OWNER CHANE ST DT
The start date of a change of ownership within the period for the second provider.
PROVIDER
The Medicare hospice provider
INTER
The Medicare contactor number for the hospice provider
1ST BILL DT
The date of the first billing
LST BILL DT
The date of the last billing
DAYS BILLED
The number of hospice days billed to date
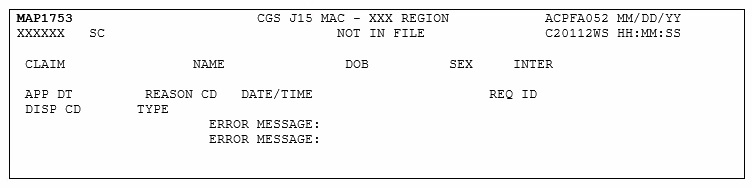
Map 1753 Screen Example
Map 1753 Field Descriptions
CLAIM
Identifies the beneficiary's Medicare ID number
NAME
The name of the beneficiary
DOB
The date of birth of the beneficiary
SEX
The sex of the beneficiary (F – female; M – male)
INTER
The intermediary number for the provider
APP DT
Applicable Date – used for spell determination, i.e., admission date, and current date.
REASON CD
The reason for the inquiry. Valid values:
1 – Status inquiry
2 – Inquiry related to an admission
DATE/TIME
The date and time stamp
REQ ID
Identifies the individual who submitted the inquiry.
DISP CD
The code assigned when the request is processed through the CWF host site. Valid values:
01 – Part A inquiry approved; beneficiary have never used Part A services
02 – Part A inquiry approved; beneficiary has had some prior utilization
03 – Part A inquiry rejected
04 – Qualified approval; may require further investigation
05 – Qualified approval; according to CMSs records, this inquiry begins a new benefit period.
TYPE
Identifies the type of CWF reply. (3 – accepted)
ERROR MESSAGE:
Identifies the error message.
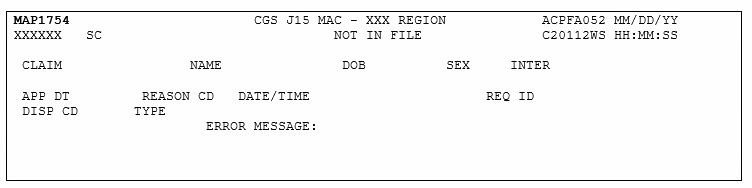
Map 1754 Screen Example
Map 1754 Field Descriptions
CLAIM
Identifies the beneficiary's Medicare ID number
NAME
The name of the beneficiary
DOB
The date of birth of the beneficiary
SEX
The sex of the beneficiary (F – female; M – male)
INTER
The intermediary number for the provider
APP DT
Applicable Date – used for spell determination, i.e., admission date, and current date.
REASON CD
The reason for the inquiry. Valid values:
1 – Status inquiry
2 – Inquiry related to an admission
DATE/TIME
The date and time stamp
REQ ID
Identifies the individual who submitted the inquiry.
DISP CD
The code assigned when the request is processed through the CWF host site. Valid values:
01 – Part A inquiry approved; beneficiary have never used Part A services
02 – Part A inquiry approved; beneficiary has had some prior utilization
03 – Part A inquiry rejected
04 – Qualified approval; may require further investigation
05 – Qualified approval; according to CMSs records, this inquiry begins a new benefit period.
TYPE
Identifies the type of CWF reply. (3 – accepted)
ERROR MESSAGE:
Identifies the error message.
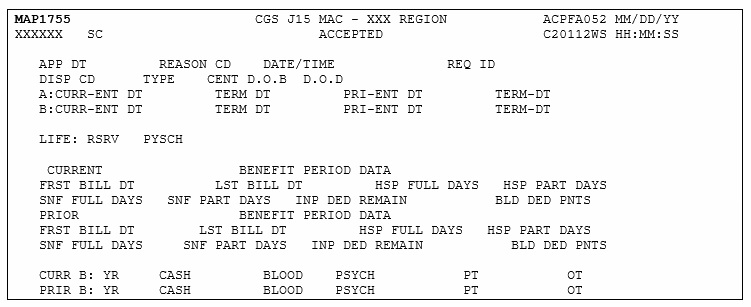
Map 1755 Screen Example
Map 1755 Field Descriptions
CLAIM
Identifies the beneficiary's Medicare ID number
NAME
The name of the beneficiary
DOB
The date of birth of the beneficiary
SEX
The sex of the beneficiary (F – female; M – male)
INTER
The intermediary number for the provider
APP DT
Applicable Date – used for spell determination, i.e., admission date, and current date.
REASON CD
The reason for the inquiry. Valid values:
1 – Status inquiry
2 – Inquiry related to an admission
DATE/TIME
The date and time stamp
REQ ID
Identifies the individual who submitted the inquiry.
DISP CD
The code assigned when the request is processed through the CWF host site. Valid values:
01 – Part A inquiry approved; beneficiary have never used Part A services
02 – Part A inquiry approved; beneficiary has had some prior utilization
03 – Part A inquiry rejected
04 – Qualified approval; may require further investigation
05 – Qualified approval; according to CMSs records, this inquiry begins a new benefit period.
TYPE
Identifies the type of CWF reply. (3 – accepted)
CENT D.O.B
Century Code for Date of Birth – The beneficiary/patients date of birth. This is a one-position alphanumeric field. The valid values are: This field is not used by FISS. Value – Description:
8 – 18th Century
9 – 19th Century
D.O.D
Date of Death – The date of death of the beneficiary/patient.
A CURR ENT DT
Part A Current Entitlement Date – The current Part A entitlement date.
TERM DT
Part A Termination Date – The termination date of the current entitlement.
PRI-ENT DT
Part A Prior Entitlement Date – The prior Part A entitlement.
TERM DT
Part A Prior Termination Date – The termination date of the prior Part A entitlement.
B CURR-ENT DT
Part B Current Entitlement Date – The current Part B entitlement date.
TERM DT
Part B Termination Date – The termination date of the current entitlement.
B: CURR-ENT DT
Part B Prior Entitlement Date – The prior Part B entitlement date.
TERM DT
Part B Prior Termination Date – The termination date of the prior Part B entitlement.
PRE-ENT DT
Lifetime Reserve Days – The number of lifetime reserve days remaining.
TERM DT
Part A Termination Date – The termination date of the current entitlement.
LIFE: RSRV
Part A Prior Entitlement Date – The prior Part A entitlement.
PYSCH
Psychiatric Days Remaining – The number of lifetime psychiatric days remaining.
CURRENT BENEFIT PERIOD DATA
FRST BILL DT
First Bill Date – The earliest billing action in the current benefit period.
LST BILL DT
Last Bill Date – The date of the latest billing action in the current benefit period.
HSP FULL DAYS
Hospital Full Days – The number of regular hospital full days the remaining in the current benefit period.
HSP PART DAYS
Hospital Coinsurance Days – The number of hospital coinsurance days remaining in the current benefit period.
SNF FULL DAYS
Skilled Nursing Facility Full Days – The number of SNF full days remaining in the current benefit period.
SNF PART DAYS
Skilled Nursing Facility Coinsurance Days – The number of SNF coinsurance days remaining in the current period.
INP DED REMAIN
Inpatient Deductible Amount Remaining – The amount of inpatient deductible amount remaining to be met for the benefit period.
BLD DED PNTS
Blood Deductible Pints – The number of blood deductible pints remaining to be met for the benefit period.
PRIOR BENEFIT PERIOD DATA
FRST BILL DT
First Bill Date – This field identifies the date of the earliest billing action in the prior benefit period.
LST BILL DT
Last Bill Date – This field identifies the date of the latest billing action in the prior benefit period.
HSP FULL DAYS
Hospital Full Days – The number of regular hospital full days remaining in the prior benefit period.
HSP PART DAYS
Hospital Coinsurance Days – The number of hospital coinsurance days remaining in the prior benefit period.
SNF FULL DAYS
Skilled Nursing Facility Full Days – The number of SNF full days remaining in the prior benefit period.
SNF PART DAYS
Skilled Nursing Facility Coinsurance Days – The number of SNF coinsurance days remaining in the prior period.
INP DED REMAIN
Inpatient Deductible Amount Remaining – The amount of inpatient deductible amount remaining to be met for the benefit period.
BLD DED PNTS
Blood Deductible Pints – The number of blood deductible pints remaining for the benefit period.
CURR B: YR
Most Recent Part B Year – The most recent Medicare Part B benefit year.
CASH
Medicare Part B Cash Deductible Remaining to be Met – The amount of cash deductible remaining for the most recent Part B year.
BLOOD
Medicare Part B Blood Deductible Remaining to be Met -The amount of blood deductible pints remaining for the most recent Part B year.
PSYCH
Medicare Part B Psychiatric Limit Remaining – The Part B psychiatric limit remaining for the benefit year.
PT
Medicare Part B Physical Therapy Limit. – The Part B physical therapy limit amount applied year to date for the most recent Medicare Part B benefit year.
OT
Medicare Part B Occupational Therapy Limit – The Part B occupational therapy limit amount applied year to date for the most recent Medicare Part B benefit year.
PRIR B: YR
Prior Part B Year – The prior Medicare Part B benefit year.
CASH
Medicare Part B Cash Deductible Remaining to be Met – The amount of cash deductible remaining to be met for the prior Part B benefit year.
BLOOD
Medicare Part B Blood Deductible Remaining to be Met – The amount of blood deductible remaining to be met for the prior Part B benefit year.
PSYCH
Medicare Part B Psychiatric Limit Remaining – The Part B psychiatric limit remaining for the prior Part B benefit year.
PT
Medicare Part B Physical Therapy Limit – The Part B physical therapy limit amount applied year to date for the prior Part B benefit year.
OT
Medicare Part B Occupational Therapy Limit – The Part B occupational therapy limit amount applied year to date for the prior Part B benefit year.
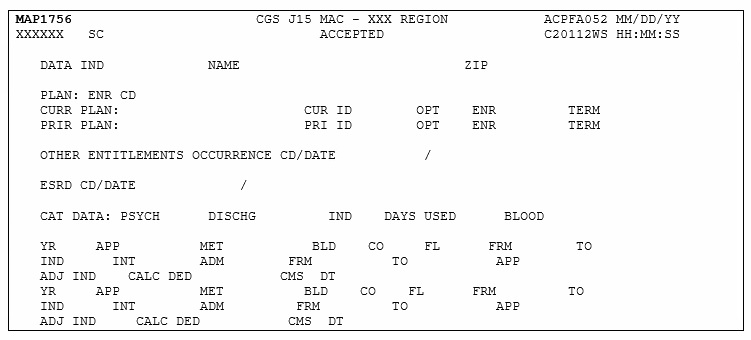
Map 1756 Screen Example
Map 1756 Field Descriptions
DATA IND
Data Indicators – This field identifies the data indicator. Valid values for each position are:
Position 1: Part B Buy In
0 – Does not apply
1 – State buy-in involved
Position 2: Alien Indicator
0 – Does not apply
1 – Alien non-payment, provision may apply
Position 3: Psychiatric Pre-Entitlement
0 – Does not apply
1 – Psychiatric pre-entitlement reduction applied
Position 4: Reason For Entitlement
0 – Normal entitlement
1 – Disability
2 – End stage renal disease (ESRD)
3 – Has or had ESRD, but current DIB
4 – Old age but has or had ESRD
8 – Has or had ESRD and is covered under Part A premium
9 – Covered under Part A premium
Position 5: Part A Buy-In
0 – No Part A buy-in
1 – Part A buy-in applies
Position 6: Rep Payee Indicator
0 – Does not apply
1 – Selected for GEP contract
2 – Has Rep Payee
3 – Both conditions apply
Positions 7-10: Not Used at This Time (pre-filled with zeroes)
NAME
The full name of the beneficiary in last name, first name, middle initial format.
ZIP
The ZIP code of residence of the beneficiary.
PLAN: ENR CD
The number of periods of Plan enrollment code. The valid values are: 0, 1, 2, and 3 indicating 0, 1, 2, or more than two periods of enrollment.
CURRENT PLAN
CUR ID
The Current Plan identification code.
OPT
The Plan Option Code – This field identifies whether the current Plan services are restricted or unrestricted.
Unrestricted
1 – Medicare contractor to process all Part A and B provider claims
2 – Plan to process claims for directly provided service and for services from providers with effective arrangements.
Restricted
A – Medicare contractor to process all Part A and B provider claims
B – Plan to process claims only for directly provided services
C – Plan to process all claims
ENR
The effective date of the current entitlement.
TERM
The termination date of the current enrollment.
PRIOR PLAN
PRI ID
The prior Plan identification code.
OPT
The prior Plan Option code.
Unrestricted
1 – Medicare contractor to process all Part A and B provider claims
2 – Plan to process claims for directly provided service and for services from providers with effective arrangements.
Restricted
A – Medicare contractor to process all Part A and B provider claims
B – Plan to process claims only for directly provided services
C – Plan to process all claims
ENR
The effective date of the prior HMO entitlement.
TERM
The termination date of the prior HMO enrollment.
OTHER ENTITLEMENTS OCCURRENCE CD
The first two occurrence codes and dates indicating another federal program or other type of insurance that may be a primary payer. The valid values are:
Value – Description:
1 – Workers Compensation coverage.
2 – Black Lung.
A – Working Aged beneficiary or spouse covered by employer health plan.
B – End stage renal disease (ESRD) beneficiary in his 12 month coordination period and covered by an employer health plan.
C – Medicare has made a conditional payment pending final resolution.
D – Automobile no-fault or other liability insurance involvement.
E – Workers Compensation and/or Black Lung.
F – Veterans Administration program, public health service or other federal agency program.
G – Working disabled beneficiary or spouse covered by employer health plan.
H – Black Lung.
I – Veterans Administration program.
ESRD CD
The home dialysis method selection code. The valid codes are:
1 – The beneficiary elects to receive all supplies and equipment for home dialysis from an ESRD facility and the facility submits claims for services it renders.
2 – The beneficiary elects to deal directly with one supplier for home dialysis supplies and equipment and the beneficiary is responsible for submitting his/her own claims to the Carrier for reimbursement.
ESRD DATE
The home dialysis method selection effective date.
PSYCH
The the number of lifetime psychiatric days remaining for the beneficiary/patient.
DISCHG
The last or through discharge date.
IND
This field identifies whether or not the discharge date is an interim date. The valid values are:
0 – Initialized
1 – Interim
DAYS USED
The number of pre-entitled psychiatric days used by the beneficiary/patient.
BLOOD
The number of blood pints carried over from 1988 to 1989.
YR
The catastrophic trailer year.
APP
This field identifies whether a December inpatient stay has been applied to the current year deductible.
MET
The amount of inpatient hospital deductible to be met according to the catastrophic trailer year.
BLD
The number of blood deductible pints remaining to be met.
CO
The number of co-insurance SNF days remaining.
FL
The number of full SNF days remaining.
FRM
The from date of the earliest processed bill.
TO
The through date of the earliest processed bill.
IND
The yearly data indicator. This is a one-position alphanumeric field. This field provides the following information:
Position 1
0 – Not used
2 – Clerical involvement
3 – Religious Non-Medical Healthcare Institution/SNF usage
4 – Both 1 and 2
Position 2
Value – Description:
0 – Not used
1 – Through date is interim
INT
The intermediary number for the earliest hospital bill processed with a deductible.
ADM
The admission date for the earliest hospital bill processed with a deductible.
FROM
The from date for the earliest hospital bill processed with a deductible.
TO
The through date for the earliest hospital bill processed with a deductible.
APP
The deductible amount applied for the earliest hospital bill processed with a deductible.
ADJ IND
The type of adjustment made. The valid values are:
0 – No adjustment
1 – Downward adjustment
2 – Upward adjustment
CALC DED
The amount of deductible calculated.
CMS DATE
The date the claim was processed by CMS.
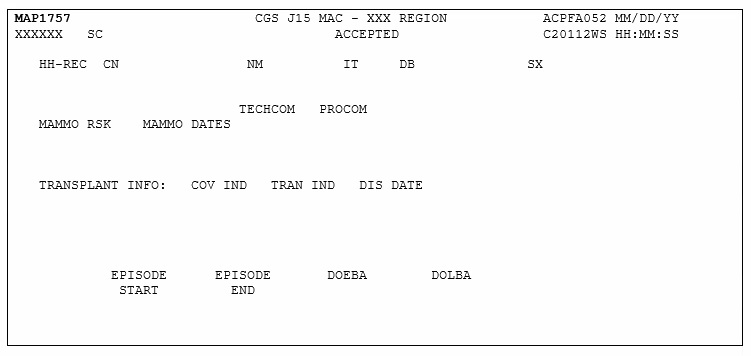
Map 1757 Screen Example
Map 1757 Field Descriptions
CN
The beneficiary's Medicare ID number.
NM
The last name of the beneficiary/patient.
IT
The first initial of the beneficiary/patient name.
DB
The date of birth of the beneficiary.
SX
The sex of the beneficiary. The valid values are:
F – Female
M – Male
MAMMO RSK
Mammography Risk Indicator – This field identifies whether or not the beneficiary is at risk. The valid values are:
Y – Yes
N – No
TECHCOM
The date of mammography screening interpreted by a technician. Up to three technical component dates may be displayed.
PROCOM
The date of mammography screening requiring interpretation by a physician. Up to three professional component dates may be displayed.
COV IND
This field identifies whether or not the transplant was a covered procedure. Up to three coverage indicators may be displayed. The valid values are:
N – Non-covered transplant.
Y – Covered transplant.
TRAN IND
Transplant Indicator – This field identifies the type of transplant performed. Up to three transplant indicators may be displayed. The valid values are:
1 – Allogeneous bone marrow
2 – Autologous bone marrow
B – Lung Transplant
C – Heart and Lung Transplant
D – Kidney and Pancreas Transplant
H – Heart transplant
I – Intestinal Transplant
K – Kidney transplant
L – Liver transplant
P – Pancreas Transplant
DIS DATE
The date of discharge for the beneficiary/patient for the transplant procedure.
EPISODE START
The start date of an episode.
EPISODE END
The end date of an episode.
DOEBA
The first service date of the HHPPS period.
DOLBA
The last service date of the HHPPS period.
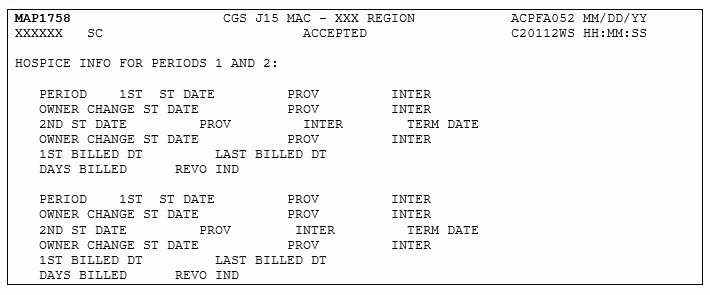
Map 1758 Screen Example
Map 1758 Field Descriptions
PERIOD
The specific Hospice Election Period. This is a one-position alphanumeric field with two occurences. The valid values are:
1 – The first time a beneficiary uses hospice benefits.
2 – The second time a beneficiary uses hospice benefits.
1ST ST DATE
The start date of the beneficiary's effective period with the Hospice provider.
PROV
The identification number assigned by Medicare to the Hospice provider.
INTER
The intermediary number of the Hospice provider.
OWNER CHANGE ST DATE
The new owner of the Hospice provider if a change of ownership occurs within an election period.
PROV
The identification number assigned by Medicare to the Hospice provider.
INTER
The intermediary number of the Hospice provider.
2NDT ST DATE
The start date of the beneficiary's effective period with the Hospice provider.
PROV
The identification number assigned by Medicare to the Hospice provider.
INTER
The intermediary number of the Hospice provider.
TERM DATE
The ending date of a beneficiary's election period.
OWNER CHANGE ST DATE
The new owner of the Hospice provider if a change of ownership occurs within an election period.
PROV
The identification number assigned by Medicare to the Hospice provider.
INTER
The intermediary number of the Hospice provider.
1ST BILLED DATE
The first billed date of the beneficiary's effective period with the Hospice provider.
LAST BILLED DATE
The last billed date of the beneficiary's effective period with the Hospice provider.
DAYS BILLED
The number of hospice days billed to date for a particular beneficiary/patient.
REVO IND
The revocation indicator.
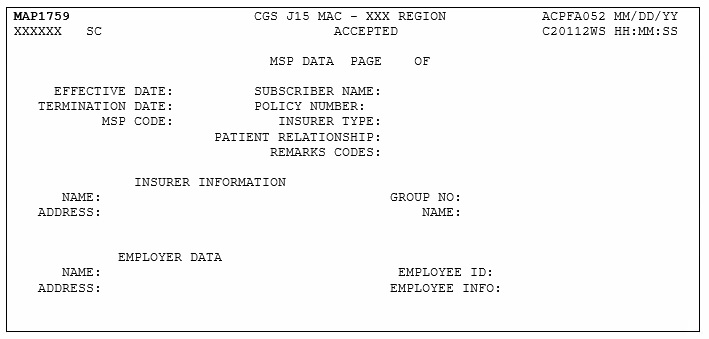
Map 1759 Screen Example
Map 1759 Field Descriptions
Page
The sequence number of the Medicare Secondary Payer (MSP) data page being displayed.
OF
The sequence number of the highest MSP data page that will be displayed.
EFFECTIVE DATE:
The date of the Medicare Secondary Payer (MSP) coverage.
SUBSCRIBER NAME:
The first name of the individual subscribing to the MSP coverage.
SUBSCRIBER NAME:
The last name of the individual subscribing to the MSP coverage.
TERMINATION DATE:
The date the coverage terminates under the payer listed.
POLICY NUMBER:
The policy number with the payer listed.
MSP CODE:
The MSP source code.
INSURER TYPE:
This field is not used in DDE.
PATIENT RELATIONSHIP:
The relationship of the beneficiary to the insured under the policy listed.
REMARKS CODES:
This field is the MSP Remark Code #1 and it identifies information needed by the contractor to assist in additional development.
REMARKS CODES
This field is the MSP Remark Code #2 and it identifies information needed by the contractor to assist in additional development.
REMARKS CODES
This field is the MSP Remark Code #3 and it identifies information needed by the contractor to assist in additional development.
INSURER INFORMATION
NAME:
the name of the insurance company which may be primary over Medicare.
ADDRESS:
The street, city, state, and ZIP code for the insurer.
GROUP NO:
The group number for the policyholder with this insurer name.
NAME:
The name of the insurer group.
EMPLOYER DATA
NAME:
The name of the employer that provides or may provide health care coverage for the beneficiary/patient.
ADDRESS:
The street of the employer.
NO TITLE
The city of the employer.
NO TITLE
The state of the employer.
NO TITLE
The zip code of the employer.
EMPLOYEE ID:
The identification number assigned by the employer to the beneficiary.
EMPLOYEE INFO:
This field is not used in DDE.
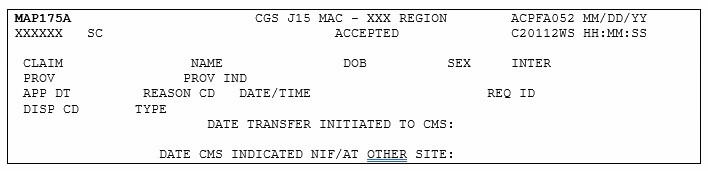
Map 175A Screen Example
Map 175A Field Descriptions
CLAIM
The beneficiary's Medicare ID number.
NAME
The first initial and last name of the beneficiary.
DOB
The date of birth of the beneficiary.
SEX
The sex of the beneficiary. The valid values are:
F – Female
M – Male
INTER
The intermediary number for the provider.
APP DT
Applicable Date – This field is used for spell determination, i.e., admission date, and current date.
REASON CD
The reason for the inquiry. The valid values are:
1 – Status inquiry
2 – Inquiry related to an admission
DATE/TIME
Date and Time Stamp (Julian).
REQ ID
The individual who submitted the inquiry.
DISP CD
CWF Disposition Code – This field identifies a code assigned when the request is processed through the CWF host site.
TYPE
The type of CWF reply. The valid values are:
4 – Not in file
DATE TRANSFER INITIATED TO CMS
The date the transfer was initiated to CMS.
DATE CMS INDICATED NIF/AT OTHER SITE
The date CMS indicated the beneficiary Medicare number was not in file at another site.
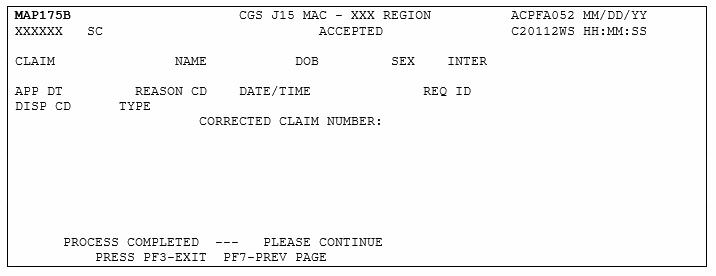
Map 175B Screen Example
Map 175B Field Descriptions
CLAIM
The beneficiary's Medicare ID number.
NO TITLE
The middle initial of the beneficiary.
NAME
The first initial and last name of the beneficiary.
DOB
The date of birth of the beneficiary.
SEX
The sex of the beneficiary. The valid values are:
F – Female
M – Male
INTER
The intermediary number for the provider.
APP DT
Applicable Date – This field is used for spell determination, i.e., admission date, and current date.
REASON CD
The reason for the inquiry. The valid values are:
1 – Status inquiry
2 – Inquiry related to an admission
DATE/TIME
Date and Time Stamp (Julian).
REQ ID
The individual who submitted the inquiry.
DISP CD
A code assigned when the request is processed through the CWF host site.
TYPE
The type of CWF reply. The valid values are:
5 – Not in file on CMS batch but is another potential claim number for this beneficiary.
CORRECTED CLAIM NUMBER
The corrected Medicare ID number.
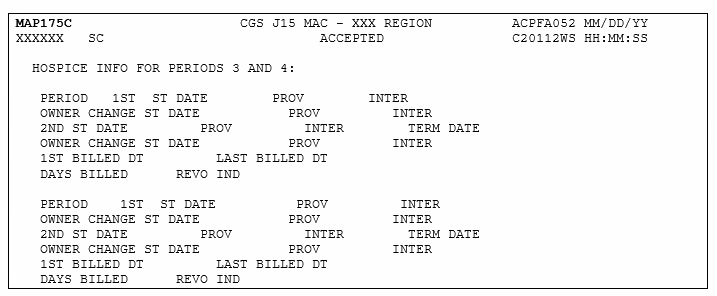
Map 175C Screen Example
Map 175C Field Descriptions
PERIOD
The specific Hospice Election Period. The valid values are:
1 – The first time a beneficiary uses hospice benefits.
2 – The second time a beneficiary uses hospice benefits.
1ST ST DATE
The start date of the beneficiary's effective period with the Hospice provider.
PROV
The identification number assigned by Medicare to the Hospice provider.
INTER
The intermediary number of the Hospice provider.
OWNER CHANGE ST DATE
The new owner of the Hospice provider if a change of ownership occurs within an election period.
PROV
The identification number assigned by Medicare to the Hospice provider.
INTER
The intermediary number of the Hospice provider.
2NDT ST DATE
The start date of the beneficiary's effective period with the Hospice provider.
PROV
The identification number assigned by Medicare to the Hospice provider.
INTER
The intermediary number of the Hospice provider.
TERM DATE
The ending date of a beneficiary's election period.
OWNER CHANGE ST DATE
The new owner of the Hospice provider if a change of ownership occurs within an election period.
PROV
The identification number assigned by Medicare to the Hospice provider.
INTER
The intermediary number of the Hospice provider.
1ST BILLED DATE
The first billed date of the beneficiary's effective period with the Hospice provider.
LAST BILLED DATE
The last billed date of the beneficiary's effective period with the Hospice provider.
DAYS BILLED
The number of hospice days billed to date for a particular beneficiary/patient.
REVO IND
The revocation indicator.
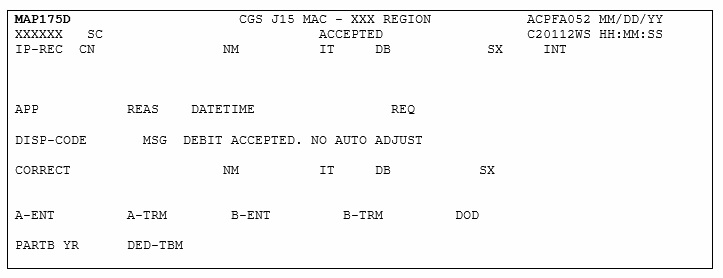
Map 175D Screen Example
Map 175D Field Descriptions
CN
The beneficiary's Medicare ID number.
NM
The last name of the beneficiary.
IT
The first Initial of the beneficiary name.
DB
The date of birth of the beneficiary.
SX
The sex of the beneficiary. The valid values are:
F – Female
M – Male
INT
The intermediary number for the earliest hospital bill processed with a deductible.
APP
This field identifies spell determination, i.e. admission date and current date.
REAS
The reason for the inquiry. The valid values are:
1 – Status inquiry
2 – Inquiry related to an admission
DATETIME
The date and time stamp of the inquiry.
REQ
The operator ID of the person submitting the inquiry.
DISP-CODE
The code assigned when the request is processed through the CWF host site.
MSG
The process of the episode (i.e. paid, suspended, RTP, etc.)
CORRECT
The crossover reference of a Medicare ID number and populates the correct Medicare ID number.
NM
The last name of the beneficiary.
IT
The first initial of the beneficiary name.
DB
The date of birth of the beneficiary.
SX
The sex of the beneficiary. The valid values are:
F – Female
M – Male
A-ENT
The current Part A entitlement.
A-TRM
The Part A termination date of the current entitlement.
B-ENT
The current Part B entitlement.
B-TRM
The Part B termination date of the current entitlement.
DOD
The date of death of the beneficiary.
PARTB YR
The most recent Medicare Part B benefit year.
DED-TBM
The Part B deductible amount.
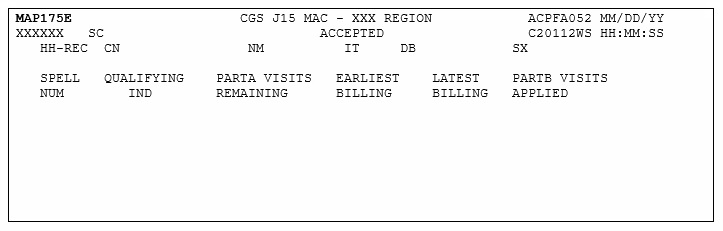
Map 175E Screen Example
Map 175E Field Descriptions
CN
The beneficiary's Medicare ID number.
NM
The last name of the beneficiary.
IT
The first initial of the beneficiary name.
DB
The date of birth of the beneficiary.
SX
The sex of the beneficiary. The valid values are:
F – Female
M – Male
SPELL NUM
The spell number, up to 14 episodes.
QUALIFYING IND
The beneficiary qualified for Part A or Part B Medicare.
PARTA VISITS REMAINING
This field identifies how many visits are remaining for the beneficiary/patient.
EARLIST BILLING
The earliest date of an episode.
LATEST BILLING
The latest date of an episode.
PARTB VISITS APPLIED
This field identifies how many Part B visits were applied to the episode.
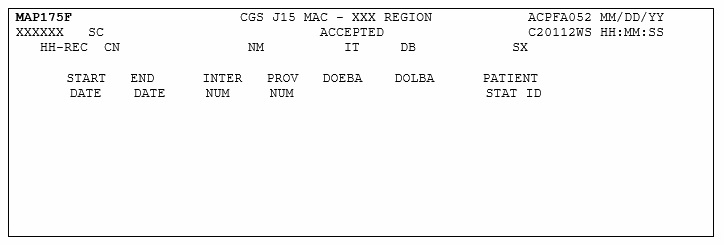
Map 175F Screen Example
Map 175F Field Descriptions
CN
The beneficiary's Medicare ID number.
NM
The last name of the beneficiary.
IT
The first initial of the beneficiary name.
DB
The date of birth of the beneficiary.
SX
The sex of the beneficiary. The valid values are:
F – Female
M – Male
START DATE
The start date of an episode.
END DATE
The end date of an episode.
INTER NUM
The Hospice provider intermediary number.
PROV NUM
The identification number assigned by Medicare to the Hospice provider.
DOEBA
The first service date of the HHPPS period.
DOLBA
The last service date of the HHPPS period.
PATIENT STAT ID
The patient status during the episode.
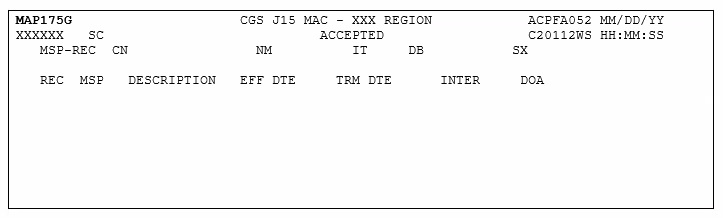
Map 175G Screen Example
Map 175G Field Descriptions
CN
The beneficiary's Medicare ID number.
NM
The last name of the beneficiary.
IT
The first initial of the beneficiary name.
DB
The date of birth of the beneficiary.
SX
The sex of the beneficiary. The valid values are:
F – Female
M – Male
REC
The sequence record number of the paid claims starting with 00 and occurs up to 16 times.
MSP
This field identifies MSP source.
DESCRIPTION
The value in the MSP code field. The valid values are:
1 – MEDICAID
2 – BLUE CROSS
3 – OTHER
4 – NONE
A – WORKING AGED
B – ESRD BENE
C – COND PAYMENT
D – NO-FAULT
E – WORKERS COMP
F – PUB HLTH SRV
G – DISABLED
H – BLACK LUNG
I – VETERANS
L – LIABILITY
W – WC SET-ASIDE
Z – MEDICARE
EFF DTE
The effective date of the Medicare Secondary Payer (MSP) coverage.
TRM DTE
The termination date of the Medicare Secondary Payer (MSP) coverage termination.
INTER
The Hospice provider intermediary number.
DOA
The date the entry was added.
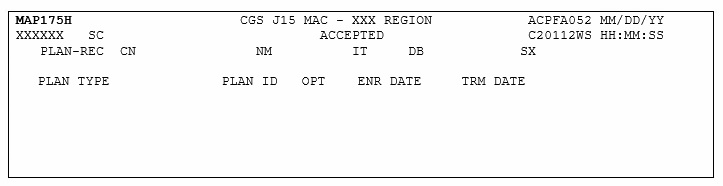
Map 175H Screen Example
Map 175H Field Descriptions
CN
The beneficiary's Medicare ID number.
NM
The last name of the beneficiary.
IT
The first initial of the beneficiary name.
DB
The date of birth of the beneficiary.
SX
The sex of the beneficiary. The valid values are:
F – Female
M – Male
PLAN TYPE
This field identifies the type of plan.
PLAN ID
The Plan Identification code. The structure of the identification number is:
Position 1 – H
Position 2 & 3 – State Code
Position 4 & 5 – Plan number within the state
OPT
The current Plan services are restricted or unrestricted. The valid values are:
Unrestricted
1 – Medicare contractor to process all Part A and B provider claims
2 – Plan to process claims for directly provided service and for services from providers with effective arrangements.
Restricted
A – Medicare contractor to process all Part A and B provider claims
B – Plan to process claims only for directly provided services
C – Plan to process all claims
ENR DATE
The enrollment date of the Plan for a beneficiary Plan entitlement.
TRM DATE
The termination date of the Plan for a beneficiary Plan entitlement.
Map 175I Screen Example
Map 175I Field Descriptions
CN
The beneficiary's Medicare ID number.
NM
The last name of the beneficiary.
IT
The first initial of the beneficiary name.
DB
The date of birth of the beneficiary.
SX
The sex of the beneficiary. The valid values are:
F – Female
M – Male
PERIOD
The Hospice election period. The valid values are:
1 – The first time a beneficiary uses Hospice benefits.
2 – The second time a beneficiary uses Hospice benefits.
3 – The third time a beneficiary uses Hospice benefits.
4 – The fourth time a beneficiary uses Hospice benefits.
START DATE 1
The start date of the beneficiary's first election period with the Hospice provider.
OWNER CHANGE
The date of the Hospice provider change of ownership within an election period.
TERM DATE 1
The ending date of the beneficiary's first election period.
PROV 1
The first Hospice provider identification number assigned by Medicare.
INTER 1
The intermediary number of the first Hospice provider.
DOEBA DATE
The first service date of the HHPPS period.
DOLBA DATE
The last service date of the HHPPS period.
DAYS USED
The number of days used by the beneficiary/patient.
START DATE 2
The start date of the beneficiary's second election period with the Hospice provider.
OWNER CHANGE
The date of the Hospice provider change of ownership within an election period.
PROV 2
The second Hospice provider identification number assigned by Medicare.
INTER 2
The intermediary number of the second Hospice provider.
REVOCATION IND
The revocation indicator number.
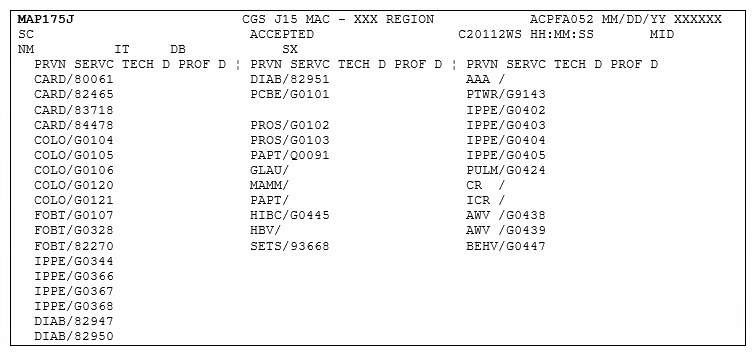
Map 175J Screen Example
Map 175J Field Descriptions
MID
The beneficiary's Medicare ID number.
NM
The last name of the beneficiary.
IT
The first initial of the beneficiary name.
DB
The date of birth of the beneficiary.
SX
The sex of the beneficiary. The valid values are:
F – Female
M – Male
TECH D
Technical Date – This field identifies the date the beneficiary is eligible for preventative service coverage.
NOTE: When there is not a date, one of the following messages display to explain why the beneficiary is not eligible.
PTB – Beneficiary not entitled to Part B
RCVD – Beneficiary already received service
DOD – Beneficiary not eligible due to DOD
GDR – Beneficiary not eligible due to sex
AGE – Beneficiary not eligible due to age
SRV – Beneficiary not eligible for the service
VAC – Beneficiary already vaccinated
0000 – Service not applicable
PROF D
Professional Date – This field identifies the date the beneficiary is eligible for preventative service coverage.
NOTE: When there is not a date, one of the following messages display to explain why the beneficiary is not eligible.
PTB – Beneficiary not entitled to Part B
RCVD – Beneficiary already received service
DOD – Beneficiary not eligible due to DOD
GDR – Beneficiary not eligible due to sex
AGE – Beneficiary not eligible due to age
SRV – Beneficiary not eligible for the service
VAC – Beneficiary already vaccinated
0000 – Service not applicable
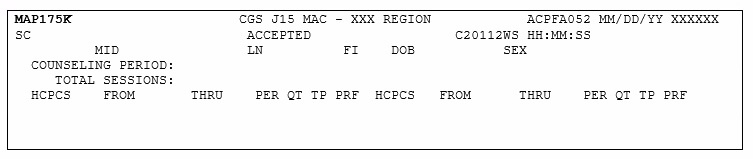
Map 175K Screen Example
Map 175K Field Descriptions
MID
The beneficiary's Medicare ID number.
LN
The last name of the beneficiary.
FI
The first initial of the beneficiary name.
DOB
The date of birth of the beneficiary.
SEX
The sex of the beneficiary. The valid values are:
F – Female
M – Male
TOTAL SESSIONS
Total Sessions – This field identifies the number of sessions billed for each beneficiary. This occurs five times This is a one-position alphanumeric field.
Note: If a date range is billed on a detail, and a quantity that matches the range is not identified, CWF posts the session as 1 unit. (i.e., 10/25 – 10/27 Unit 1 will post as 1 session).
Note: The following fields display up to 28 occurrences of the maximum session occurrences from the most recent to the oldest received from CWF.
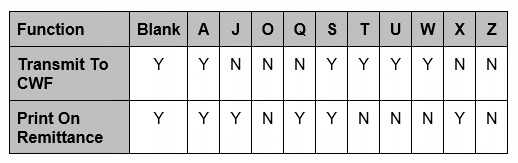
HCPCS
The HCPC code of G0375 or G0376.
FROM
The from date of the claim.
THRU
The through date of the claim.
PER
Period – This field identifies up to five years of counseling data. The valid values are:
1 – One year
2 – Two years
3 – Three years
4 – Four years
5 – Five years
QT
Quantity – This field identifies the number of services billed for each date.
TP
The claim type. The valid values are:
O – Outpatient
B – Part B
PRF
The technicaland professional remaining sessions.
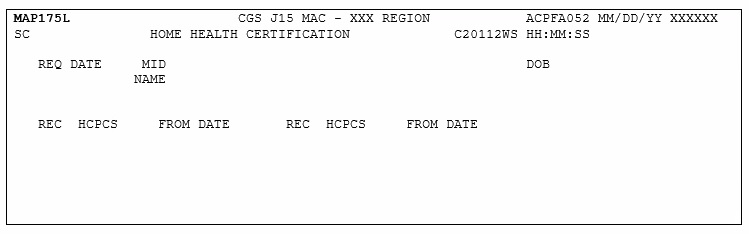
Map 175L Screen Example
Map 175L Field Descriptions
MID
The beneficiary's Medicare ID number.
DOB
The date of birth associated with the Medicare ID number.
REQ DAT
The date of request.
NAME
The name associated with the Medicare ID number.
REC
Record Number First Ten Occurrences – This field displays the Home Health Certification records one through ten on the CWF Reply Record. This number is incremented by one for each of the first ten records found.
HCPCS
Record HCPCS First Ten Occurrences – This field identifies the health insurance record number.
FROM DATE
From Date First Ten Occurrences – This field identifies the Home Health from date.
REC
Record Number Second Ten Occurrences – This field displays the Home Health Certification records eleven through 20 on the CWF Reply Record. This number is incremented by one for each of the second ten records found.
HCPCS
Record HCPCS Second Ten Occurrances – This field identifies the health insurance record number.
FROM DATE
From Date Second Ten Occurrences – This field identifies the Home Health from date.
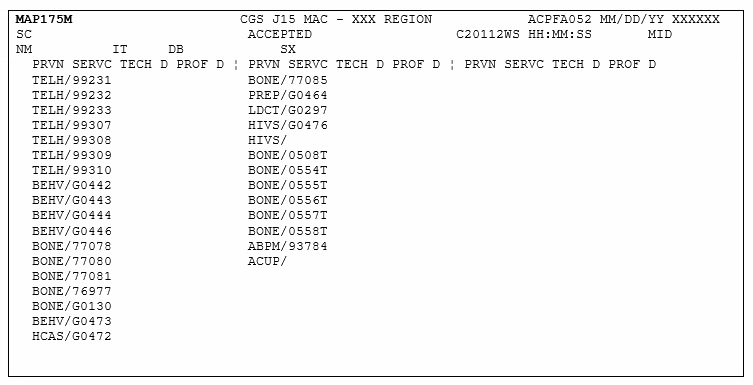
Map 175M Screen Example
Map 175M Field Descriptions
MID
The beneficiary's Medicare ID number.
NM
The last name of the beneficiary.
IT
The first initial of the beneficiary name.
DB
The date of birth of the beneficiary.
SX
The sex of the beneficiary. The valid values are:
F – Female
M – Male
TECH D
The date the beneficiary is eligible for preventative service coverage.
Note: When there is not a date, one of the following messages display to explain why the beneficiary is not eligible.
PTB – Beneficiary not entitled to Part B
RCVD – Beneficiary already received service
DOD – Beneficiary not eligible due to DOD
GDR – Beneficiary not eligible due to sex
AGE – Beneficiary not eligible due to age
SRV – Beneficiary not eligible for the service
VAC – Beneficiary already vaccinated
0000 – Service not applicable
PROF D
The date the beneficiary is eligible for preventative service coverage.
Note: When there is not a date, one of the following messages display to explain why the beneficiary is not eligible.
PTB – Beneficiary not entitled to Part B
RCVD – Beneficiary already received service
DOD – Beneficiary not eligible due to DOD
GDR – Beneficiary not eligible due to sex
AGE – Beneficiary not eligible due to age
SRV – Beneficiary not eligible for the service
0000 – Service not applicable
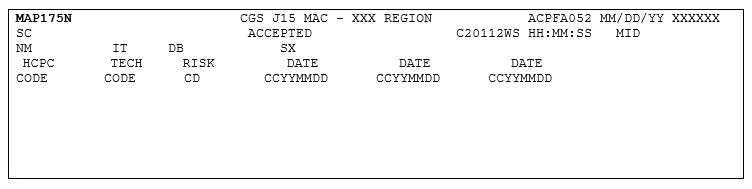
Map 175N Screen Example
Map 175N Field Descriptions
MID
The beneficiary's Medicare ID number.
NM
The last name of the beneficiary.
IT
The first initial of the beneficiary name.
DB
The date of birth of the beneficiary.
SX
The sex of the beneficiary. The valid values are:
F – Female
M – Male
HCPC CODE
The HCPC code.
TECH CODE
This field identifies the technical code.
RISK CD
The breast cancer risk indicator for the beneficiary. The valid values are:
Y – High Risk
N – Not High Risk
DATE
Date 1 – This field identifies the date the HCPC code was returned from CWF.
DATE
Date 2 – This field identifies the date the TECH code was returned from CWF.
DATE
Date 3 – This field identifies the date the RISK code was returned from CWF.
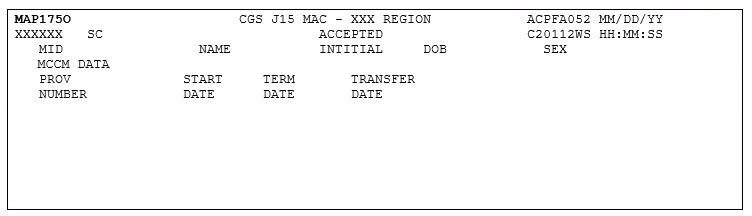
Map 175O Screen Example
Map 175O Field Descriptions
MID
The beneficiary's Medicare ID number.
NM
The last name of the beneficiary.
IT
The first initial of the beneficiary name.
DB
The date of birth of the beneficiary.
SX
The sex of the beneficiary. The valid values are:
F – Female
M – Male
PROVIDER NUMBER
The identification number assigned by Medicare to the Hospice provider.
START DATE
The beginning date of a beneficiary's election of the MCCM Hospice provider.
TERM DATE
The ending date of a beneficiary's election of the MCCM Hospice provider.
TRANSFER DATE
The date of the MCCM Hospice provider change of ownership.
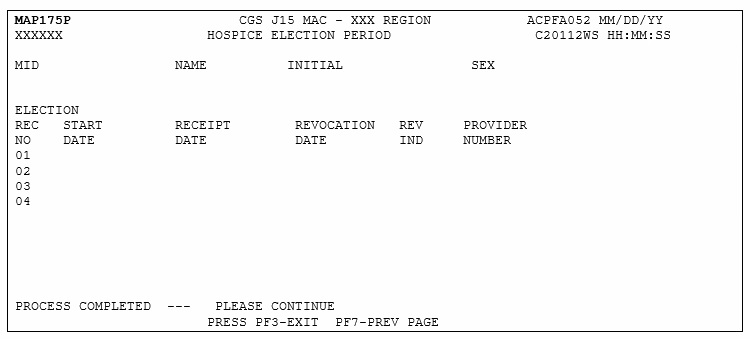
Map 175P Screen Example
Map 175P Field Descriptions
MID
The beneficiary's Medicare ID number.
NM
The last name of the beneficiary.
IT
The first initial of the beneficiary name.
DB
The date of birth of the beneficiary.
SX
The sex of the beneficiary. The valid values are:
F – Female
M – Male
START DATE
Hospice election start date (MMDDCCYY)
RECEIPT DATE
Receipt date of the Notice of Election (NOE) (MMDDCCYY).
REVOCATION DATE
Hospice revocation date (MMDDCCYY)
REV IND
Hospice revocation indicator
PROVIDER NUMBER
Hospice provider number.
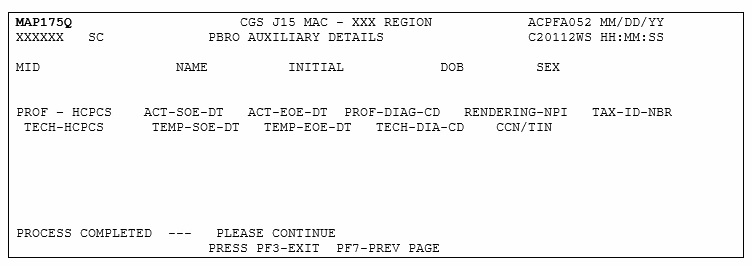
Map 175Q Screen Example
Map 175Q Field Descriptions
MID
The beneficiary's Medicare ID number.
NM
The last name of the beneficiary.
INITIAL
The first initial of the beneficiary name.
SEX
The sex of the beneficiary. The valid values are:
F – Female
M – Male
PROF-HCPCS
The professional radiation oncology model-specific HCPCS code.
ACT-SOE-DT
Actual starte of episode date.
ACT-EOE-DT
Actual end of episode date.
PROF-DIAG-CD
Professional line item diagnosis code.
RENDERING-NPI
The National provider Identifier (NPI) of the radiation oncologists performing the service.
TAC-ID-NBR
The Tax Identification Number (TIN) of the radiation oncologists performing the service.
TECH-HCPCS
The technical readiation oncoloby model-specific HCPCS code.
TEMP-SOE-DT
Temporary start of episode date.
TEMP-EOE-DT
Temporary end of episode date
TECH-DIAG-CD
Technical line item diagnosis code.
CCN/TIN
Facility/Technical participant provider number.
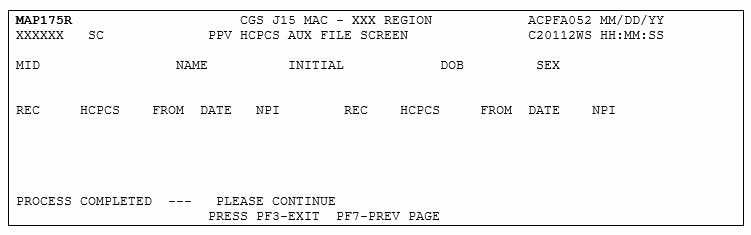
Map 175R Screen Example
Map 175R Field Descriptions
MID
The beneficiary's Medicare ID number.
NM
The last name of the beneficiary.
INITIAL
The first initial of the beneficiary name.
DOB
The date of birth of the beneficiary.
SEX
The sex of the beneficiary. The valid values are:
F – Female
M – Male
REC
Record number
HCPCS
Pneumococcal pneumonia vaccination HCPCS – up to 10 occurrences
FROM DATE
The most recent 'from' date of service – up to 10 occurrences
NPI
Provider's National Provider Identifier – up to 10 occurrences
This option allows you to view specific DRG (diagnostic related group) assignment and PPS (prospective payment system) information for inpatient hospital stays as calculated by the Pricer/Grouper software programs within FISS.
From the Inquiry Menu, type 11 in the Enter Menu Selection field and press Enter.
⇒You may also access this screen by typing 11 in the SC field if you are in an inquiry or claim entry screen.
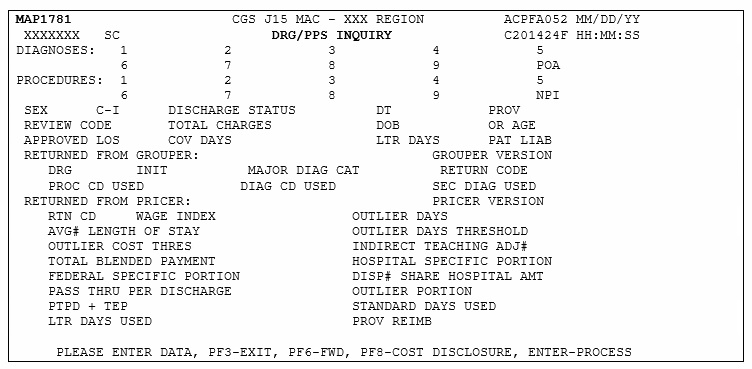
The DRG/PPS Inquiry screen (Map 1781) appears:
Map 1781 Field Descriptions
DIAGNOSIS
ICD diagnosis codes that identify up to nine codes for coexisting conditions on a particular claim. The admitting diagnosis is not entered.
No Title
This field follows the ICD diagnosis code field and identifies the Present On Admission (POA) indicator for every principal and secondary diagnosis and whether the patient's condition is present at the time the order for inpatient admission to a general acute care hospital occurs.
POA
The End of POA Indicator. This is the last character of the POA Indicator. Valid values:
X – The end of POA indicators for principal and, if applicable, other diagnoses in special processing situations that may be identified by CMS in the future. Z – The end of POE indicators for principal and, if applicable other diagnoses. Blank – Not acute care, POA's do not apply.
PROCEDURES
ICD procedure codes that identify the principal procedure performed and up to eight additional procedures during the billing period.
NPI
The providers National Provider Identifier (NPI) number.
The date the beneficiary was discharged (MMDDYY format).
PROV
The provider's Medicare number
REVIEW CODE
Identifies the code used to calculate the standard payment. Valid values are:
00 = Pay with outlier
07 = Pay without cost
01 = Pay days outlier
09 = Pay transfer special DRG post-acute transfers for DRGs 209, 110, 211, 014, 113, 236, 263, 264, 429, 483 11 = Pay transfer special DRG no cost post-acute transfers for DRGs 209, 110, 211, 014, 113, 236, 263, 264, 429, 483
02 = Pay cost outlier
03 = Pay per diem days 04 = Pay average stay only 05 = Pay transfer with cost 06 = Pay transfer no cost
TOTAL CHARGES
The total charge as submitted on the claim.
DOB
The beneficiary's date of birth (MMDDCCYY format).
OR AGE
The beneficiary's age at the time of discharge. This field may be used instead of the DOB field.
APPROVED LOS
The approved length of stay (LOS). This is necessary for Pricer to determine whether day outlier status is applicable in non-transfer cases, and in transfer cases to determine the number of days for which to pay the per diem rate.
COV DAYS
Identifies the number of Medicare Part A days covered for this claim. Pricer uses the relationship between the covered days and the day outlier trim point of the assigned DRG to calculate the rate.
LTR DAYS
Identifies the number of Lifetime Reserve (LTR) days used for a claim.
PAT LIAB
Identifies the patient liability that is due, which is the dollar amount owed by the beneficiary to cover any coinsurance days or non-covered days or charges.
Press ENTER to allow FISS to assign the DRG. The following information will display on the screen under RETURNED FROM GROUPER or RETURNED FROM PRICER
RETURN FROM GROUPER:
GROUPER VERSION
The version of the Grouper program used.
DRG
Identifies the Diagnosis Related Group code assigned by the grouper program.
INIT
INIT identifies the initial DRG code assigned. Used in the event a Hospital Acquired Condition (HAC) impacts the final MS-DRG assignment.
MAJOR DIAG CAT
INIT Identifies the Major Diagnostic Category in which the DRG resides. Valid values are:
RETURN CODE
Identifies the status of the claim when it has returned from the Grouper program.
PROC CD USED
Identifies the procedure code used by the Grouper program for calculation.
DIAG CD USED
Identifies the primary diagnosis code used by the Grouper program for calculation.
SEC DIAG USED
Identifies the secondary diagnosis code used by the Group program for calculation.
RETURN FROM PRICER:
PRICER VERSION
The version of the Pricer program used.
RTN CD
The Return Code that identifies the status of the claim when is is returned from the Pricer program
WAGE INDEX
Identifies the providers' wage index factor for the state where the services were provided to determine reimbursement rates for the services provided.
OUTLIER DAYS
Identifies the number of outlier days that exceed the cutoff point for the applicable DRG.
AVG# LENGTH OF STAY
The predetermined average length of stay for the assigned DRG.
OUTLIER DAYS THRESHOLD
Identifies the number of days of utilization permissible for the claim's DRG code. Day outlier payment is made when the length of stay exceeds the length of stay for a specific DRG plus the CMS-mandated adjustment calculation.
OUTLIER COST THRES
Identifies the Outlier Cost Threshold when the claim has extraordinarily high charges and does not qualify as a day outlier.
INDIRECT TEACHING ADJ#
The amount of adjustment calculated by the Pricer for teaching hospitals.
TOTAL BLENDED PAYMENT
The total PPC payment amount consisting of the Federal, hospital, outlier and indirect teaching portions.
HOSPITAL SPECIFIC PORTION
The hospital specific portion of the total blended payment.
FEDERAL SPECIFIC PORTION
The Federal specific portion of the total blended payment.
DISP# SHARE HOSPTIAL AMT
The percentage of a hospital total Medicare Part A patient days attributable to Medicare patients who are also SSI.
PASS THRU PER DISCHARGE
The pass through per discharge cost.
OUTLIER PORTION
The dollar amount calculated that reflects the outlier portion of the charges.
PTPD + TEP
The pass through per discharge cost plus the total blended payment amount.
STANDARD DAYS USED
The number of regular Medicare Part A days covered for this claim.
LTR DAYS USED
The number of Lifetime Reserve Days used during this benefit period
PROV REIMB
The actual payment amount to the provider for this claim.
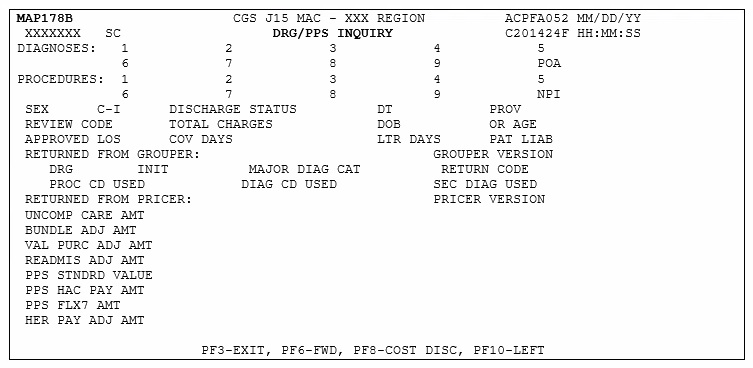
MAP178B – DRG/PPS Inquiry Screen
Map178B – The top half of the screen displays the same fields as MAP 1781; therefore the field descriptions below begin with the fields located under RETURNED FROM PRICER.
Map 178B Field Descriptions
RETURN FROM PRICER:
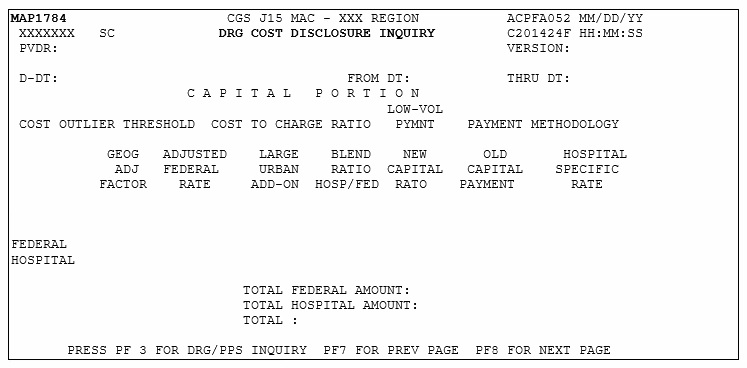
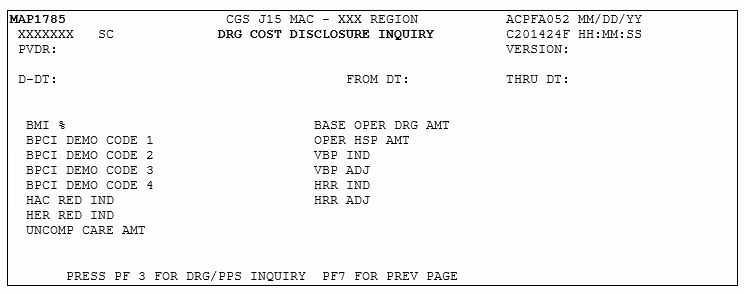
UNCOMP CARE AMT
Uncompensated Care Payment Amount. This amount is published by CMS to the MACs (by provider) entitled to an uncompensated care payment amount add on.
BUNLDE ADJ ATM
The adjustment amount for hospitals participating in the Bundled Payments for Care Improvement Initiative (BPCI) Model 1 (demo code 61).
VAL PURC ADJ AMT
The adjustment amount for hospitals participating in the Value Based Purchase Program.
READMIS ADJ AMT
The reduction adjustment for those hospitals participating in the Hospital Readmissions Reduction program.
PPS STNDRD VALUE
The final standardized amount.
PPS HAC PAY AMT
The Hospital Acquired Condition (HAC) payment reduction amount.
PPS FLX7 AMT
Reserved for future use.
EHR PAY ADJ AMT
The reduction adjustment amount for hospitals not meaningful users of EHR.
MAP1782 – DRG Cost Disclosure Inquiry
Map 1782 Field Descriptions
PVDR
Identifies the provider number
VERSION
Identifies the program version number of the Pricer program.
D – DT
This date identifies which Pricer version to obtain data from.
FROM DT
The provider's effective start date on the provider file.
THRU DT
The provider's end date on the provider file.
DRG NUMBER
The number identifying the specific Diagnosis Related Group (DRG).
DSH OPERATING FACTOR
The operating payment for hospitals serving a disproportionate share of low income patients.
DSH CAPITAL FACTOR
The capital payment for hospitals serving a disproportionate share of low-income patients.
IME OPERATING FACTOR
Identifies the actual IME add-on to operating federal payments.
IME CAPTIAL FACTOR
Identifies the actual IME add-on to operating federal payments.
IME OPERATING RATIO
Identifies the ratio of interns and residents to available beds.
IME CAPITAL RATIO
Identifies the Capital Indirect Medical Education Ration which is the ratio of interns and residents to the average daily census.
XIX RATIO
Identifies the ratio of Medicaid days to total days.
SSI RATIO
Identifies the supplemental security income ratio to covered days.
NEW PROVIDER
Identifies a new provider for capital prospective payment.
URBAN / RURAL
Identifies the type of location and is determined by the DRG Pricer
NUMBER OF BEDS
The number of hospital beds available for lodging inpatients.
LOW-VOL PYMNT
The low-volume payment amount calculated by the IPPS Pricer.
DSH RATIO
The disproportionate share adjustment percentage.
COUNTY CODE
The County Code.
RELATIVE WEIGHT
The relative weight of the DRG amount.
ALOS
The CMS predetermined length of stay based on certain claim data.
OUTLIER DAY CUTOVER
The cut off point for determining day outliers.
OPERATING PAYMENT DSH
The operating payment for those hospitals serving a disproportionate share of low-income patients.
OPERATING PAYMENT IME
The capital payment for indirect medical education.
CAPITAL PAYMENT DSH
The capital payment for hospitals serving disproportionate share of low-income patients.
CAPITAL PAYMENT IME
The capital payment for indirect medical education.
OPERATING PAYMENT
The accumulated FSP and HSP total amount for Operating Payments.
CAPITAL PAYMENT
The accumulated HSP, FSP and Harmless total amount for Capital Payments.
TOTAL PAYMENT
The total amount of payments.
MAP1783 – DRG Cost Disclosure Inquiry
Map 1783 Field Descriptions
PVDR
Identifies the provider number
VERSION
Identifies the program version number of the Pricer program.
D-DT
The date for which the DRG information is being selected.
FROM DT
The beginning date of service (MMDDYY format)
THRU DT
The ending date of service (MMDDYY format)
OPERATING PORTION
COST OUTLIER THRESHOLD
The cost outlier threshold amount.
CASE MIX INDEX
The case mix index from the operating PPS base year.
COST TO CHARGE RATIO
The Cost to Charge ratio of operating costs to charges
LOW-VOL PYMNT
The low-volume payment amount calculated by the IPPS PRICER.
BLENDED RATIO TARGET/DRG
The ratio target amount used during operating PPS transition periods.
BLEND RATIO REG/NAT
The ratio DRG amount used during operating PPS transition periods
TARGET AMOUNT
The target amount (the updated specific rate). Used to determine Health Service Area (HAS) add-on amounts for sole community and Medicare dependents hospitals.
WAGE AMOUNT NATIONAL
The national wage-related rate used to determine the labor portion of the operating federal rate.
WAGE AMOUNT REGIONAL
The regional wage-related amount.
NON-WAGE AMOUNT NATIONAL
The national non-wage-related rate used to determine the labor portion of the operating federal rate.
NON-WAGE AMOUNT REGIONAL
The regional non-wage-related amount.
FED REG – WAGE AMOUNT
The regional wage-related amount.
FED REG – WAGE INDEX
The regional wage index as supplied by CMS to be used for the state in which the services were provided to determine reimbursement rates for services rendered.
FED REG – NON WAGE FED AMOUNT
The total Regional Non-Wage Federal amount.
FED REG – NON WAGE FED RATIO
The Non-Wage Federal Amount Ratio.
FED REG – AMOUNT
The Federal Regional amount.
FED REG – TOTALS
The Federal Regional total.
FED NAT – WAGE AMOUNT
The Federal National wage-related amount.
FED NAT – WAGE INDEX
The National Wage Index as supplied by CMS to be used for the state in which the services were provided to determine reimbursement rates for the services rendered.
FED NAT – NON WAGE FED AMOUNT
The National Non-Wage Federal total amount.
FED NAT – NON WAGE FED RATIO
The Non-Wage Federal Amount Ratio.
FED NAT – AMOUNT
The Federal National amount.
FED NAT – TOTALS
The Federal National total.
TOTAL FED – TOTALS
The accumulated amount by adding the Federal Regional Totals and the Federal National Totals.
HOSPITAL AMOUNT – AMOUNT
The hospital amount.
HOSPITAL AMOUNT – TOTALS
The hospital totals.
BLEND AMOUNT – TOTALS
The blended accumulated amount total by adding the Federal Regional Totals and the Federal National Totals.
HSA AMOUNT
The hospital rate amount.
HSA CALCULATION
Health Service Area (HAS) Calculation – (TARGET AMOUNT – (TOT FED / OUTLIER * OPER DSH)) * HAS FCTR
DRG WT
The payment weight of the Diagnosis Related Group (DRG).
HSA TOT
The total of the Health Service Area (HSA) amount multiplied by the DRG Weight.
MAP1784 – DRG Cost Disclosure Inquiry
Map 1784 Field Descriptions
PVDR
Identifies the provider number
VERSION
Identifies the program version number of the Pricer program.
D-DT
The date for which the DRG information is being selected.
FROM DT
The beginning date of service (MMDDYY format)
THRU DT
The ending date of service (MMDDYY format)
CAPITAL PORTION
COST OUTLIER THRESHOLD
The cost outlier threshold amount, which is the standard operating threshold for computing cost outlier payments.
COST TO CHARGE RATIO
The Cost to Charge ratio of operating costs to charges.
LOW-VOL PYMT
The Low-Volume Payment amount calculated by the IPPS Pricer.
PAYMENT METHODOLOGY
The capital PPS payment methodology based on the value of the PPS Pay Code. Valid values are:
A – Hold Harmless
B – Hold Harmless Fed
C – Fully Prospective
GEOG ADJ FACTOR
The Geographical Adjustment Factor used to adjust the capital federal rate, based on the applicable wage index.
ADJUSTED FEDERAL RATE
The base adjusted federal capital rate.
LARGE URBAN ADD-ON
The federal rate applicable to those hospitals located in a large urban SMSA.
BLEND RATION HOSP/FED
The blended ratio of the Hospital Specific Rate (HSA) and the Federal Rate used to compute capital payments under PPS.
NEW CAPITAL RATIO
The capital to total capital and is applicable for hospitals being reimbursed under the hold harmless payment method for capital.
OLD CAPITAL PAYMENT
The old capital cost per discharge as provided by the hospital or as provided by the latest filed cost report under capital PPS and is applicable for those hospitals being reimbursed under the hold harmless payment method for capital.
HOSPITAL SPECIFIC RATE
The capital base period cost per discharge updated to applicable fiscal year-end.
FEDERAL HOSPITAL
TOTAL FEDERAL AMOUNT
The Total Federal amount.
TOTAL HOSPITAL AMOUNT
The Total Hospital amount
TOTAL
The total Federal and Hospital amounts.
MAP1785 – DRG Cost Disclosure Inquiry
Map 1785 Field Descriptions
PVDR
Identifies the provider number
VERSION
Identifies the program version number of the Pricer program.
D-DT
The date for which the DRG information is being selected.
FROM DT
The beginning date of service (MMDDYY format)
THRU DT
The ending date of service (MMDDYY format)
BM1%
The Bundle Model 1 Discount Percentage.
BASE OPER DRG AMT
The Base Operating DRG Payment Amount. This is the amount a hospital would normally receive for the discharge of a Medicare patient.
BPCI DEMO CODE 1
The Bundled Payment for Care Improvement Indicator. Valid values are:
61 – Bundled Payment for Care Model 1
63 – Bundled Payment for Care Model 3
62 – Bundled Payment for Care Model 2
64 – Bundled Payment for Care Model 4
OPER HSP AMT
The Operating HSP (Hospital Specific Payment) DRG amount.
BPCI DEMO CODE 2
The Bundled Payment for Care Improvement Indicator. Valid values are:
61 – Bundled Payment for Care Model 1
63 – Bundled Payment for Care Model 3
62 – Bundled Payment for Care Model 2
64 – Bundled Payment for Care Model 4
VBP IND
The Value Based Pricing Indicator.
BPCI DEMO CODE 3
The Bundled Payment for Care Improvement Indicator. Valid values are:
61 – Bundled Payment for Care Model 1
63 – Bundled Payment for Care Model 3
62 – Bundled Payment for Care Model 2
64 – Bundled Payment for Care Model 4
VBP ADJ
The Value Based Pricing Adjustment.
BPCI DEMO CODE 4
The Bundled Payment for Care Improvement Indicator. Valid values are:
61 – Bundled Payment for Care Model 1
63 – Bundled Payment for Care Model 3
62 – Bundled Payment for Care Model 2
64 – Bundled Payment for Care Model 4
HRR IND
The Hospital Readmission Reduction (HRR) Program Indicator.
HAC RED IND
Reserved for future use. Valid values for IPPS.
Blank – Hospital Acquired Condition Reduction Program – Non PPS
N – Hospital Acquired Condition Reduction Program – PPS
HRR ADJ
The Hospital Readmission Reduction (HRR) Adjustment.
EHR RED IND
The Electronic Health Record Adjustment Reduction Indicator for provides that are subject to claim adjustments when the provider does not meet the guidelines for use of EHR technology.
UNCOMP CARE AMT
The Uncompensated Care Payment Amount. This is the amount published by CMS for MACs (by provider) entitled to an uncompensated care payment amount add on. The MACs enter the amount for each Federal Fiscal year begin date based on published information.
You will use this option often because it allows you access to a variety of claim processing information. The following provides instructions on how to:
Check the status of your billing transactions / beneficiary claim history
Check for Medical Review Additional Development Requests (MR ADRs) and non-MR ADRs (home health and hospice only).
View upcoding and downcoding claim information for home health claims
View line item denial information
View Outcome and Assessment Information Set (OASIS) information for Patient-Driven Grouping Model (PDGM) claims (home health only).
From the Inquiry Menu, type 12 in the Enter Menu Selection field and press Enter .
The Claim Summary Inquiry screen (Map 1741) appears:
You can use the following function keys to move within the Claim Summary Inquiry screen and within the different claim pages:
F3 – Exit (return to the Inquiry Menu)
F5 – Scroll back through a list of claims or revenue code pages
F6 – Scroll forward through a list of claims or revenue code pages
F7 – Move one claim page back
F8 – Move one claim page forward
F10 – Move to the left page
F11 – Move to the right page
Shift+Tab– Move from the right to left in valid fields (ex. Move from the MID field to the NPI field)
Map 1741 Screen Example
Map 1741 Field Descriptions
NPI
National provider identifier.
MID
The beneficiary's Medicare ID number.
PROVIDER
Not applicable.
S/LOC
Status and location code assigned to the claim by FISS.
TOB
The type of bill submitted on the CMS-1450 claim form. The first two positions are required for a search. The third position is optional. Leave this field blank to view billing transacations for all bill types submitted by the NPI.
OPERATOR ID
Identifies the operator ID utilizing the screen.
FROM DATE
"From" date of service (MMDDYY format).
TO DATE
"Through" date of service (MMDDYY format).
DDE SORT
This field is not functional through the Inquiry Menu. Refer to the "Claims Corrections" section of this manual.
MEDICAL REVIEW SELECT
Not in use.
DCN
The claim document control number. This field can be used in conjunction with the Invoice NO/DCN Trans, Option 88 on the Inquiry Menu screen.
First Line of Data
MID
The beneficiary's Medicare ID number.
PROV/MRN
Medicare PTAN (provider number) assigned to your facility.
S/LOC
Status/location. This code is assigned to the claim by FISS. Refer to the FISS Overview section of this manual for additional information.
TOB
Type of bill. The type of bill code submitted on the CMS-1450 claim form.
ADM DT
Admission date. The date the beneficiary was admitted for care.
FRM DT
"From" date of service (MMDDYY format).
THRU DT
"Through" date of service (MMDDYY format).
REC DT
Received date. The date CGS originally received the claim or the date the claim was corrected from the Return to Provider (RTP) file.
Second Line of Data
SEL
Selection. This field is used to select the claim you wish to view.
LAST NAME
Last name of the beneficiary.
FIRST INIT
First initial of the beneficiary's name.
TOT CHG
Total charge. The total charge submitted on the CMS-1450 claim form.
PROV REIMB
Provider reimbursement. The amount reimbursed to the provider for an individual claim.
PD DT
Paid date. The date the claim will pay (for claims in P B9996) or was paid (P B9997). For claims in RTP (T B9997), this is the date the claim went to the RTP status/location. For claims rejected (R B9997) or denied (D B9997), this is the date the claim rejected or denied.
CAN DT
Cancel date. The date the original claim was canceled.
REAS
Reason code. The code assigned by FISS describing what is happening to the claim (edit).
NPC
Non-payment code. The code indicating why payment was not made.
Values are:
B Benefits exhausted N All other reasons R Spell of illness benefits refused, certification refused, failure to submit evidence, provider responsible for not filing timely,ro Waiver of Liability W Workers compensation X MSP cost avoided Z System set for type of bills 322 – MSP Primary Payer
NOTE: this code displays on home health Requests for Anticipated Payment (RAPs) when:
there is another insurer that is primary to Medicare.
the "From" date of a RAP falls within a Medicare Advantage plan enrollment period.
# DAYS
Number of days. The number of days the claim has been in the Return to Provider (RTP) status. This field is only functional through the Claim and Attachments Corrections Menu. Refer to the Claims Corrections section of this manual for additional information.
FISS Inquiry Screens MAP 171E, 171A, 171D, and 171G
Once you have selected to view a claim from the Claim Summary Inquiry screen (MAP 1741), and press F8 to access Page 02 of the claim, you have the ability to press F11 to move to the right, which will display MAP171E, Press F11 again, and MAP 171A will display, press F11 again, and MAP 171D displays, and press F11 again and Map 171G (home health only) will display. Refer to the following screen prints and field descriptions.
Map 171E Screen Example
Map 171E Field Descriptions
The MID, TOB, and S/LOC fields are system generated from Page 01 of the claim.
CL
Claim line item number (1 – 450).
NDC FIELD
National Drug Code (NDC) information. No longer required by Hospice providers.
NDC QUANTITY
The NDC quantity. No longer required by Hospice providers.
QUALIFIER
The units of measurement qualifier. No longer required by Hospice providers.
RETURN HIPPS1
Identifies the HIPPS codes returned from the Internet Quality Information Evaluation System (iQIES). Applicable to inpatient rehabilitation, home health agency or skilled nursing facility/swing bed facilities.
RETURN HIPPS2
Identifies the HIPPS codes returned from iQIES. Applicable to skilled nursing facility/swing bed.
MOLDX
Identifies the Molecular Diagnostic Services test ID. Not applicable to home health and hospice claims.
LLR NPI
Line Level Rendering Physician's NPI number.
L
Last name of the physician.
F
First name of the physician.
M
Middle name of the physician.
SC
Special Code.
LLO NPI
Line Level Ordering National Provider Identifier (NPI). For institutional outpatient claims with advanced diagnostic imaging services subject to the Appropriate Use Criteria (AUC). Review SE20002 for additional information.
Map 171A Screen Example
Map 171A Field Descriptions
Fields prior to the start of the revenue code line item information (first four rows of information) are system generated from Page 01 of the claim.
REP PAYEE
Identifies a Medicare beneficiary with a Rep Payee.
UTN
Unique Tracking Number – assigned to a prior authorization request.
PGM
Prior authorization program indicator – a four-position alphanumeric field that identifies the prior authorization program ID matching to the item/services on the claim.
Value Code 05/Other. Identifies whether value code 05 is present on the claim.
MSP BLOOD DEDUCTIBLES
Medicare Secondary Payer Blood Deductibles.
MSP CASH DEDUCTIBLES
Medicare Secondary Payer Cash Deductibles.
MSP COINSURANCE
Medicare Secondary Payer Coinsurance.
ANSI ESRD-RED/ PSYCH/HBCF
ANSI End Stage Renal Disease Reduction/Psychiatric Coinsurance/Hemophilia Blood Clotting Factor.
ANSI VALCD-05
/OTHER
ANSI Value Code-05/Other. Identifies the 2-position ANSI group code and 3-position ANSI reason (adjustment) code. The ANSI data for the value codes are reported on the Remittance Advice for the Value Code 05/Other amount.
OUTLIER
The apportioned line level outlier amount returned from the MSP module.
Medicare Secondary Payer Payer-1. Identifies the amount entered by the provider (if available) or apportioned by FISS as payment from the primary payer. FISS, based on the amount used in payment calculation and the value code for the primary payer, apportions this amount.
MSP PAYER-2
Medicare Secondary Payer Payer-2. Identifies the amount entered by the provider (if available) or apportioned by FISS as payment from the secondary payer. FISS, based on the amount used in payment calculation and the value code for the secondary payer, apportions this amount.
OTAF
Obligated to Accept Payment in Full. Identifies the line item apportioned amount entered by the provider (if applicable) or apportioned amount calculated by the MSPPAY module of the obligated to accept as payment in full, when value code 44 is present.
MSP DENIAL IND
Medicare Secondary Payer Denial Indicator. Identifies to the MSPPAY module that an insurer primary to Medicare has denied this line item. The valid values are:
" " – not denied
D – denied
OCE FLAGS
Flag 1 – Service Indicator – valid values are:
B – Non-allowed item or service for OPPS
M – Medical Review changes a HIPPS code
P – Pricer upcode/downcode; The Pricer program in FISS changes the HIPPS code to "early" or "late" based on the beneficiary's adjacent episode history posted to the Common Working File (CWF) and/or the claim contains more or less therapy revenue codes than indicated by the HIPPS code submitted.
Flag 2 – Payment Indicator Flag 3 – Discounting Formula Number Flag 4 – Line Item Denial or Rejection Flag Flag 5 – Packing Flag Flag 6 – Payment Adjustment Flag Flag 7 – Payment Method Flag Flag 8 – Line Item Action Flag Flag 9 – Composite Adjustment Flag 10 – Claim Receipt Flag
MSP PAYER – 1 ID
Medicare Secondary Payer Payer-1 ID – Displays 1-position alphanumeric code identifying the specific payer. If Medicare is primary, this field will be blank. The valid values are:
1 – Medicaid 2 – Blue Cross 3 – Other 4 – None A – Working Aged B – ESRD beneficiary in a 30-month coordination period with an employer group health plan C – Conditional payment D – Auto no-fault E – Worker's Compensation F – Public Health Service or other Federal Agency G – Disabled H – Black Lung L – Liability
MSP PAYER – 2 ID
Medicare Secondary Payer Payer-2 ID – Displays 1-position alphanumeric code identifying the specific payer. If Medicare is secondary, this field will be blank. The valid values are:
1 – Medicaid 2 – Blue Cross 3 – Other 4 – None A – Working Aged B – ESRD beneficiary in a 12-month coordination period with an employer group health plan C – Conditional payment D – Auto no-fault E – Worker's Compensation F – Public Health Service or other Federal Agency G – Disabled H – Black Lung L – Liability
PAT REIMB
Patient Reimbursement. This field identifies the system generated calculated line amount to be paid to the patient on the basis of the amount entered by the provider on Page 03 of the claim, in the "Due From PAT" field.
PAT RESP
Patient Responsibility. Identifies the amount for which the individual receiving services is responsible. The amount is calculated as follows:
If Payer 1 indicator is C or Z, the amount equals: cash deductible + coinsurance + blood deductible.
If Payer 1 indicator is not C or Z, the amount equals: MSP blood + MSP cash deductible + MSP coinsurance.
PAT PAID
Patient paid. Identifies the line item patient paid amount calculated by the system. This amount is the lower of (patient reimbursement + patient responsibility) or the remaining patient paid (after the preceding lines have reduced the amount entered on Page 03 of the claim).
REDUCT-AMT
Reduction amount. A 10 percent reduction in conjunction with Group Code "CO".
ANSI
ANSI Group Code and the Claim Adjustment Reason Codes related to the reduction amount.
PROV REIMB
Provider Reimbursement. Identifies the system generated calculated line amount to be paid to the provider.
LABOR
Identifies the labor amount of the payment as calculated by Pricer.
NON-LABOR
Identifies the non-labor amount of the payment as calculated by Pricer.
MED REIMB
Medicare Reimbursement. Identifies the total Medicare reimbursement for the line item, which is the sum of the patient reimbursement and the provider reimbursement.
CONTR
ADJUSTMENT
Contractor Adjustment. Identifies the total contractual adjustment. The calculation is: submitted charge – deductible – wage adjusted coinsurance – blood deductible – value code 71 – psychiatric reduction – value code 05/other – reimbursement amount.
Note: For MSP claims, the MSP deductible, MSP blood deductible, and MSP coinsurance is used in the above calculation in place of the deductible, blood deductible, and coinsurance amounts.
ANSI
ANSI Group – ANSI Adjustment Code – Identifies the 2-position ANSI group code and 3-position ANSI reason (adjustment) code. The ANSI data for the value codes are reported on the Remittance Advice.
PRICER AMT
Pricer Amount. Identifies the total reimbursement received from Pricer.
PRICER RTC
Pricer Return Code. Identifies the return code from the OPPS Pricer.
PAY METHOD
Payment Method. Identifies the payment method returned from OCE. Valid values are:
1 – paid standard OPPS amount (status indicators S, T, V, X, or P)
2 – services not paid under OPPS (status indicator A)
3 – not paid (status indicators W, Y, or E) or not paid under OPPS (status indicators B, C or Z)
4 – acquisition cost paid (status indicator F)
5 – additional payment for drug or biological (status indicator G)
6 – additional payment for device (status indicator H)
7 – additional payment for new drug or new biological (status indicator J)
9 – no additional payment included in line items with APCS (status indicator N, or no HCPCS code and certain revenue codes, or HCPCS codes Q0082 (activity therapy), G0129 (occupational therapy), or G0177 (partial hospitalization program services)
IDE/NDC/UPC
Identifies IDE, NDC, and UPC.
ASC GRP
Identifies the ASC group code for the indicated revenue code.
%
ASC Percentage. Identifies the percentage used by the ASC Pricer in its calculation for the indicated revenue code.
Map 171D Screen Example
Map 171D Field Descriptions
SC
Screen Control. A feature that allows you to access other FISS inquiry options.
DCN
Document Control Number. Displays the claim's identification number assigned by FISS when the claim is received.
MID
Beneficiary's Medicare ID number
RECEIPT DATE
Identifies the actual receipt date. This is automatically entered by FISS.
TOB
Type of Bill. Identifies the type of bill that applies to the claim.
STATUS
Identifies the claim's status in the system (P, D, R, S, or T).
LOCATION
Further identifies the claim's location in the system.
TRAN DT
Transaction Date. Identifies the date of the latest update activity.
STMT COV DT
Statement Covers Date. Identifies the beginning date of service.
TO
Statement Covers "To" Date. Identifies the ending date of service.
PROVIDER ID
Provider Number. Identifies your facility's National Provider Identifier (NPI).
BENE NAME
Beneficiary Name. Identifies the name of the beneficiary.
NONPAY CD
Non-Pay Code. Identifies the reason for Medicare's decision not to make payment. Valid values are:
B
Benefits exhausted
N
All other reasons
P
Payment Requested
R
Spell of illness benefits refused, certification refused, failure to submit evidence, provider responsible for not filing timely,ro Waiver of Liability
W
Workers Compensation
X
MSP cost avoided
Z
MSP Primary Payer
GENER HARDCPY
Generate hardcopy. Instructs system to generate a specific type of hard copy document. Valid values are:
2 Medical ADR
3 Non-medical ADR
4 MSP ADR
5 MSP cost avoidance ADR
7 ADR to beneficiary
8 MSN (line item) or partial benefit denial letter (BDL)
9 MSN (claim level) or full BDL
MR INCLD IN COMP
Composite Medical Review Included in Composite Rate.
CL MR IND
Complex Manual Medical Review Indicator. Identifies if all services on the claim received complex manual medical review. Valid values:
""The services did not receive manual medical review. Y Medical records received and this service received complex manual medical review. A "Y" will display when the OCE FLAGS field on Map 171A displays an "M" (Medical Review changes a HIPPS code). N Medical records were not received and this service received routine manual medical review.
TPE-TO-TPE
Tape to Tape flag. Displays the tape-to-tape flag indicating the system to either perform or skip a function. If the value in this field is "X", the claim data information is not posted to the Common Working File (CWF). If this field is blank, the claim data from the finalized (status/location P B9997, R B9997, or D B9997) billing transaction did post to CWF. Whenever claim data has posted to CWF, a cancel or adjustment must be submitted to remove or change this information. Valid values and the functions include:
USER ACT CODE
User Action Code. For intermediary use for medical review and reconsideration only. Valid values are:
A – pay per waiver – full technical B – pay per waiver – full medical C – provider liability – full medical – subject to waiver provision D – beneficiary liability – full – subject to waiver provision E – pay claim – line full F – pay claim partial – claim must be updated to reflect liability G – provider liability – full technical – subject to waiver provision H – full/partial denial with multiple liabilities – claim must be updated to reflect liability I – full provider liability – medical – not subject to waiver provision J – full provider liability – technical – not subject to waiver provision K – full beneficiary liability – not subject to waiver provision L – full provider liability – code changed to reflect actual service M – pay per waiver – line or partial line N – provider liability – line or partial line O – beneficiary liability – line or partial line P – open biopsy changed to closed biopsy Q – release with no medical review performed R – CWF denied but medical review was performed Z – force claim to be re-edited by medical policy 5 – set systematically from the reason code file to identify claims for which special processing is required 7 – force claim to be re-edited by medical policy edits in the 5XXXX range 8 – claim was suspended via an OCE MED review reason 9 – claim has been identified as a first claim review
WAIV IND
Waiver Indicator. Identifies whether the provider has their presumptive waiver status. This field is no longer used.
MR REV URC
Medical Review Utilization Review Committee Reversal.
DEMAND
Medical Review Demand Reversal
REJ CD
Reject Code. Identifies the reason code for which the claim is being denied (on full claim denials only).
MR HOSP RED
Medical Review Hospice Reduced. For hospice claims, this field identifies the line item(s) has been reduced to a lesser charge by medical review. Valid values are:
Y – Reduced
" " – Not reduced
RCN IND
Reconsideration Indicator. Only used on home health claims. Valid values are:
A – finalized count affirmed B – finalized no adjustment count (pay per waiver) R – finalized count reversal (adjustment) U – reconsideration
MR HOSP RO
Medical Review Regional Office Referred. For hospice claims, if the claim has been referred to the CMS Regional Office for questionable revocation, the medical review operator will indicate so by entering a Y in this field, otherwise the field will be blank.
ORIG UAC
Original User Action Code. For intermediary use only.
MED REV RSNS
Medical Review Reasons. Identifies a specific error condition relative to medical review. There are up to nine medical review reasons that can be captured per claim. This field only displays medical review reasons specific to claim level.
OCE MED REV
RSNS
OCE Medical Review Reasons.
Unlabeled
Identifies the line number of the revenue code. The line number is located above the revenue code field on this Map. To move to another revenue code, press F6 to scroll down and F5 to scroll up.
REV
Revenue Code.
HCPC/MOD IN
HCPCS Code/Modifier. Valid values are:
U – upcoding D – downcoding
" " – no downcoding
HCPC
Healthcare Common Procedure Coding System. Indicates 5-position HCPCS associated with the revenue code.
MODIFIERS
Healthcare Common Procedure Coding System Modifier.
SERV DATE
Service date. Line item date of service associated with the revenue code.
COV-UNT
Covered units. Reflects the number of covered visits associated with the revenue code.
COV-CHRG
Covered charges. Represents the covered charges associated with the revenue code.
ADR REASON
CODES
Additional Development Request. ADR reason codes used when additional information has been requested.
FMR REASON
CODES
Focused Medical Review Suspense Codes. Identifies the medical review suspense codes when a claim is edited based on the medical policy parameter file.
ODC REASON
CODES
Original Denial Reason Code. Identifies the original denial reason codes.
ORIG
Original HCPCS or HIPPS code, or modifiers billed.
ORIG REV
CODE
Original revenue code billed.
MR
Complex Manual Medical Review Indicator. Identifies if all services on the claim received complex manual medical review. Valid values are:
" " – services did not receive manual medical review Y – medical records received and services received complex manual medical review N – medical records were not received and services received routine manual medical review
OCE OVR
Override. Overrides the way the OCE module controls the line item. Valid values are:
0 – OCE line item denial or rejection is not ignored 1 – OCE line item denial or rejection is ignored 2 – External line item denial. Line item is denied even if no OCE edits. 3 – External line item reject. Line item is rejected even if no OCE edits. 4 – External line item adjustment. Technical charge rules apply.
CWF OVR
CWF Home Health Override. Overrides the way the OCE module controls the line item.
NCD OVR
National Coverage Determination Override Indicator. Identifies whether the line has been reviewed for medical necessity and should bypass the NCD edits, the line has no covered charges and should bypass the NCD edits, or the line should not bypass the NCD edits. Valid values are:
" " – NCD edits are not bypassed Y – the line has been reviewed for medical necessity and bypasses the NCD edits D – the line has no covered charges and bypasses the NCD edits
NCD DOC
National Coverage Determination Documentation Indicator. Identifies whether the documentation was received for the necessary medical service. Valid values are:
Y – the documentation supporting the medical necessity was received. N – the documentation supporting the medical necessity was not received.
NCD RESP
National Coverage Determination Response Code. Identifies the response code that is returned from the NCD edits. Valid values are:
" " – default 0 – the HCPCS/diagnosis code matched the NCD edit table pass criteria. The line continues through the internal local medical necessity edits. 1 – the line continues through the internal local medical necessity edits because: the HCPCS code was not applicable to the NCD edit table process, the date of services was not within the range of the effective dates for the codes, the override indicator is set to Y or D, or the HCPCS code field is blank. 2 – none of the diagnoses supported the medical necessity of the claim, but the documentation indicator shows that the documentation to support medical necessity is provided. The line suspends for medical review. 3 – the HCPCS/diagnosis code matched the NCD edit table list ICD deny codes. The line suspends and indicates that the service is not covered and is to be denied as beneficiary liable due to noncoverage by statute. 4 – none of the diagnosis codes on the claim support the medical necessity for the procedure and no additional documentation is provided. This line suspends as not medically necessary and will be denied. 5 – diagnosis codes were not passed to the NCD edit module for the NCD HCPCS code. The claim suspends and will move to the Return to Provider (RTP) file.
NCD #
National Coverage Determination Number. This field identifies the NCD number associated with the beneficiaries claim denial. This is an eight-position alphanumeric field.
OLUAC
Original Line User Action Code. Identifies the original line user action code and is only used when there is a line user action code and a corresponding medical review denial reason code in the Benefits Savings portion of the claim.
LUAC
Line User Action Code. This is a 2-position field. The 1st position indicates the cause of the denial reason for the specific revenue line (see the USER ACT CODE field of this FISS Guide chapter for valid values). The 2nd position indicates the reconsideration code. A value equal to R indicates that reconsideration has been performed.
NON COV-UNT
Noncovered units. Contains the number of units that are being denied, if applicable.
NON COV-CHRG
Noncovered charges. Identifies the total of denied/rejected/noncovered charges for each line item being denied.
DENIAL REAS
Denial Reason. Identifies the reason code associated with the denial for the revenue code line.
OVER CODE
Override Code. Overrides the system generated ANSI codes from the denial reason code file. The valid values are:
A – override system generated ANSI code
" " – system default
ST/LC OVER
Status/location Override. Overrides the reason code file status. Only used by CGS. Valid values are:
D – denied line item for the reason code. R – rejected the line item for the reason code
" " – processed claim with no override action
MED TEC
Medical Technical Denial Indicator. Identifies the appropriate Medical Technical Denial indicator used when performing the medical review denial of a line item. The valid values are:
A – home health only – not intermittent care – technical and waiver was applied B – home health only – not homebound – technical and waiver was applied C – home health only – lack of physician's orders – technical deletion and waiver was not applied D – home health only – records not submitted after the request – technical deletion and waiver was not applied M – medical denial and waiver was applied S – medical denial and waiver was not applied T – technical denial and waiver was applied U – technical denial and waiver was not applied
ANSI ADJ
ANSI Adjustment Reason Code. Identifies the ANSI adjustment reason code associated with the denial reason for each line item.
ANSI GRP
ANSI Group Code. Contains the ANSI group code associated with the denial reason for each line item.
ANSI REMARKS
ANSI Remarks Code. Contains the ANSI remarks codes associated with the denial reason for each line item.
TOTAL
Contains the sum of all revenue code noncovered units.
LINE ITEM
REASON CODES
Identifies the reason code that is assigned for suspending the line item.
Map 171G Screen Example (Home Health only)
Map 171G Field Descriptions
The MID, TOB, and S/LOC fields are system generated from Page 01 of the claim.
Each of the 8 OASIS items lines include an OA (OASIS Assessment) field and MR (Medical Review) field. The OA field displays the OASIS item sent from iQIES to FISS. The MR field is used by the CGS Medical Review staff to enter corrections when, based on their review of the full medical record, they find OASIS data is not supported.
M1033-HSTRY-FALLS
OA (OASIS Assessment)
MR (Medical Review)
This field indicates if there are risk factors for hospitalization-falls. One position numeric field.
Valid Values: 0 – Unchecked (No) 1 – Checked (Yes) 9 – No iQIES Assessment found
M1033-WEIGHT-LOSS
OA
MR
This field indicates if there are risk factors for hospitalization-weight loss. One position numeric field.
Valid Values: 0 – Unchecked (No) 1 – Checked (Yes) 9 – No iQIES Assessment found
M1033-MLTPL HOSPZTN
OA
MR
This field indicates if there are risk factors for hospitalization-multiple hospitalizations. One position numeric field.
Valid Values: 0 – Unchecked (No) 1 – Checked (Yes) 9 – No iQIES Assessment found
M1033-MLTPL-ED-VISIT
OA
MR
This field indicates if there are risk factors for hospitalization-multiple emergency department visits. One position numeric field.
Valid Values: 0 – Unchecked (No) 1 – Checked (Yes) 9 – No iQIES Assessment found
M1033-MNTL-BHV-DCLN
OA
MR
This field indicates if there are risk factors for hospitalization-mental behavior decline. One position numeric field.
Valid Values: 0 – Unchecked (No) 1 – Checked (Yes) 9 – No iQIES Assessment found
M1033-COMPLIANCE
OA
MR
This field indicates if there are risk factors for hospitalization-compliance. One position numeric field.
Valid Values: 0 – Unchecked (No) 1 – Checked (Yes) 9 – No iQIES Assessment found
M1033-5PLUS-MDCTN
OA
MR
This field indicates if there are risk factors for hospitalization-currently taking 5 or more medications. One position numeric field.
Valid Values: 0 – Unchecked (No) 1 – Checked (Yes) 9 – No iQIES Assessment found
M1033-CRNT-EXHSTN
OA
MR
This field indicates if there are risk factors for hospitalization-exhaustion. One position numeric field.
Valid Values: 0 – Unchecked (No) 1 – Checked (Yes) 9 – No iQIES Assessment found
M1033-OTHER RISK
OA
MR
This field indicates if there are risk factors for hospitalization-other risks. One position numeric field.
Valid Values: 0 – Unchecked (No) 1 – Checked (Yes)
9 – No iQIES Assessment found
M1033-NONE-ABOVE
OA
MR
This field indicates if there are risk factors for hospitalization-none of the above. One position numeric field.
Valid Values:
0 – Unchecked (No) 1 – Checked (Yes) 9 – No iQIES Assessment found
M1800-CRNT-GROOMING
OA
MR
This field indicates Grooming: Current ability to tend safely to personal hygiene needs (specifically: washing face and hands, hair care, shaving or make up, teeth or denture care, or fingernail care). Two position numeric field.
Valid Values: 00 – Able to groom self unaided, with or without the use of assistive devices or adapted methods 01 – Grooming utensils must be placed within reach before able to complete grooming activities. 02 – Someone must assist the patient to groom self. 03 – Patient depends entirely upon someone else for grooming needs. 99 – No iQIES Assessment found
M1810-DRESS-UPPER
OA
MR
This field indicates Current Ability to Dress Upper Body safely (with or without dressing aids) including undergarments, pullovers, front-opening shirts and blouses, managing zippers, buttons, and snaps. Two position numeric field.
Valid Values: 00 – Able to get clothes out of closets and drawers, put them on and remove them from the upper body without assistance. 01 – Able to dress upper body without assistance if clothing is laid out or handed to the patient. 02 – Someone must help the patient put on upper body clothing. 03 – Patient depends entirely upon another person to dress the upper body. 99 – No iQIES Assessment found
M1820-DRESS-LOWER
OA
MR
This field indicates Current Ability to Dress Lower Body safely (with or without dressing aids) including undergarments, slacks, socks or nylons, shoes. Two position numeric field.
Valid Values: 00 – Able to obtain, put on, and remove clothing and shoes without assistance. 01 – Able to dress lower body without assistance if clothing and shoes are laid out or handed to the patient. 02 – Someone must help the patient put on undergarments, slacks, socks or nylons, and shoes. 03 – Patient depends entirely upon another person to dress the lower body. 99 – No iQIES Assessment found
M1830-CRNT-BATHG
OA
MR
This field indicates Bathing: Current ability to wash entire body safely. Excludes grooming (washing face, washing hands, and shampooing hair). Two position numeric field.
Valid Values: 00 – Able to bathe self in shower or tub independently, including getting in and out of tub/shower. 01 – With the use of devised, is able to bathe self in shower or tub independently, including getting in and out of the tub/shower. 02 – Able to bathe in shower or tube with the intermittent assistance of another person.
For intermittent supervision or encouragement or reminders, OR
To get in and out of the shower or tube, OR
For washing difficult to reach areas.
03 – Able to participate in bathing self in shower or tub, but requires presence of another person throughout the bath for assistance or supervision. 04 – Unable to use the shower or tub, but able to bathe self independently with or without the use of devices at the sink, in chair, or on commode. 05 – Unable to use the shower or tub, but able to participate in bathing self in bed, at the sink in bedside chair, or on commode, with the assistance or supervision of another person. 06 – Unable to participate effectively in bathing and is bathed totally by another person. 99 – No iQIES Assessment found
M1840-CRNT TOILTG
OA
MR
This field indicates Toilet Transferring: Current ability to get to and from the toilet or bedside commode safely and transfer on and off toilet/commode. Two position numeric field.
Valid Values: 00 – Able to get to and from the toilet and transfer independently with or without a device. 01 – When reminded, assisted, or supervised by another person, able to get to and from the toilet and transfer. 02 – Unable to get to and from the toilet but is able to use a bedside commode (with or without assistance). 03 – Unable to get to and from the toilet or bedside commode but is able to use a bedpan/urinal independently. 04 – Is totally dependent in toileting. 99 – No iQIES Assessment found
M1850-CRNT-TRNSFRNG
OA
MR
This field indicates Transferring: Current ability to move safely from bed to chair, or ability to turn and position self in bed if patient is bedfast Two position numeric field.
Valid Values: 00 – Able to independently transfer. 01 – Able to transfer with minimal human assistance or with use of an assistive device. 02 – Able to bear weight and pivot during the transfer process but unable to transfer self. 03 – Unable to transfer self and is unable to bear weight or pivot when transferred to another person. 04 – Bedfast, unable to transfer but is able to turn and position slef in bed. 05 – Bedfast, unable to transfer and is unable to turn and position self. 99 – No iQIES Assessment found
M1860-CRNT-AMBLTN
OA
MR
This field indicates Ambulation/Locomotion: Current ability to walk safely, once in a standing position, or use a wheelchair, once in a seated position, on a variety of surfaces. Two position numeric field.
Valid Values: 00 – Able to independently walk on even and uneven surfaces and negotiate stairs with or without railings (specifically: needs no human assistance or assistive device). 01 – With the use of a one-handed device (for example, cane, single crutch, hemi-walker), able to independently walk or even and uneven surfaces and negotiate stairs with or without railings. 02 – Requires use of a two-handed device (for example, walker, or crutches) to walk alone on a level surface and/or requires human supervision or assistance to negotiate stairs or steps or uneven surfaces. 03 – Able to walk only with the supervision or assistance of another person at all times. 04 – Chairfast, unable to ambulate but is able to wheel self independently. 05 – Chairfast, unable to ambulate and is unable to wheel self. 06 – Bedfast, unable to ambulate or be up in a chair. 99 – No iQIES Assessment found
Archived Claims
FISS archives claim data on processed claims after 18 months from the date the claim is processed. Archived claims can be identified by status/location P O9998 or R O9998 (the letter "O" as in "offline" and not a "0" (zero)).
These claims can be accessed by selecting 12 (Claims) from the Inquiry Menu; typing your NPI in the NPI field, and entering the beneficiary's Medicare number in the MID field. Then tab to the S/LOC field and, enter P O9998 or R O9998. Press Enter. Archived claims do not display the beneficiary's name or provider reimbursement (PROV REIMB) amount, and if selected (type an S in the SEL field) all claim pages appear blank. The message "ADJUSTMENT CLAIM IS PRESENTLY OFFLINE PF10 TO RETRIEVE" will display.
Although the claim data is archived, you are able to retrieve an archived claim to inquire into how it was submitted and processed. For additional information on how to retrieve an archived claim, refer to the "Claims Correction" section of this manual.
This option is helpful if you need to verify revenue codes that can be billed with specific bill types. This screen also provides information to verify what additional information (e.g., units, HCPCS code) must accompany the revenue code.
From the Inquiry Menu, type 13 in the Enter Menu Selection field and press Enter.
You may also access this screen by typing 13 in the SC field if you are in an inquiry or claim entry screen.
The Revenue Code Table Inquiry screen (Map 1761) appears:
To view revenue code information, type the revenue code in the REV CD field and press Enter.
The REV CD field is a 4-digit field. If you enter a 3-digit revenue code and press Enter, FISS will add a zero to the first position.
To see all of the revenue code information for all types of bill (TOB), press F6 to scroll forward.
To make additional inquiries, simply enter a new revenue code over the previously entered code and press Enter. If you enter a new 3-digit revenue code over the previously entered code, the first digit must be a zero, or enter the 3-digit revenue code in the first 3 positions and delete the 4th digit before pressing Enter.
Press F3 to exit the Revenue Code Table Inquiry screen and return to the Inquiry Menu.
Map 1761 Field Descriptions
REV CD
Revenue code. A 4-digit field that represent the type of service, supply, or equipment being provided.
EFF DT
Effective date. The date the revenue code became effective (MMDDYY format).
IND
Effective date indicator. This date instructs the system to either use the "from" date of the claim or the system run date to perform edits for this revenue code. Values are:
F Claim from date R Claim receipt date D Claim discharge date
TRM DT
Termination date. The date the revenue code became invalid. (MMDDYY format).
NARR
Narrative. The English-language description for the revenue code.
TOB
Type of bill. The first two digits of the type of bill followed by an 'X' denoting the frequency.
ALLOW:
Allowable. This field indicates whether the revenue code is valid for the type of bill. Values are:
Y Yes N No
EFF-DT
Allowable effective date. The date the revenue code became a valid code (MMDDYY format).
TRM-DT
Allowable termination date. The date the revenue code was no longer valid (MMDDYY format).
HCPC:
Healthcare Common Procedure Code System. This field indicates whether the revenue code requires a HCPCS. Values are:
Y Yes N No V Validation of HCPCS is required
EFF-DT
HCPCS effective date. The beginning date the HCPCS code became required for this revenue code (MMDDYY format).
TRM-DT
HCPCS termination date. The date the HCPCS code was no longer required for this revenue code (MMDDYY format).
UNITS:
Units required. This field indicates whether units must be entered for this revenue code. Values are:
Y Yes N No
EFF-DT
Unit's effective date. The beginning date units became required for this revenue code (MMDDYY format).
TRM-DT
Unit's termination date. The date units were no longer required for this revenue code (MMDDYY format).
RATE:
Rate. This field indicates whether a rate must be entered for this revenue code. Values are:
Y Yes N No
Note: This field is currently not functional, and will always show "N".
EFF-DT
Rate's effective date. The beginning date for the requirement to enter a rate for this revenue code (MMDDYY format).
TRM-DT
Rate's termination date. The end date for the requirement to enter a rate for this revenue code (MMDDYY format).
This option is helpful if you need to inquire about Healthcare Common Procedure Coding System (HCPCS) code reimbursement or verify which revenue codes are allowable with HCPCS codes.
From the Inquiry Menu, type 14 in the Enter Menu Selection field and press Enter.
You may also access this screen by typing 14 in the SC field if you are in an inquiry or claim entry screen.
The HCPC Information Inquiry screen (Map 1771) appears:
Use your Tab key to move to the HCPC field and type the HCPCS code. Press Enter. FISS will automatically insert information in the CARRIER and LOC fields based on your geographic location.
Note for Hospice Providers: To determine if the HCPC code is allowable for hospice revenue codes, you must also enter an "R" in the IND field, and then press Enter.
Use the following function keys to move around the screen:
F3 – Exit (return to the Inquiry Menu)
F5 – Scroll up one page
F6 – Scroll down one page
F11 – Scroll right
F10 – Scroll left
Press F11 to move the screen to the right. Map 1772 will display. The type of data that displays will depend on the type of HCPCS code you enter. Press F10 to move back to the left of Map 1771. Refer to the following for more information.
If the HCPCS code is a durable medical equipment (DME) item, Map 1772 will display the new, rental and used rates for that DME item (screen example on the next page). Press F10 to move back to the left to Map 1771.
If the code is any other type of HCPCS code (non-DME), Map 1772 will display the 60 percent, 62 percent, rehabilitation, and professional service rates. Press F10 to move back to the right to Map 1771.
To inquire about other HCPCS codes, enter the HCPCS code over the previously entered HCPC and press Enter.
Press F3 to exit the HCPCS Information Inquiry screen and return to the Inquiry Menu.
Map 1772 Field Descriptions
CARRIER
Carrier. The carrier number assigned to your provider file. System generated.
LOC
The two position locality code which identifies the area where the provider is located.
HCPC
Healthcare Common Procedure Coding System. The HCPCS code to be reviewed on the screen.
MOD
HCPC Modifier. Multiple fees will be identified for the HCPCS code based on the modifier.
IND
HCPC indicator. Type an "R" to display hospice allowable revenue codes.
EFF DT
Effective date. The date the code became effective (MMDDYY format).
TERM DT
Termination date. The termination date for the code (MMDDYY format).
PROVIDER
The Medicare provider number assigned to your facility.
DRUG CODE
This field identifies whether the HCPCS code is a drug. The valid values are:
E – HCPCS is a drug
" " – HCPCS is not a drug
EFF. DATE
Effective date. The effective date for the rate listed (MMDDYY format).
TRM. DATE
Termination date. The termination date for the rate listed (MMDDYY format).
EFF
Effective date indicator. This indicator instructs the system to either use the 'from' and 'through' dates of the claim or the system run date to perform edits for this HCPCS. Values are:
F Claim from date R Claim receipt date D Discharge date
OVR
Override code. This field instructs the system in applying the services towards deductible and coinsurance. Values are:
0 Apply deductible and coinsurance 1 Do not apply deductible 2 Do not apply coinsurance 3 Do not apply deductible or coinsurance 4 No need for total charges (used for multiple HCPCS for single revenue code centers) 5 Rural health clinic or comprehensive outpatient rehabilitation facility psychiatric M Employer group health plan (EGHP) (only used on the 0001 total line for Medicare Secondary Payer (MSP)) N Non-EGHP (only used on the 0001 total line for MSP) X Bypass cost avoided MSP edits Y MSP cost avoided
FEE
Fee Indicator. The fee indicator received in the Physician Fee Schedule file. Valid values: B Bundled procedure R Rehab/Audiology Function Test/CORF Services
" " Default
OPH
Outpatient Hospital Indicator. The outpatient hospital indicator received in the physician fee schedule abstract test file. Valid values: O Fee applicable in Hospital Outpatient Setting 1 Fee not applicable in Hospital Outpatient Setting
" " Default
CAT
Category Code. This field identifies the category of the DME equipment. The valid values are:
1 Inexpensive or other routinely purchased DME 2 DME items requiring frequent maintenance and substantial servicing 3 Certain customized DME items 4 Prosthetic and orthotic devices 5 Capped rental DME items 6 Oxygen and oxygen equipment
PC/TC
Professional Component/Technical Component. Valid values are:
0 Pay the Health Professional Shortage Area (HPSA) bonus 1 Globally billed. Professional component for this service qualifies for the HPSA bonus payment 2 Professional component only, pay the HPSA bonus 3 Technical component only, do not pay the HPSA bonus 4 Global test only. Professional component of this service qualifies for the HPSA bonus payment 5 Incident codes, do not pay the HPSA bonus 6 Laboratory physician interpretation codes, pay the HPSA bonus 7 Physical therapy service, do not pay the HPSA bonus 8 Physician interpretation codes, pay the HPSA bonus 9 Concept of PC/TC does not apply, do not pay the HPSA bonus
ANES BASE VAL
Anesthesia base value. The anesthesia base values.
TYP
HCPCS Type. An 'M' indicator will display when the HCPCS associated with the revenue line originated from the Medicare physician fee schedule.
MSI
Multiple services indicator. The value of '5' identifies services that are subject to the multiple procedure payment reduction (MPPR).
ALLOWABLE
REVENUE CODES
Allowable revenue codes. The allowable revenue codes this HCPCS code may use in billing. This is a four-position field. When the last digit shows an "X," each variable for that revenue code is allowable. If this field is blank, the system will allow a HCPCS code on any revenue code.
HCPC
DESCRIPTION
HCPCS description. The English narrative description of the HCPCS code.
Map 1772 Field Descriptions – DME HCPCS
NEW
New purchase price. The price for the item if it was purchased new.
RENTAL
Monthly rental amount. The monthly rental charge in dollars for this particular HCPCS code.
USED
Used purchase price. The price for the item if it was purchased used.
Map 1772 Field Descriptions – non-DME HCPCS
60%RATE
60% reimbursement rate. The rate the system will use for calculating reimbursement for the HCPCS.
62% RATE or
62%/REDU
62% lab reimbursement rate. The rate the system will use for calculating reimbursement for the lab HCPCS. When the MSI field equals a '5', this field will dispay "62%/REDU" or the reduced therapy fee amount.
REHAB
Rehabilitation rate. The rate used by the system to calculate reimbursement for the HCPCS code for rehabilitation services billed.
PROF
Professional service rate. The rate used by the system to calculate reimbursement for the HCPCS code for professional services
NFACPE
Non-facility amount practice expense (PE) relative value units (RVUs). This field reflects the 20 percent reduction in non-facility PE RVUs.
This option is helpful if you need to confirm the validity of ICD-9 diagnosis or procedure codes. Note that ICD-9 codes are only valid for services provided prior to October 1, 2015.
From the Inquiry Menu, type 15 in the Enter Menu Selection field and press Enter.
You may also access this screen by typing 15 in the SC field if you are in an inquiry or claim entry screen.
The ICD-9-CM Code Inquiry screen (Map 1731) appears:
To inquire about a diagnosis code, enter the diagnosis code in the STARTING ICD9 CODE field and press Enter. Do not type the decimal point or zero-fill the code. To review a complete list of diagnosis codes, leave the STARTING ICD9 CODE field blank, and press Enter.
While FISS enables you to validate diagnosis codes, you should still have a current ICD-9-CM coding book in your office.
If more than one of the same code is listed, be sure to review the description, effective and termination dates, and use the most current code that applies to the service dates on your claim.
Press F6 to scroll forward through the list of diagnosis codes.
To make an additional inquiry, type the new diagnosis code over the previously entered diagnosis code and press Enter.
To inquire about a procedure code, type the letter P followed by the procedure code in the STARTING ICD9 CODE field and press Enter. To review a complete list of procedure codes, enter only the letter P in the STARTING ICD9 CODE field and press Enter.
Press F3 to exit and return to the Inquiry Menu.
Map 1731 Field Descriptions
STARTING ICD9 CODE
ICD-9-CM code. The ICD-9-CM code identifying a specific diagnosis or procedure.
DESCRIPTION
ICD-9-CM description. The narrative for the ICD-9-CM code.
EFFECTIVE/
TERM DATE
Effective/termination date. The effective and/or termination date for the ICD-9-CM code in MMDDYY format. (Up to three occurrences of dates can appear.) All ICD-9 codes will display a termination code of 093015.
This option allows you to view adjustment reason codes and their narratives. Use these codes to identify reasons for an adjustment. Adjustment reason codes must be submitted on adjustment and cancellation claims when using FISS to submit these type of billing transactions. Refer to the "Claims Correction" section of this manual for additional information about using FISS to submit adjustment and cancellation claims.
From the Inquiry Menu, type 16 in the Enter Menu Selection field and press Enter.
You may also access this screen by typing 16 in the SC field if you are in an inquiry or claim entry screen.
The Adjustment Reason Codes Inquiry screen (Map 1821) appears:
Press Enter to view a complete listing of adjustment reason codes on Map 1821, or type an adjustment reason code in the REASON CODE field and press Enter to display Map 1822.
On Map 1821, press F6 to scroll forward through the list of adjustment reason codes. Press F5 to scroll backwards.
Type S in the S field to select a specific code. Press Enter to view Map 1822.
You can only select one code at a time.
The Adjustment Reason Code Update Scrn Inquiry (Map 1822) appears. The difference between Map 1821 and Map 1822 is that Map 1822 allows you to see the full narrative.
Press F7 to return to Map 1821. Press F3 to return to the Inquiry Menu.
Map 1821 Field Descriptions
MNT:
Identifies your operator ID and today's date. For intermediary use only.
CLAIM TYPES:
Claim types. The claim types identified for each adjustment reason code. The claim types are:
I Inpatient/SNF O Outpatient H Home Health/CORF A All Claims
PLAN CODE:
Plan Code. For intermediary use only.
REASON CODE:
Adjustment reason code. To review a particular adjustment reason code, enter the adjustment reason code value in this field. This field can be used instead of the S (selection) field described below.
S
Selection. This field is used to make a selection to view information for a particular adjustment reason code.
PC
Plan Code. For intermediary use only.
RC
Adjustment reason code. This field displays the adjustment reason codes.
HC
HIGLAS adjustment reason code. This field identifies the HIGLAS (Healthcare Integrated General Ledger Accounting System) adjustment reason code.
TYPE
Claim type. The type of claim associated with this reason code. (Refer to the "CLAIM TYPES" field, above, for valid values.)
NARRATIVE
Narrative. The description for the adjustment reason code.
Map 1822 Field Descriptions
MNT:
Identifies the last operator who created or revised this screen and the date. For intermediary use only.
CLAIM TYPES:
The claim types identified for each adjustment reason code. Valid claim types are:
I Inpatient/SNF O Outpatient H Home Health/CORF A All Claims
PLAN CODE:
Plan Code. For intermediary use only.
REASON CODE
Adjustment reason code identifying the reason for an adjustment.
HIGLAS REASON
CODE
HIGLAS reason code. Used to crosswalk the FISS adjustment reason code to the HIGLAS adjustment reason code.
CLAIM TYPE
Claim type. The type of claim associated with this reason code. (Refer to the "CLAIM TYPES" field, above, for valid values.)
NARRATIVE
Narrative. The description for the adjustment reason code.
The Reason Codes Inquiry screen provides an explanation/description of the reason code on your claim. You will use this option often to determine what actions are necessary to correct claims in the Return to Provider (RTP) file (T B9997). Rather than selecting option 17 from the Inquiry Menu, you will most likely access the reason codes by pressing F1 when you are in the Claims Entry or Claims Correction options in FISS.
From the Inquiry Menu, type 17 in the Enter Menu Selection field and press Enter.
You may also access this screen by typing 17 in the SC field if you are in an inquiry or claim entry screen or by pressing F1 while you are inquiring, entering or correcting a claim.
The Reason Codes Inquiry screen (Map 1881) appears:
Enter the reason code in the REAS CODE field and press Enter.
Reason codes are found at the bottom left corner of the FISS claim pages. Whenever a reason code appears on your claim, the easiest way to access it is to press your F1 key. Note that having a reason code present on your claim does not mean that it needs correction. For example, even when a claim is in a "P" (paid) status, FISS still assigns a reason code to the claim. Refer to the "Claims Corrections" section of this manual to further understand when you need to correct a claim.
Please note that you may need to press F6 to scroll forward to see all of the reason code narrative.
To see the ANSI reason code that corresponds to the FISS reason code press your F8 key. The ANSI Related Reason Codes Inquiry screen (Map 1882) appears.
Map 1881 Field Descriptions
MNT:
Identifies the last operator who created or revised this screen and the date. For intermediary use only.
PLAN IND
Plan indicator. For intermediary use only.
REAS CODE
Reason code. The reason code identifies a specific condition assigned to the claims during processing. The following identifies the meaning of the first digit of the reason code.
First Digit of Reason Code
Meaning
Example
1
Consistency Edits
11801 (missing/invalid point of origin, previously known as source of admission)
3
FISS
37402 (claims not submitted sequentially)
38107 (system cannot match final claim to processed RAP)
5
Medical
Review
56900 (no response to additional development request)
A-Z
(except W)
CWF
C7080 (A line item date of service overlaps a date of service on an inpatient claim.)
U5181 (occurrence code 27 required when claim overlaps certification or recertification period)
W
Integrated
Outpatient
Code Editor
W7A01 (invalid first diagnosis code)
3
FISS
32402 (invalid HCPCS code)
NARR TYPE
Narrative type. An "E" indicates the narrative is for external users.
EFF DATE
Effective date. The effective date of the reason code.
MSN REAS
Medicare Summary Notice Reason. If a denial is made on the claim, the denial reason code in this field generates the narrative for the Notes section of the Medicare Summary Notice (MSN).
EFF DATE
Effective Date. The effective date for the alternate reason.
TERM DATE
Termination Date. The termination date for the alternate reason.
EMC ST/LOC
Electronic media claims status and location. The status and location set up for automated claims that encounter the reason code. If this field is blank, the HC/PRO ST/LOC field will apply.
HC/PRO ST/LOC
Hardcopy/Quality Improvement Organization (QIO) Status/Location.
The status and location set up for hardcopy or QIO claims, which encounter the reason code.
PP LOC
Post-pay location. This field identifies the post-pay location for postpay development activities.
CC IND
Clean claim indicator. This field instructs the system whether to pay interest. Values are:
A PIP other. B PIP clean. C Non-PIP other. D Non-PIP clean. E Additional information was requested (non-PIP). F Additional information was requested (PIP). G A reply was received from the Common Working File (CWF) providing a date of death, which required development in order to process the claim (non-PIP). H A reply was received from CWF providing a date of death, which required development in order to process the claim (PIP). I A non-definitive response was received from CWF requiring development (non-PIP). J A non-definitive response was received from CWF requiring development (PIP). K A definitive response was not received from CWF within 7 days (delayed response) (non-PIP). L A definitive response was not received from CWF within 7 days (delayed response) (PIP). M The claim was manually set to non-clean. This will only occur in rare situations such as a claim requiring development external to the intermediary's operation (non-PIP). N The claim was manually set to non-clean. This will only occur in rare situations such as a claim requiring development external to the intermediary's operation (PIP). O The claim is a sequential claim in which the prior claim was pending (non-PIP). P The claim is a sequential claim in which the prior claim was pending (PIP).
TPTP
A – B
For intermediary use only.
NPCD
A – B
For intermediary use only.
HD CPY
A – B
For intermediary use only.
NB ADR
For intermediary use only.
CAL DY
For intermediary use only.
C/L
Identifies if the reason code applies to the claim or a line item.
NARRATIVE
Narrative for the specific reason code.
Map 1882 Field Descriptions
MNT:
Identifies the last operator who created or revised this screen and the date. For intermediary use only.
REASON CODE:
Reason code. The reason code identifies a specific condition assigned to the claims during processing.
PIMR ACTIVITY CODE:
Program integrity management reporting (PIMR) activity code. The PIMR activity code for which the reason code is being categorized. Valid values are:
AI Automated CCI edit AL Automated locally developed edit AN Automated national edit CP Prepay complex probe review DB TPL or demand bill claim review MR Manual routine review PS Prepay complex provider specific review RO Reopening SS Prepay complex service specific review
DENIAL CODE:
PIMR denial reason code. The denial reason code for which the reason code is being categorized. Valid values are:
100001 Documentation Does Not Support Service 100002 Investigation/Experimental 100003 Item/Services Excluded From Medicare Coverage 100004 Requested Information Not Received 100005 Services Not Billed Under The Appropriate Revenue Or Procedure Code (Include Denials Due To Unbundling In This Category 100006 Services Not Documented In Record 100007 Services Not Medically Reasonable And Necessary 100008 Skilled Nursing Facility Demand Bills 100009 Daily Nursing Visits Are Not Intermittent/ Part Time 100010 Specific Visits Did Not Include Personal Care Service 100011 Home Health Demand Bills 100012 Ability To Leave Home Unrestricted 100013 Physician's Order Not Timely 100014 Service Not Ordered/Not Included In Treatment Plan 100015 Services Not Included In Plan Of Care 100016 No Physician Certification (E.G. Home Health) 100017 Incomplete Physician Order 100018 No Individual Treatment Plan 100019 Other
MR INDICATOR:
Complex manual medical review. Identifies whether the service received complex manual medical review. Valid values are:
" " The services did not receive manual medical review. Y Medical records received. This service received complex manual medical review. N Medical records were not received. This service received routine manual medical review
CWF NCD IND:
Common Working File National Coverage Determination Indicator – This field will identify if the reason code is associated with a CWF NCD reason code. The field will be populated with a Y (yes) or N (no).
" " The medical policy parameter is not PCA-related and is not included in the PCA transfer files. Y The medical policy parameter is PCA-related and is included in the PCA transfer files. N The medical policy parameter is not PCA-related and is not included in the PCA transfer files.
LMRP/NCD ID:
Local medical review policy (LMRP) (currently known as local coverage determination (LCD)) and/or national coverage determination (NCD) identification number. The LMRP/NCD ID number that are assigned to the FMR reason code for reporting on the Medicare Summary Notice. Intermediary/CMS defined.
ADJ REASONS
Adjustment reasons. This field provides the American National Standards Institute (ANSI) code that explains why an adjustment is being processed.
GROUPS
Groups. This field provides the ANSI code indicating the financial responsibility for the amount of the adjustment or identifies a postinitial adjudication adjustment in the X12 835 case segment. The five group codes are:
PR Patient responsibility CO Contractual obligations OA Other adjustment CR Correction to or reversal of a prior decision 96 Noncovered charges
REMARKS
Remarks. This field provides the ANSI code that identifies the reason for non-payment. This is a five-position alphanumeric field, with four occurrences.
APPEALS (A)
Appeals (A). This field provides the ANSI code indicating the appeal rights related to the initial Part A determination.
APPEALS (B)
Appeals (B). This field provides the ANSI code indicating the appeal rights related to the initial Part B determination. Not applicable to hospice.
EMC CATEGORY
Electronic media claim category code. This field provides the ANSI code that identifies the EMC category of the claim returned on a 277 claim status response.
HC CATEGORY
Hard copy claim category code. This field provides the ANSI code that identifies the hard copy category of the claim returned on a 277 claim status response.
EMC STATUS
Electronic media claim status code. This field provides the ANSI code that identifies the EMC status of the claim returned on a 277 claim status response.
HC STATUS
Hard copy claim status code. This field provides the ANSI code that identifies the hard copy status of the claim returned on a 277 claim status response.
This option is applicable to ambulance providers. It provides the geographic area definitions (rural, urban, and super rural) by zip code and by state.
From the Inquiry Menu, type 19 in the Enter Menu Selection field and press Enter.
You may also access this screen by typing 19 in the SC field if you are in an inquiry or claim entry screen.
The Zip Code Inquiry screen (Map 1171) appears.
Enter a Zip Code in the ZIP CODE field, and Press Enter.
Map 1171 Field Descriptions
ZIP CODE
Identifies the Zip Code on the Zip Code file.
PLUS-FOUR
Identifies the Zip Code 4 digit extension.
SEL
The selection field. Tye "S" in the SEL field to access Map 1172 which displays the list of extensions associated with a zip code and a plus-four flag indicator.
ZIP
Identifies the Zip Code on the Zip Code file. The first Zip Code on the Zip Code file displays first.
PLUS-FOUR
Identifies the Zip Cod 4 digit extension.
CARRIER
Identifies the carrier number assignede to the HCPC.
LOC
Identifies the locality identification number for the area (or county) where the provider is located.
RURAL IND
Identifies the rural indicator. Valid values are:
U – Urban
R – Rural
B – Rural Bonus
RURAL IND2
Identifies the rural indicator. Valid values are:
U – Urban
R – Rural
B – Rural Bonus
PIND
Identifies the ASP price bucket indicator. Valid values are:
A through Z with the exception of H, I, O, R, S = ASP price bucket indicators
PLUS4-FLAG
Identifies the plus 4 flag indicator. Valid values are:
0 – No +4 Extnesion
1 – +4 Extension
STATE
Identifies the state associated with the Zip Code.
This option is used to retain the history of all Occurrence Span Codes (OSCs) billed by Long Term Care Hospital (LTCH), Inpatient Psychiatric Facility (IPF), and Inpatient Rehabilitation Facility (IRF) providers.
From the Inquiry Menu, type 1A in the Enter Menu Selection field and press Enter.
You may also access this screen by typing 1A in the SC field if you are in an inquiry or claim entry screen.
The DDE OSC Repository Inquiry screen (Map 11A1) appears.
Enter the beneficiary Medicare number in the MID field and the admission date in the ADMIT DATE field, and press Enter.
Map 1171 Field Descriptions
PROVIDER
Identifies your Medicare provider number.
MID
The beneficiary's Medicare number.
ADMIT DATE
The beneficiary's admission date.
DOCUMENT CONTROL NUMBER
Identifies the document control number (DCN) of the claim.
OSC
The occurrence span code that identifies events that relate to the payment of the claim.
FROM DATE
Identifies the occurrence span from date related to the claim.
TO DATE
Identifies the occurrence span to date related to the claim.
This option provides a summary of all of your facility's billing transactions that are currently processing within FISS by status/location and type of bill. This option will assist you in getting a quick picture of where all of your processing claims are located in FISS. CGS recommends that you check option 56 when you first sign into FISS for the day. This screen is only updated in the evening, Monday through Friday. By reviewing option 56, you can easily identify if there are claims:
On the payment floor (P B9996), which means your claim has been approved for payment;
In an Additional Development Request (ADR) status (S B6001), which means that CGS has requested that you submit additional information; or
In a Return to Provider (RTP) status (T B9997), which means that the claim needs to be corrected by your facility.
From the Inquiry Menu, type 56 in the Enter Menu Selection field and press Enter.
You may also access this screen by typing 56 in the SC field if you are in an inquiry or claim entry screen.
The Claim Summary Totals Inquiry screen (Map 1371) appears:
To obtain the summary of billing transactions, press Enter.
If you are authorized to view other provider number information (branch office), you will have access to the PROVIDER field to enter another provider number.
You may also enter a specific status/location (e.g., T B9997) in the S/LOC field, or a category type in the CAT field to narrow the selection.
Once the information is displayed, you can identify where your claims are within FISS by looking at the S/LOC field. Option 56 identifies how many claims are in a particular status/location. The CAT column identifies the first two digits of the type of bill and the category code for each specific status/location. The CLAIM COUNT column provides the number of claims in that specific status/location. Refer to the field description for a complete list of CAT codes. You may need to press F6 to see the complete list of status/locations.
In the home health provider screen example above, this provider can quickly identify:
There are a grand total (GT) of 17 claims for a total charge of $15,429.08 and payment amount of $7,786.55.
The status/location P B9996 (payment floor) has a total count (TC) of four claims. The four claims have a total charge of $00.00 and a total payment of $7,786.55. All four claims are type of bill (TOB) 32X (CAT code 32). The total charge amount $00.00 indicates that the 32X TOB billing transactions are requests for anticipated payments (RAPs).
The status/location S B6001 (Additional Development Request (ADR) status) has a total count (TC) of one claim with the TOB 32X (CAT codes 32).
The status/location T B9997 (Return to Provider (RTP) status) has a total count (TC) of seven claims. All claims are TOB 32X (CAT code 32) and all were placed in RTP because of clerical errors (CAT code NM).
Option 56 only displays claims that are currently processing in FISS. Claims that are finalized in the system (i.e., with status/locations of R B9997, P B9997, D B9997) are not included within this option. In addition, option 56 only displays claims by status/location code. You can use option 56 in conjunction with option 12 if you want to identify which claims are in a particular status/location code.
If you want to know specifically which six claims are in P B9996, press F3 to exit option 56. Select 12 (Claims) from the Inquiry Menu and press Enter. Type your facility's NPI number in the NPI field, then tab to the S/LOC field and enter P B9996. Press Enter. All the claims for your facility that are in status/location P B9996 will appear. See below. Remember that you may need to press F6 to scroll forward to see all claims.
When you view option 56, pay particular attention to whether you have claims in status/locations S B6001 and T B9997. These two status/locations require that you take action.
Claims in S B6001 require that you submit the information being requested via the ADR. Select option 12 (Claims) from the Inquiry Menu to determine which claims were selected, and what documentation you need to submit to respond to the ADR. For information about identifying and responding to ADRs, refer to the "Claims (Option 12)" information found earlier in this chapter.
Claims in the RTP status/location, T B9997, require that you make the necessary corrections to the claims. Select 03 (Claims Correction) from the Main Menu to correct claims. Refer to the "Claims Corrections" section in this manual for more information on correcting claims.
The TOTAL PAYMENT column identifies the payment amount for those claims that have been approved for payment (on the payment floor) and are in status/location (P B9996).
Option 56 updates when the system cycle runs each night, Monday through Friday. Therefore, if option 56 indicates that you have two claims to correct, and you immediately correct both claims, option 56 will continue to indicate that you have two claims to correct until the screen updates during the nightly cycle. Please note that nightly cycles do not typically run on Federal holidays.
After suppressing the view of a claim, it will no longer display in the RTP file; however, when viewing Claim Count Summary (option 56) or the Claim Inquiry (option 12) screens, the claim may still appear in status/location T B9997 for several weeks, until FISS purges suppressed claims to the "I" status.
Once you have reviewed the information on option 56, press F3 to exit and return to the Inquiry Menu. You can then select 12 (Claims) from the Inquiry Menu to view the specific claims within each status/location.
Map 1371 Field Descriptions
PROVIDER
Your Provider Transaction Access Number (PTAN).
S/LOC
Status/Location. Enter a specific status/location code in this field to view the number of billing transactions in that specific status/location. CGS suggests leaving this blank so you can see the status/locations of all the billing transactions currently processing.
CAT
Category. Enter a specific category to view the number of billing transaction under that specific category. CGS suggests leaving this blank so you can see all claims currently processing. See below for the valid CAT codes.
NPI
Your facility's National Provider Identifier (NPI) number.
S/LOC
This identifies the current status/location of the claims.
CAT
The Category field identifies different items within the list. Valid values are:
## – First two digits of the type of bill, e.g., 11, 13, 32, 34, 72, 74, 81, 82. GT – Grand total of claims currently in process. TC – Total count of claims in a particular status/location. AD – An adjustment NM – Non-medical indicates the claim was placed in RTP because of a clerical error. MP – Medical policy indicates the claim was placed in RTP because of nonclerical error.
CLAIM COUNT
The total claim count for each specific status/location.
TOTAL CHARGES
The total dollar amount of charges submitted by the provider for the total number of claims identified in the claim count.
TOTAL PAYMENT
The total dollar payment amount calculated by the system. An amount will only show in this column for claims on the payment floor (P B9996).
The Home Health Pymt Totals (Map 1B41) screen tracks your outlier payment and Home Health Prospective Payment System (HH PPS) payment totals for the purpose of applying the annual limitation. Data for up to three years is available. Once the HH PPS claim (3X9 TOB) or adjustment (3X7, 3XG, 3XH, or 3XI TOB) has processed (FISS S/LOC P B9997), they are available to view using this inquiry option.
From the Inquiry Menu, type 67 in the Enter Menu Selection field and press Enter.
You may also access this screen by typing 67 in the SC field if you are in an inquiry or claim entry screen.
The Home Health Payment Totals Inquiry screen (Map 1B41) appears:
Type your facility’s Provider Transaction Access Number (PTAN) in the PROVIDER field.
Tab to the NPI field and type your facility’s National Provider Identifier (NPI), and press Enter.
The Home Health Payment Totals Inquiry (Map 1B41) screen displays the total home health payment and outlier totals for up to three years.
The payment information is updated only after HH PPS claims/adjustments are in FISS status/location (S/LOC) P B9997 (paid).
Please note that the "TO" date on your HH PPS billing transaction determines the calendar year where the payment was applied and where the claim’s detail information can be accessed.
To display a list of claims that comprise the outlier and payment totals for a specific year, type an S in the SEL field next to that year. Press Enter.
The Home Health Payment Totals Detail (MAP 1B42) screen appears with individual claim data and the value code amount listed under the corresponding value code. You may need to press F6 to scroll forward to view the entire listing of claims data available on the "Detail" screen.
To return to the Home Health Payment Totals Inquiry (Map 1B42) screen, press F7. To return to the Inquiry Menu, press F3.
Map 1B41 Field Descriptions
PROVIDER
Your Provider Transaction Access Number (PTAN).
NPI
Your facility's National Provider Identifier (NPI) number.
SEL
Selection. This field is used to view claim data for a particular year.
YEAR
The calendar year in which the outlier and payment totals are comprised.
OUTLIER TOTAL
The total outlier payments made on HH PPS home health claims for a calendar year. Note that Requests for Anticipated Payment (RAPs), (type of bill 322), are excluded from this total. The "TO" date on the HH PPS claim determines the calendar year in which the outlier is applied.
PAYMENT TOTAL
The total HH PPS payment made on home health claims for a calendar year. Note that Requests for Anticipated Payment (RAPs), (type of bill 322), are excluded from this total. The "TO" date on the HH PPS claim determines the calendar year in which the outlier is applied.
Map 1B42 Field Descriptions
PD DT SRCH
Enter a paid date to search for specific records for the same provider and NPI number.
PROVIDER
Your Provider Transaction Access Number (PTAN).
NPI
Your facility's National Provider Identifier (NPI) number
YEAR
The calendar year that was selected to view the claim detail data.
TO DATE
The month and day of the "through" date of the claim.
MID
The beneficiary's Medicare ID number on the claim.
DCN
The document control number of the claim.
VALUE CD 17
The dollar amount associated with the outlier payment on the claim.
VALUE CD 64
The dollar amount associated with the HH PPS payment from the Part A trust fund.
VALUE CD 65
The dollar amount associated with the HH PPS payment from the Part B trust fund
PAID DATE
The claim paid date (displayed in a CCYYMMDD format).
TOTAL PAID
The total claim payment amount for each of the three value codes (17, 64, and 65) for an individual claim displayed.
TOTALS:
The total amount paid for all HH PPS payments. Note: a total HH PPS payment amount for all calendar year HH PPS claims/adjustments will only appear on the last page of this screen. You will need to press the F6 key in order to scroll forward to reach the last page.
This option allows you to view the narrative for the ANSI (American National Standards Institute) codes. ANSI reason codes appear on remittance advices, and provide additional information, such as provider appeal rights and claims processing determinations.
From the Inquiry Menu, type 68 in the Enter Menu Selection field and press Enter.
You may also access this screen by typing 68 in the SC field if you are in an inquiry or claim entry screen.
The ANSI Standard Codes Inquiry screen (Map 1581) appears:
Type a record type, (A, C, G, R, S, or T) in the RECORD TYPE field and press Enter to display the ANSI reason codes for that particular record type.
A = Appeals
C = Adjustment reason
G = Groups
R = Reference remarks
S = Claim status
T = Claim category
Press F6 to page forward through the various ANSI reason codes. Press F5 to scroll backwards.
Type S in the S field to view the entire narrative for the ANSI reason code and press Enter.
The ANSI Standard Reason Codes Inquiry screen (Map 1582) appears.
Press F7 to return to Map 1581.
To display one specific ANSI code, type the appropriate record type (e.g., A, C, G, R, S, or T) in the RECORD TYPE field. Type the ANSI Standard Code that you wish to view in the STANDARD CODE field and press Enter. The Map 1582 will display.
When Record Type ‘C’ is selected, Map 1582 will include a next page (F8) option. Press F8 to display the CARC RARC Group Combinations Inquiry screen (Map 1583).
When the Record Type ‘C’ was selected, press F8 to display Map 1583, or press F7 to return to Map 1581.
Press F7 to return to Map 1582. Press F7 again to return to Map 1581.
Map 1581 Field Descriptions
RECORD TYPE
The record type for the ANSI standard code. Valid values are:
A Appeals C Adjustment Reasons G Groups R Reference Remarks S Claim Status T Claim Category
STANDARD CODE
The standard code within the above record type.
S
The selection field used to view the entire narrative of a specific ANSI code.
RT
The record type of the ANSI code being selected.
CODE
The ANSI code being selected.
TERM DT
The date that the ANSI code was deactivated. (MMDDYY)
NARRATIVE
The description of the ANSI code.
Map 1582 Field Descriptions
MNT:
Identifies the last operator who created or revised his screen and the date. For intermediary use only.
RECORD
TYPE
The record type for the ANSI code.
STANDARD CODE
The ANSI code within the above record type.
NARRATIVE
The description of the ANSI code.
Map 1583 Field Descriptions
MNT:
Identifies the last operator who created or revised his screen and the date. For intermediary use only.
CARC
Identifies the claim adjustment reason code (CARC)
SCENARIO
Identifies defined business scenarios. Only displays if a Record Type 'C' is selected. Valid values are:
1 – Additional information required – missing/invalid/incomplete documentation
2 – Additional information required – missing/invalid/incomplete data from submitted claim
3 – Billed service not covered by health plan
4 – Benefit for billed service not separately payable
PAGE 01 OF 01
Identifies the page number.
SEL
Intermediary use only.
RARC
Identifies the remittance advice remark code (RARC).
GROUP CODES
Identifies the group code. Up to four occurrences may display.
CAQH/MAC
Identifies whether the code combinations have been approved by the CAQH Committee on Operating Rules for Information Exchange (CORE). Valid values are:
C Code combination is approved
M The MAC has added the code combination and is awaiting approval from CAQH CORE
CR#
Identifies the change request number that made the change to CARC/RARC/GROUP combination.
ADD DATE
Identifies the date for which the CARC/RARC/GROUP combination were added.
USER ID
The job number identifying that the update or add is based on a system change.
MAINT DATE
Identifies the last maintenance date for this file.
ERR
Error Code.
USER ID
Intermediary use only
MNT DATE
Identifies the last maintenance date for this file.
This option identifies the three most recent Medicare payments issued to your facility.
From the Inquiry Menu, type FI in the Enter Menu Selection field and press Enter.
The Check History screen (Map 1B01) appears.
To view current check history, type your:
National Provider Identifier (NPI) in the NPI field; or
Provider Transaction Access Number (PTAN) in the PROV field and your NPI in the NPI field.
Press Enter to see check history for the three most recent reimbursements that were distributed to your facility either by check or Electronic Funds Transfer (EFT). The PTAN will display in the PROV field, after you type the NPI in the NPI field and press Enter.
Please note that one day is added to the paid date (DATE field) that appears in the Check History screen. For example, although the Check History screen above shows 1024 (MMDD) in the DATE field, the screen was viewed on 10/23. The RA/ERA for the paid amount $916.56 will be dated 10/23. In addition, when viewing each individual claim record in FISS, that appears on that RA/ERA, the paid date will display as 10/23.
Check numbers that start with the letters EFT (e.g., EFT1234567) indicate that your facility receives its reimbursement via Electronic Funds Transfer (EFT).
Map 1B01 Field Descriptions
PROV
Your Provider Transaction Access Number (PTAN).
NPI
Your facility's National Provider Identifier (NPI).
CHECK #
The check number or EFT transaction number associated with the issued payment.
DATE
The date of the issued payment (YYMMDD format).
AMOUNT
The dollar amount of the payment issued. This amount can reflect all payments from Medicare (e.g., claims, cost report settlements, etc).
This option is helpful if you need to confirm the validity of ICD-10-CM (diagnosis) or ICD-10-PCS (procedure) codes. ICD-10-CM coding became effective October 1, 2015.
From the Inquiry Menu, type 1B in the Enter Menu Selection field and press Enter.
You may also access this screen by typing 1B in the SC field and pressing Enter, if you are in an inquiry or claim entry screen.
The ICD-10-CM Code Inquiry screen (Map 1C31) appears:
To inquire about a diagnosis code, type a D in the DIAG/PROC field and the diagnosis code in the STARTING ICD 10 CODE field and press Enter. Do not type the decimal point or zero-fill the code. To review a complete list of diagnosis codes, leave the STARTING ICD 10 CODE field blank, and press Enter.
If more than one of the same code is listed, be sure to review the description, effective and termination dates, and use the most current code that applies to the service dates on your claim.
Press F6 to scroll forward through the list of diagnosis codes.
To make an additional inquiry, type a D in the DIAG/PROC field and the other diagnosis code over the previously entered diagnosis code and press Enter.
To inquire about a procedure code, type the letter P in the DIAG/PROC field and the procedure code in the STARTING ICD 10 CODE field and press Enter. To review a complete list of procedure codes, type the letter P in the DIAG/PROC field and press Enter. Leave the STARTING ICD 10 CODE field blank.
Press F3 to exit and return to the Inquiry Menu.
Map 1731 Field Descriptions
DIAG/PROC
Identifies whether this is an ICD-10 diagnosis or procedure code. Valid values are:
D Diagnosis code
P Procedure code
STARTING ICD 10 CODE
ICD-10-CM code. The ICD-10-CM code identifying a specific diagnosis or procedure.
D/P
Identifies whether this is an ICD-10 diagnosis or procedure code (D or P).
ICD 10 CODE
The ICD-10 code used to identify a specific diagnosis or procedure.
SEQ CODE
Identifies the number of times CMS has terminated and then reactivated a given ICD-10 code with a different meaning.
DESCRIPTION
The ICD-10-CM code description.
EFFECTIVE/
TERM DATE
Effective/termination date. The effective and/or termination date for the ICD-10 code in MMDDYY format. (Up to three occurrences of dates can appear.)
This option allows providers to view the practice location address for an off-campus, outpatient, or provider-based department of a hospital.
Effective April 1, 2019, system edits were activated that require the service facility address reported on the claim to be an exact match to the provider practice file address provided in this screen. For additional information, please reference CMS MLN Matters article SE18023
From the Inquiry Menu, type 1D in the Enter Menu Seletion field and press Enter.
You may also access this screen by typing 1C in the SC field and pressing Enter, if you are in an inquiry or claim entry screen.
The PROV PRACTICE ADDR QUER screen (MAP1AB1) appears.
Map 1731 Field Descriptions
NPI
The providers National Provider Identifier (NPI) number.
OSCARE
Online Survey Certification and Reporting System (OSCAR).
SEL
Enter an "S" in thie field to select each record for the OSCAR and/or NPI.
NPI
The providers National Provider Identifier (NPI) number.
OSCAR
Online Survey Certification and Reporting System (OSCAR).
PRAC EFF DT
The effective date of the Practice.
PRAC TERM DT
The termination date of the Practice.
ADDRESS
The Practice Provider's address information.
ZIP
The Practice Provider's zip code.
To access additional information, type an S in the SEL field. Map 1AB2 will display.
Map 1AB2 Field Descriptions
NPI
The providers National Provider Identifier (NPI) number.
OSCAR
Online Survey Certification and Reporting System (OSCAR).
PRAC EFF DT
The effective date of the Practice.
PRAC TERM DT
The termination date of the Practice. When there is no actual practice termination date, the default value of 123119999 will display.
PRACTICE LOCATION KEY
The Practice Location Key from the PECOS Extract file.
OTHER PRACTICE
Identifies where the PECOS record is for an other practice.
TYPE OF PRACTICE
The Practice type.
ADDRESS 1
Address line 1 for the provider's practice location.
ADDRESS 2
Address line 2 for the provider's practice location.
CITY
The city for the provider's practice location.
STATE
The state for the provider's practice location.
ZIP
The zip for the provider's practice location.
NPI EFF DT
The effective date of the provider's NPI.
NPI TERM DT
The termination date of the provider's NPI. When there is no actual termination date, the default value of 123119999 will display.
This option is helpful if you need to inquire about Healthcare Common Procedure Coding System (HCPCS) code reimbursement or verify which revenue codes are allowable with HCPCS codes.
From the Inquiry Menu, type 1E in the Enter Menu Selection field and press Enter.
You may also access this screen by typing 1E in the SC field if you are in an inquiry or claim entry screen.
The New HCPC Information Inquiry screen (Map 1E01) appears:
Use your Tab key to move to the HCPC field and type the HCPCS code. Press Enter. FISS will automatically insert information in the CARRIER and LOC fields based on your geographic location.
To determine if the HCPC code is allowable for hospice revenue codes, you must also enter an "R" in the IND field, and then press Enter.
Use the following function keys to move around the screen:
F3 – Exit (return to the Inquiry Menu)
F5 – Scroll up one page
F6 – Scroll down one page
F11 – Scroll right
F10 – Scroll left
Press F11 to move the screen to the right. The New HCPC Rates Inquiry screen (Map 1E02) will display. Press F10 to move back to the left of Map 1E01.
To inquire about other HCPCS codes, enter the HCPCS code over the previously entered HCPC and press Enter.
Press F3 to exit the HCPCS Information Inquiry screen and return to the Inquiry Menu.
Map 1E01 Field Descriptions
CARRIER
Carrier. The carrier number assigned to your provider file. System generated.
LOC
The two-position locality code which identifies the area where the provider is located.
HCPC
Healthcare Common Procedure Coding System. The HCPCS code to be reviewed on the screen.
MOD
HCPC Modifier. Multiple fees will be identified for the HCPCS code based on the modifier.
IND
HCPC indicator. Type an "R" to display hospice allowable revenue codes.
FEE TYPE
This identifies the fee file the HCPC was obtained from. The valid values are:
ISNF
RHHI
OTHR
CLAB
CLFS
IDME
ABST
MAMM
DRUG
AMBF
SUP1
SUP2
EFF. DT
Effective date. The date the code became effective (MMDDYY format).
TRM. DT
Termination date. The termination date for the code (MMDDYY format).
PROVIDER
The Medicare provider number assigned to your facility.
EFF. DATE
Effective date. The effective date for the rate listed (MMDDYY format).
TRM. DATE
Termination date. The termination date for the rate listed (MMDDYY format).
EFF
Effective date indicator. This indicator instructs the system to either use the 'from' and 'through' dates of the claim or the system run date to perform edits for this HCPCS. Values are:
F Claim from date R Claim receipt date D Discharge date
OVR
Override code. This field instructs the system in applying the services towards deductible and coinsurance. Values are:
0 Apply deductible and coinsurance 1 Do not apply deductible 2 Do not apply coinsurance 3 Do not apply deductible or coinsurance 4 No need for total charges (used for multiple HCPCS for single revenue code centers) 5 Rural health clinic or comprehensive outpatient rehabilitation facility psychiatric M Employer group health plan (EGHP) (only used on the 0001 total line for Medicare Secondary Payer (MSP)) N Non-EGHP (only used on the 0001 total line for MSP) X Bypass cost avoided MSP edits Y MSP cost avoided
FEE
Fee Indicator. The fee indicator received in the Physician Fee Schedule file. Valid values: B Bundled procedure R Rehab/Audiology Function Test/CORF Services
" " Default
OPH
Outpatient Hospital Indicator. The outpatient hospital indicator received in the physician fee schedule abstract test file. Valid values: O Fee applicable in Hospital Outpatient Setting 1 Fee not applicable in Hospital Outpatient Setting
" " Default
CAT
Category Code. This field identifies the category of the DME equipment. The valid values are:
1 Inexpensive or other routinely purchased DME 2 DME items requiring frequent maintenance and substantial servicing 3 Certain customized DME items 4 Prosthetic and orthotic devices 5 Capped rental DME items 6 Oxygen and oxygen equipment
PC/TC
Professional Component/Technical Component. Valid values are:
0 Pay the Health Professional Shortage Area (HPSA) bonus 1 Globally billed. Professional component for this service qualifies for the HPSA bonus payment 2 Professional component only, pay the HPSA bonus 3 Technical component only, do not pay the HPSA bonus 4 Global test only. Professional component of this service qualifies for the HPSA bonus payment 5 Incident codes, do not pay the HPSA bonus 6 Laboratory physician interpretation codes, pay the HPSA bonus 7 Physical therapy service, do not pay the HPSA bonus 8 Physician interpretation codes, pay the HPSA bonus 9 Concept of PC/TC does not apply, do not pay the HPSA bonus
ANES BASE VAL
Anesthesia base value. The anesthesia base values.
TYP
HCPCS Type. An 'M' indicator will display when the HCPCS associated with the revenue line originated from the Medicare physician fee schedule.
MSI
Multiple services indicator. The value of '5' identifies services that are subject to the multiple procedure payment reduction (MPPR).
ALLOWABLE
REVENUE CODES
Allowable revenue codes. The allowable revenue codes this HCPCS code may use in billing. This is a four-position field. When the last digit shows an "X," each variable for that revenue code is allowable. If this field is blank, the system will allow a HCPCS code on any revenue code.
HCPC
DESCRIPTION
HCPCS description. The English narrative description of the HCPCS code.
Map 1E02 Field Descriptions
EFF DT
Effective date. The date the code became effective (MMDDYY format).
TRM DT
Termination date. The termination date for the code (MMDDYY format).
60%RATE
60% reimbursement rate. The rate the system will use for calculating reimbursement for the HCPCS.
62% RATE
62% lab reimbursement rate. The rate the system will use for calculating reimbursement for the lab HCPCS. When the MSI field equals a '5', this field will dispay "62%/REDU" or the reduced therapy fee amount.
REHAB
Rehabilitation rate. The rate used by the system to calculate reimbursement for the HCPCS code for rehabilitation services billed.
PROF
Professional service rate. The rate used by the system to calculate reimbursement for the HCPCS code for professional services
NFACPE
Non-facility amount practice expense (PE) relative value units (RVUs). This field reflects the 20 percent reduction in non-facility PE RVUs.
VAR COIN
This field identifies the Variable Coinsurance percentage received from CMS on the Drug Fee file.
HCPC DESCRIPTION
HCPCS description. The English narrative description of the HCPCS code.
The Inquiries option (FISS Main Menu option 01) allows you to:
Check the status of submitted billing transactions
Locate claims in an ADR (Additional Development Request) status
View a summary of all claims currently being processed in the system
Verify revenue codes, diagnosis codes, HCPCS codes, adjustment reason codes, reason codes, and ANSI (American National Standards Institute) codes
View the amount and payment date of the last three checks issued to your facility
Monitor total Home Health Prospective Payment System (HH PPS) payments and outlier payments made in a calendar year
Access the Inquiry Menu
From the FISS Main Menu (Map 1701), type 01 in the Enter Menu Selection field and press Enter.
The Inquiry Menu (Map 1702) appears:
Enter the two-characters for the inquiry option you want to access and press Enter. All of the options are described in this chapter.
All FISS direct data entry (DDE) screens display two lines of information in the top right corner that identifies the region (ACPFA052), the current date, release number (e.g., C20112WS) and the time of day. This information is for internal purposes only and is used to assist CGS staff in researching issues when screen prints are provided.
Beneficiary/CWF (Option 10)
This option allows you need to view the beneficiary's address. The beneficiary's address is not available on the CWF (Common Working File) eligibility screens, ELGA and ELGH, but is available by using this option.
From the Inquiry Menu, type 10 in the Enter Menu Selection field and press Enter.
This option includes several screen pages with eligibility information. Medicare eligibility is also available in the myCGS website portal, or the CGS Interactive Voice Response (IVR) system. For additional information about myCGS, refer to the myCGS User Manual on the CGS website. Eligibility information is also available from the Medicare Health Insurance Portability and Accountability Act (HIPAA) Eligibility Transaction System (HETS). For information about HETS, refer to the CMS website.
You may also access this screen by typing 10 in the SC field if you are in an inquiry or claim entry screen.
The Eligibility Detail Inquiry screen (Map 1751) appears:
As indicated at the bottom of the Map 1751, you must have the following five pieces of information about the beneficiary to access information:
Medicare ID number (e.g., Medicare Beneficiary Identifier (MBI)) Last Name First Name sex Date of Birth (MMDDCCYY format)
You can use the following function keys to move around the screens:
F3 – Exit (return to the Inquiry Menu)
F7 – Move one page back
F8 – Move one page forward
Start by entering the beneficiary's Medicare ID number as it appears on their Medicare card in MID field.
Tab to the LN field. Type the beneficiary's last name as it appears on their Medicare card.
Tab to the FN field. Type the beneficiary's first name as it appears on their Medicare card.
Tab to the SEX field. Type the sex of the beneficiary. M = male; F = female
The cursor will automatically move to the DOB field. Type the beneficiary's date of birth (MMDDCCYY).
The cursor will automatically move to the ELIG FROM field and then the ELIG THRU field. Type the from date of service in the ELIG FROM field, and type the through date of service, or the current date in the ELIG THRU field. Press Enter.
After you press Enter, the system will search for the beneficiary's eligibility file. If a match is found, additional information will display on Map 1751. If no match is found, verify that you have entered the correct information, make any necessary corrections, and press Enter again.
Information will only display if CGS has processed a claim for the beneficiary. If no match is found, a claim for the beneficiary has not been submitted/processed in FISS by CGS.
Once a match is found with the beneficiary information entered, the beneficiary's eligibility information will display.
Press F8 to access additional eligibility screens. Screen descriptions follow.
PressF3 to exit and return to the Inquiry Menu.
Field Descriptions for Option 10 – Beneficiary/CWF Screen
Map 1751 (Page 1) Screen Example
Map 1751 Field Descriptions
MID
The beneficiary's Medicare ID number.
CURR XREF HIC
If the Medicare number has changed, this field represents the most recent number.
PREV XREF HIC
Not used.
TRANSFER HIC
Not used.
C-IND
Century Indicator – Identifies if the beneficiary's date of birth is in the 19th or 20th century.
LTR DAYS
Not applicable to home health and hospice.
LN
Last name of the beneficiary.
FN
First name of the beneficiary.
MI
Middle initial of the beneficiary.
SEX
Sex of the beneficiary.
F Female M Male
DOB
Date of birth of the beneficiary (MMDDCCYY format).
DOD
Date of death of the beneficiary (MMDDCCYY format).
ELIG FROM
Enter the date of service as the eligibility from date (MMDDCCYY format).
ELIG THRU
Enter the through date of service or the current date as the eligibility through date (MMDDCCYY format).
ADDRESS (1-6)
Beneficiary's street address, city and state.
ZIP
Zip code for beneficiary's residence.
Map 1752 Screen Example
Map 1752 Field Descriptions
RI
This identifies the CWF inquiry type
MAMMO DT
The date of the last mammogram
SRV YR
The calendar year for current Medicare Part B services that are associated with the cash deductible amount entered in the Medical Expense field and Blood Deductible field.
MEDICAL EXPENSE
The amount of cash deductible that has been satisfied by the beneficiary for the specific service year.
BLD DED REM
The number of blood pints deductible remaining to be met for Part B services, for the specific service year.
PSY EXP
The dollar amount associated with psychiatric services
SRV YR
The calendar year for current Medicare Part B services
BLD DED
Not used.
CSH DED
Not used.
PLAN DATA
ID CD
The Plan Identification Code for a beneficiary who is enrolled in a Medicare Advantage (MA) Plan. The structure of the code is:
Position 1
H
Position 2 & 3
State Code
Positional 4 & 5
Plan number within state
OPT CD
The current Plan services are restricted or unrestricted. The valid values are:
Unrestricted
1 – Medicare contractor to process all Part A and B provider claims
2 – Plan to process claims for directly provided service and for services from providers with effective arrangements.
Restricted
A – Medicare contractor to process all Part A and B provider claims
B – Plan to process claims only for directly provided services
C – Plan to process all claims
EFF DT
Effective date of the Plan benefits.
CANC DT
Termination date of the Plan benefits.
HOSPICE DATA
PERIOD
Specific hospice election period. Valid values are: 1 – The first time a beneficiary uses Hospice benefits
2 – The second time a beneficiary uses Hospice benefits.
1ST DT
First hospice start date.
PROVIDER
The hospice's six-digit Medicare provider number
INTER
The Medicare contactor number for the hospice provider
OWNER CHANGE ST DT
Displays the start date of a change of ownership within the period for the first provider.
PROVIDER
The Medicare hospice provider
INTER
The Medicare contactor number for the hospice provider
2ND ST DATE
The start date for of the 2nd period with the hospice provider
PROVIDER
The hospice's six-digit Medicare provider number
INTER
The Medicare contactor number for the hospice provider
TERM DT
The termination date for hospice services for this hospice provider
OWNER CHANE ST DT
The start date of a change of ownership within the period for the second provider.
PROVIDER
The Medicare hospice provider
INTER
The Medicare contactor number for the hospice provider
1ST BILL DT
The date of the first billing
LST BILL DT
The date of the last billing
DAYS BILLED
The number of hospice days billed to date
Map 1753 Screen Example
Map 1753 Field Descriptions
CLAIM
Identifies the beneficiary's Medicare ID number
NAME
The name of the beneficiary
DOB
The date of birth of the beneficiary
SEX
The sex of the beneficiary (F – female; M – male)
INTER
The intermediary number for the provider
APP DT
Applicable Date – used for spell determination, i.e., admission date, and current date.
REASON CD
The reason for the inquiry. Valid values:
1 – Status inquiry
2 – Inquiry related to an admission
DATE/TIME
The date and time stamp
REQ ID
Identifies the individual who submitted the inquiry.
DISP CD
The code assigned when the request is processed through the CWF host site. Valid values:
01 – Part A inquiry approved; beneficiary have never used Part A services
02 – Part A inquiry approved; beneficiary has had some prior utilization
03 – Part A inquiry rejected
04 – Qualified approval; may require further investigation
05 – Qualified approval; according to CMSs records, this inquiry begins a new benefit period.
TYPE
Identifies the type of CWF reply. (3 – accepted)
ERROR MESSAGE:
Identifies the error message.
Map 1754 Screen Example
Map 1754 Field Descriptions
CLAIM
Identifies the beneficiary's Medicare ID number
NAME
The name of the beneficiary
DOB
The date of birth of the beneficiary
SEX
The sex of the beneficiary (F – female; M – male)
INTER
The intermediary number for the provider
APP DT
Applicable Date – used for spell determination, i.e., admission date, and current date.
REASON CD
The reason for the inquiry. Valid values:
1 – Status inquiry
2 – Inquiry related to an admission
DATE/TIME
The date and time stamp
REQ ID
Identifies the individual who submitted the inquiry.
DISP CD
The code assigned when the request is processed through the CWF host site. Valid values:
01 – Part A inquiry approved; beneficiary have never used Part A services
02 – Part A inquiry approved; beneficiary has had some prior utilization
03 – Part A inquiry rejected
04 – Qualified approval; may require further investigation
05 – Qualified approval; according to CMSs records, this inquiry begins a new benefit period.
TYPE
Identifies the type of CWF reply. (3 – accepted)
ERROR MESSAGE:
Identifies the error message.
Map 1755 Screen Example
Map 1755 Field Descriptions
CLAIM
Identifies the beneficiary's Medicare ID number
NAME
The name of the beneficiary
DOB
The date of birth of the beneficiary
SEX
The sex of the beneficiary (F – female; M – male)
INTER
The intermediary number for the provider
APP DT
Applicable Date – used for spell determination, i.e., admission date, and current date.
REASON CD
The reason for the inquiry. Valid values:
1 – Status inquiry
2 – Inquiry related to an admission
DATE/TIME
The date and time stamp
REQ ID
Identifies the individual who submitted the inquiry.
DISP CD
The code assigned when the request is processed through the CWF host site. Valid values:
01 – Part A inquiry approved; beneficiary have never used Part A services
02 – Part A inquiry approved; beneficiary has had some prior utilization
03 – Part A inquiry rejected
04 – Qualified approval; may require further investigation
05 – Qualified approval; according to CMSs records, this inquiry begins a new benefit period.
TYPE
Identifies the type of CWF reply. (3 – accepted)
CENT D.O.B
Century Code for Date of Birth – The beneficiary/patients date of birth. This is a one-position alphanumeric field. The valid values are: This field is not used by FISS. Value – Description:
8 – 18th Century
9 – 19th Century
D.O.D
Date of Death – The date of death of the beneficiary/patient.
A CURR ENT DT
Part A Current Entitlement Date – The current Part A entitlement date.
TERM DT
Part A Termination Date – The termination date of the current entitlement.
PRI-ENT DT
Part A Prior Entitlement Date – The prior Part A entitlement.
TERM DT
Part A Prior Termination Date – The termination date of the prior Part A entitlement.
B CURR-ENT DT
Part B Current Entitlement Date – The current Part B entitlement date.
TERM DT
Part B Termination Date – The termination date of the current entitlement.
B: CURR-ENT DT
Part B Prior Entitlement Date – The prior Part B entitlement date.
TERM DT
Part B Prior Termination Date – The termination date of the prior Part B entitlement.
PRE-ENT DT
Lifetime Reserve Days – The number of lifetime reserve days remaining.
TERM DT
Part A Termination Date – The termination date of the current entitlement.
LIFE: RSRV
Part A Prior Entitlement Date – The prior Part A entitlement.
PYSCH
Psychiatric Days Remaining – The number of lifetime psychiatric days remaining.
CURRENT BENEFIT PERIOD DATA
FRST BILL DT
First Bill Date – The earliest billing action in the current benefit period.
LST BILL DT
Last Bill Date – The date of the latest billing action in the current benefit period.
HSP FULL DAYS
Hospital Full Days – The number of regular hospital full days the remaining in the current benefit period.
HSP PART DAYS
Hospital Coinsurance Days – The number of hospital coinsurance days remaining in the current benefit period.
SNF FULL DAYS
Skilled Nursing Facility Full Days – The number of SNF full days remaining in the current benefit period.
SNF PART DAYS
Skilled Nursing Facility Coinsurance Days – The number of SNF coinsurance days remaining in the current period.
INP DED REMAIN
Inpatient Deductible Amount Remaining – The amount of inpatient deductible amount remaining to be met for the benefit period.
BLD DED PNTS
Blood Deductible Pints – The number of blood deductible pints remaining to be met for the benefit period.
PRIOR BENEFIT PERIOD DATA
FRST BILL DT
First Bill Date – This field identifies the date of the earliest billing action in the prior benefit period.
LST BILL DT
Last Bill Date – This field identifies the date of the latest billing action in the prior benefit period.
HSP FULL DAYS
Hospital Full Days – The number of regular hospital full days remaining in the prior benefit period.
HSP PART DAYS
Hospital Coinsurance Days – The number of hospital coinsurance days remaining in the prior benefit period.
SNF FULL DAYS
Skilled Nursing Facility Full Days – The number of SNF full days remaining in the prior benefit period.
SNF PART DAYS
Skilled Nursing Facility Coinsurance Days – The number of SNF coinsurance days remaining in the prior period.
INP DED REMAIN
Inpatient Deductible Amount Remaining – The amount of inpatient deductible amount remaining to be met for the benefit period.
BLD DED PNTS
Blood Deductible Pints – The number of blood deductible pints remaining for the benefit period.
CURR B: YR
Most Recent Part B Year – The most recent Medicare Part B benefit year.
CASH
Medicare Part B Cash Deductible Remaining to be Met – The amount of cash deductible remaining for the most recent Part B year.
BLOOD
Medicare Part B Blood Deductible Remaining to be Met -The amount of blood deductible pints remaining for the most recent Part B year.
PSYCH
Medicare Part B Psychiatric Limit Remaining – The Part B psychiatric limit remaining for the benefit year.
PT
Medicare Part B Physical Therapy Limit. – The Part B physical therapy limit amount applied year to date for the most recent Medicare Part B benefit year.
OT
Medicare Part B Occupational Therapy Limit – The Part B occupational therapy limit amount applied year to date for the most recent Medicare Part B benefit year.
PRIR B: YR
Prior Part B Year – The prior Medicare Part B benefit year.
CASH
Medicare Part B Cash Deductible Remaining to be Met – The amount of cash deductible remaining to be met for the prior Part B benefit year.
BLOOD
Medicare Part B Blood Deductible Remaining to be Met – The amount of blood deductible remaining to be met for the prior Part B benefit year.
PSYCH
Medicare Part B Psychiatric Limit Remaining – The Part B psychiatric limit remaining for the prior Part B benefit year.
PT
Medicare Part B Physical Therapy Limit – The Part B physical therapy limit amount applied year to date for the prior Part B benefit year.
OT
Medicare Part B Occupational Therapy Limit – The Part B occupational therapy limit amount applied year to date for the prior Part B benefit year.
Map 1756 Screen Example
Map 1756 Field Descriptions
DATA IND
Data Indicators – This field identifies the data indicator. Valid values for each position are:
Position 1: Part B Buy In
0 – Does not apply
1 – State buy-in involved
Position 2: Alien Indicator
0 – Does not apply
1 – Alien non-payment, provision may apply
Position 3: Psychiatric Pre-Entitlement
0 – Does not apply
1 – Psychiatric pre-entitlement reduction applied
Position 4: Reason For Entitlement
0 – Normal entitlement
1 – Disability
2 – End stage renal disease (ESRD)
3 – Has or had ESRD, but current DIB
4 – Old age but has or had ESRD
8 – Has or had ESRD and is covered under Part A premium
9 – Covered under Part A premium
Position 5: Part A Buy-In
0 – No Part A buy-in
1 – Part A buy-in applies
Position 6: Rep Payee Indicator
0 – Does not apply
1 – Selected for GEP contract
2 – Has Rep Payee
3 – Both conditions apply
Positions 7-10: Not Used at This Time (pre-filled with zeroes)
NAME
The full name of the beneficiary in last name, first name, middle initial format.
ZIP
The ZIP code of residence of the beneficiary.
PLAN: ENR CD
The number of periods of Plan enrollment code. The valid values are: 0, 1, 2, and 3 indicating 0, 1, 2, or more than two periods of enrollment.
CURRENT PLAN
CUR ID
The Current Plan identification code.
OPT
The Plan Option Code – This field identifies whether the current Plan services are restricted or unrestricted.
Unrestricted
1 – Medicare contractor to process all Part A and B provider claims
2 – Plan to process claims for directly provided service and for services from providers with effective arrangements.
Restricted
A – Medicare contractor to process all Part A and B provider claims
B – Plan to process claims only for directly provided services
C – Plan to process all claims
ENR
The effective date of the current entitlement.
TERM
The termination date of the current enrollment.
PRIOR PLAN
PRI ID
The prior Plan identification code.
OPT
The prior Plan Option code.
Unrestricted
1 – Medicare contractor to process all Part A and B provider claims
2 – Plan to process claims for directly provided service and for services from providers with effective arrangements.
Restricted
A – Medicare contractor to process all Part A and B provider claims
B – Plan to process claims only for directly provided services
C – Plan to process all claims
ENR
The effective date of the prior HMO entitlement.
TERM
The termination date of the prior HMO enrollment.
OTHER ENTITLEMENTS OCCURRENCE CD
The first two occurrence codes and dates indicating another federal program or other type of insurance that may be a primary payer. The valid values are:
Value – Description:
1 – Workers Compensation coverage.
2 – Black Lung.
A – Working Aged beneficiary or spouse covered by employer health plan.
B – End stage renal disease (ESRD) beneficiary in his 12 month coordination period and covered by an employer health plan.
C – Medicare has made a conditional payment pending final resolution.
D – Automobile no-fault or other liability insurance involvement.
E – Workers Compensation and/or Black Lung.
F – Veterans Administration program, public health service or other federal agency program.
G – Working disabled beneficiary or spouse covered by employer health plan.
H – Black Lung.
I – Veterans Administration program.
ESRD CD
The home dialysis method selection code. The valid codes are:
1 – The beneficiary elects to receive all supplies and equipment for home dialysis from an ESRD facility and the facility submits claims for services it renders.
2 – The beneficiary elects to deal directly with one supplier for home dialysis supplies and equipment and the beneficiary is responsible for submitting his/her own claims to the Carrier for reimbursement.
ESRD DATE
The home dialysis method selection effective date.
ESRD CD
The home dialysis method selection code. The valid codes are:
1 – The beneficiary elects to receive all supplies and equipment for home dialysis from an ESRD facility and the facility submits claims for services it renders.
2 – The beneficiary elects to deal directly with one supplier for home dialysis supplies and equipment and the beneficiary is responsible for submitting his/her own claims to the Carrier for reimbursement.
ESRD DATE
The home dialysis method selection effective date.
PSYCH
The the number of lifetime psychiatric days remaining for the beneficiary/patient.
DISCHG
The last or through discharge date.
IND
This field identifies whether or not the discharge date is an interim date. The valid values are:
0 – Initialized
1 – Interim
DAYS USED
The number of pre-entitled psychiatric days used by the beneficiary/patient.
BLOOD
The number of blood pints carried over from 1988 to 1989.
YR
The catastrophic trailer year.
APP
This field identifies whether a December inpatient stay has been applied to the current year deductible.
MET
The amount of inpatient hospital deductible to be met according to the catastrophic trailer year.
BLD
The number of blood deductible pints remaining to be met.
CO
The number of co-insurance SNF days remaining.
FL
The number of full SNF days remaining.
FRM
The from date of the earliest processed bill.
TO
The through date of the earliest processed bill.
IND
The yearly data indicator. This is a one-position alphanumeric field. This field provides the following information:
Position 1
0 – Not used
2 – Clerical involvement
3 – Religious Non-Medical Healthcare Institution/SNF usage
4 – Both 1 and 2
Position 2
Value – Description:
0 – Not used
1 – Through date is interim
INT
The intermediary number for the earliest hospital bill processed with a deductible.
ADM
The admission date for the earliest hospital bill processed with a deductible.
FROM
The from date for the earliest hospital bill processed with a deductible.
TO
The through date for the earliest hospital bill processed with a deductible.
APP
The deductible amount applied for the earliest hospital bill processed with a deductible.
ADJ IND
The type of adjustment made. The valid values are:
0 – No adjustment
1 – Downward adjustment
2 – Upward adjustment
CALC DED
The amount of deductible calculated.
CMS DATE
The date the claim was processed by CMS.
Map 1757 Screen Example
Map 1757 Field Descriptions
CN
The beneficiary's Medicare ID number.
NM
The last name of the beneficiary/patient.
IT
The first initial of the beneficiary/patient name.
DB
The date of birth of the beneficiary.
SX
The sex of the beneficiary. The valid values are:
F – Female
M – Male
MAMMO RSK
Mammography Risk Indicator – This field identifies whether or not the beneficiary is at risk. The valid values are:
Y – Yes
N – No
TECHCOM
The date of mammography screening interpreted by a technician. Up to three technical component dates may be displayed.
PROCOM
The date of mammography screening requiring interpretation by a physician. Up to three professional component dates may be displayed.
COV IND
This field identifies whether or not the transplant was a covered procedure. Up to three coverage indicators may be displayed. The valid values are:
N – Non-covered transplant.
Y – Covered transplant.
TRAN IND
Transplant Indicator – This field identifies the type of transplant performed. Up to three transplant indicators may be displayed. The valid values are:
1 – Allogeneous bone marrow
2 – Autologous bone marrow
B – Lung Transplant
C – Heart and Lung Transplant
D – Kidney and Pancreas Transplant
H – Heart transplant
I – Intestinal Transplant
K – Kidney transplant
L – Liver transplant
P – Pancreas Transplant
DIS DATE
The date of discharge for the beneficiary/patient for the transplant procedure.
EPISODE START
The start date of an episode.
EPISODE END
The end date of an episode.
DOEBA
The first service date of the HHPPS period.
DOLBA
The last service date of the HHPPS period.
Map 1758 Screen Example
Map 1758 Field Descriptions
PERIOD
The specific Hospice Election Period. This is a one-position alphanumeric field with two occurences. The valid values are:
1 – The first time a beneficiary uses hospice benefits.
2 – The second time a beneficiary uses hospice benefits.
1ST ST DATE
The start date of the beneficiary's effective period with the Hospice provider.
PROV
The identification number assigned by Medicare to the Hospice provider.
INTER
The intermediary number of the Hospice provider.
OWNER CHANGE ST DATE
The new owner of the Hospice provider if a change of ownership occurs within an election period.
PROV
The identification number assigned by Medicare to the Hospice provider.
INTER
The intermediary number of the Hospice provider.
2NDT ST DATE
The start date of the beneficiary's effective period with the Hospice provider.
PROV
The identification number assigned by Medicare to the Hospice provider.
INTER
The intermediary number of the Hospice provider.
TERM DATE
The ending date of a beneficiary's election period.
OWNER CHANGE ST DATE
The new owner of the Hospice provider if a change of ownership occurs within an election period.
PROV
The identification number assigned by Medicare to the Hospice provider.
INTER
The intermediary number of the Hospice provider.
1ST BILLED DATE
The first billed date of the beneficiary's effective period with the Hospice provider.
LAST BILLED DATE
The last billed date of the beneficiary's effective period with the Hospice provider.
DAYS BILLED
The number of hospice days billed to date for a particular beneficiary/patient.
REVO IND
The revocation indicator.
Map 1759 Screen Example
Map 1759 Field Descriptions
Page
The sequence number of the Medicare Secondary Payer (MSP) data page being displayed.
OF
The sequence number of the highest MSP data page that will be displayed.
EFFECTIVE DATE:
The date of the Medicare Secondary Payer (MSP) coverage.
SUBSCRIBER NAME:
The first name of the individual subscribing to the MSP coverage.
SUBSCRIBER NAME:
The last name of the individual subscribing to the MSP coverage.
TERMINATION DATE:
The date the coverage terminates under the payer listed.
POLICY NUMBER:
The policy number with the payer listed.
MSP CODE:
The MSP source code.
INSURER TYPE:
This field is not used in DDE.
PATIENT RELATIONSHIP:
The relationship of the beneficiary to the insured under the policy listed.
REMARKS CODES:
This field is the MSP Remark Code #1 and it identifies information needed by the contractor to assist in additional development.
REMARKS CODES
This field is the MSP Remark Code #2 and it identifies information needed by the contractor to assist in additional development.
REMARKS CODES
This field is the MSP Remark Code #3 and it identifies information needed by the contractor to assist in additional development.
INSURER INFORMATION
NAME:
the name of the insurance company which may be primary over Medicare.
ADDRESS:
The street, city, state, and ZIP code for the insurer.
GROUP NO:
The group number for the policyholder with this insurer name.
NAME:
The name of the insurer group.
EMPLOYER DATA
NAME:
The name of the employer that provides or may provide health care coverage for the beneficiary/patient.
ADDRESS:
The street of the employer.
NO TITLE
The city of the employer.
NO TITLE
The state of the employer.
NO TITLE
The zip code of the employer.
EMPLOYEE ID:
The identification number assigned by the employer to the beneficiary.
EMPLOYEE INFO:
This field is not used in DDE.
Map 175A Screen Example
Map 175A Field Descriptions
CLAIM
The beneficiary's Medicare ID number.
NAME
The first initial and last name of the beneficiary.
DOB
The date of birth of the beneficiary.
SEX
The sex of the beneficiary. The valid values are:
F – Female
M – Male
INTER
The intermediary number for the provider.
APP DT
Applicable Date – This field is used for spell determination, i.e., admission date, and current date.
REASON CD
The reason for the inquiry. The valid values are:
1 – Status inquiry
2 – Inquiry related to an admission
DATE/TIME
Date and Time Stamp (Julian).
REQ ID
The individual who submitted the inquiry.
DISP CD
CWF Disposition Code – This field identifies a code assigned when the request is processed through the CWF host site.
TYPE
The type of CWF reply. The valid values are:
4 – Not in file
DATE TRANSFER INITIATED TO CMS
The date the transfer was initiated to CMS.
DATE CMS INDICATED NIF/AT OTHER SITE
The date CMS indicated the beneficiary Medicare number was not in file at another site.
Map 175B Screen Example
Map 175B Field Descriptions
CLAIM
The beneficiary's Medicare ID number.
NO TITLE
The middle initial of the beneficiary.
NAME
The first initial and last name of the beneficiary.
DOB
The date of birth of the beneficiary.
SEX
The sex of the beneficiary. The valid values are:
F – Female
M – Male
INTER
The intermediary number for the provider.
APP DT
Applicable Date – This field is used for spell determination, i.e., admission date, and current date.
REASON CD
The reason for the inquiry. The valid values are:
1 – Status inquiry
2 – Inquiry related to an admission
DATE/TIME
Date and Time Stamp (Julian).
REQ ID
The individual who submitted the inquiry.
DISP CD
A code assigned when the request is processed through the CWF host site.
TYPE
The type of CWF reply. The valid values are:
5 – Not in file on CMS batch but is another potential claim number for this beneficiary.
CORRECTED CLAIM NUMBER
The corrected Medicare ID number.
Map 175C Screen Example
Map 175C Field Descriptions
PERIOD
The specific Hospice Election Period. The valid values are:
1 – The first time a beneficiary uses hospice benefits.
2 – The second time a beneficiary uses hospice benefits.
1ST ST DATE
The start date of the beneficiary's effective period with the Hospice provider.
PROV
The identification number assigned by Medicare to the Hospice provider.
INTER
The intermediary number of the Hospice provider.
OWNER CHANGE ST DATE
The new owner of the Hospice provider if a change of ownership occurs within an election period.
PROV
The identification number assigned by Medicare to the Hospice provider.
INTER
The intermediary number of the Hospice provider.
2NDT ST DATE
The start date of the beneficiary's effective period with the Hospice provider.
PROV
The identification number assigned by Medicare to the Hospice provider.
INTER
The intermediary number of the Hospice provider.
TERM DATE
The ending date of a beneficiary's election period.
OWNER CHANGE ST DATE
The new owner of the Hospice provider if a change of ownership occurs within an election period.
PROV
The identification number assigned by Medicare to the Hospice provider.
INTER
The intermediary number of the Hospice provider.
1ST BILLED DATE
The first billed date of the beneficiary's effective period with the Hospice provider.
LAST BILLED DATE
The last billed date of the beneficiary's effective period with the Hospice provider.
DAYS BILLED
The number of hospice days billed to date for a particular beneficiary/patient.
REVO IND
The revocation indicator.
Map 175D Screen Example
Map 175D Field Descriptions
CN
The beneficiary's Medicare ID number.
NM
The last name of the beneficiary.
IT
The first Initial of the beneficiary name.
DB
The date of birth of the beneficiary.
SX
The sex of the beneficiary. The valid values are:
F – Female
M – Male
INT
The intermediary number for the earliest hospital bill processed with a deductible.
APP
This field identifies spell determination, i.e. admission date and current date.
REAS
The reason for the inquiry. The valid values are:
1 – Status inquiry
2 – Inquiry related to an admission
DATETIME
The date and time stamp of the inquiry.
REQ
The operator ID of the person submitting the inquiry.
DISP-CODE
The code assigned when the request is processed through the CWF host site.
MSG
The process of the episode (i.e. paid, suspended, RTP, etc.)
CORRECT
The crossover reference of a Medicare ID number and populates the correct Medicare ID number.
NM
The last name of the beneficiary.
IT
The first initial of the beneficiary name.
DB
The date of birth of the beneficiary.
SX
The sex of the beneficiary. The valid values are:
F – Female
M – Male
A-ENT
The current Part A entitlement.
A-TRM
The Part A termination date of the current entitlement.
B-ENT
The current Part B entitlement.
B-TRM
The Part B termination date of the current entitlement.
DOD
The date of death of the beneficiary.
PARTB YR
The most recent Medicare Part B benefit year.
DED-TBM
The Part B deductible amount.
Map 175E Screen Example
Map 175E Field Descriptions
CN
The beneficiary's Medicare ID number.
NM
The last name of the beneficiary.
IT
The first initial of the beneficiary name.
DB
The date of birth of the beneficiary.
SX
The sex of the beneficiary. The valid values are:
F – Female
M – Male
SPELL NUM
The spell number, up to 14 episodes.
QUALIFYING IND
The beneficiary qualified for Part A or Part B Medicare.
PARTA VISITS REMAINING
This field identifies how many visits are remaining for the beneficiary/patient.
EARLIST BILLING
The earliest date of an episode.
LATEST BILLING
The latest date of an episode.
PARTB VISITS APPLIED
This field identifies how many Part B visits were applied to the episode.
Map 175F Screen Example
Map 175F Field Descriptions
CN
The beneficiary's Medicare ID number.
NM
The last name of the beneficiary.
IT
The first initial of the beneficiary name.
DB
The date of birth of the beneficiary.
SX
The sex of the beneficiary. The valid values are:
F – Female
M – Male
START DATE
The start date of an episode.
END DATE
The end date of an episode.
INTER NUM
The Hospice provider intermediary number.
PROV NUM
The identification number assigned by Medicare to the Hospice provider.
DOEBA
The first service date of the HHPPS period.
DOLBA
The last service date of the HHPPS period.
PATIENT STAT ID
The patient status during the episode.
Map 175G Screen Example
Map 175G Field Descriptions
CN
The beneficiary's Medicare ID number.
NM
The last name of the beneficiary.
IT
The first initial of the beneficiary name.
DB
The date of birth of the beneficiary.
SX
The sex of the beneficiary. The valid values are:
F – Female
M – Male
REC
The sequence record number of the paid claims starting with 00 and occurs up to 16 times.
MSP
This field identifies MSP source.
DESCRIPTION
The value in the MSP code field. The valid values are:
1 – MEDICAID
2 – BLUE CROSS
3 – OTHER
4 – NONE
A – WORKING AGED
B – ESRD BENE
C – COND PAYMENT
D – NO-FAULT
E – WORKERS COMP
F – PUB HLTH SRV
G – DISABLED
H – BLACK LUNG
I – VETERANS
L – LIABILITY
W – WC SET-ASIDE
Z – MEDICARE
EFF DTE
The effective date of the Medicare Secondary Payer (MSP) coverage.
TRM DTE
The termination date of the Medicare Secondary Payer (MSP) coverage termination.
INTER
The Hospice provider intermediary number.
DOA
The date the entry was added.
Map 175H Screen Example
Map 175H Field Descriptions
CN
The beneficiary's Medicare ID number.
NM
The last name of the beneficiary.
IT
The first initial of the beneficiary name.
DB
The date of birth of the beneficiary.
SX
The sex of the beneficiary. The valid values are:
F – Female
M – Male
PLAN TYPE
This field identifies the type of plan.
PLAN ID
The Plan Identification code. The structure of the identification number is:
Position 1 – H
Position 2 & 3 – State Code
Position 4 & 5 – Plan number within the state
OPT
The current Plan services are restricted or unrestricted. The valid values are:
Unrestricted
1 – Medicare contractor to process all Part A and B provider claims
2 – Plan to process claims for directly provided service and for services from providers with effective arrangements.
Restricted
A – Medicare contractor to process all Part A and B provider claims
B – Plan to process claims only for directly provided services
C – Plan to process all claims
ENR DATE
The enrollment date of the Plan for a beneficiary Plan entitlement.
TRM DATE
The termination date of the Plan for a beneficiary Plan entitlement.
Map 175I Screen Example
Map 175I Field Descriptions
CN
The beneficiary's Medicare ID number.
NM
The last name of the beneficiary.
IT
The first initial of the beneficiary name.
DB
The date of birth of the beneficiary.
SX
The sex of the beneficiary. The valid values are:
F – Female
M – Male
PERIOD
The Hospice election period. The valid values are:
1 – The first time a beneficiary uses Hospice benefits.
2 – The second time a beneficiary uses Hospice benefits.
3 – The third time a beneficiary uses Hospice benefits.
4 – The fourth time a beneficiary uses Hospice benefits.
START DATE 1
The start date of the beneficiary's first election period with the Hospice provider.
OWNER CHANGE
The date of the Hospice provider change of ownership within an election period.
TERM DATE 1
The ending date of the beneficiary's first election period.
PROV 1
The first Hospice provider identification number assigned by Medicare.
INTER 1
The intermediary number of the first Hospice provider.
DOEBA DATE
The first service date of the HHPPS period.
DOLBA DATE
The last service date of the HHPPS period.
DAYS USED
The number of days used by the beneficiary/patient.
START DATE 2
The start date of the beneficiary's second election period with the Hospice provider.
OWNER CHANGE
The date of the Hospice provider change of ownership within an election period.
PROV 2
The second Hospice provider identification number assigned by Medicare.
INTER 2
The intermediary number of the second Hospice provider.
REVOCATION IND
The revocation indicator number.
Map 175J Screen Example
Map 175J Field Descriptions
MID
The beneficiary's Medicare ID number.
NM
The last name of the beneficiary.
IT
The first initial of the beneficiary name.
DB
The date of birth of the beneficiary.
SX
The sex of the beneficiary. The valid values are:
F – Female
M – Male
TECH D
Technical Date – This field identifies the date the beneficiary is eligible for preventative service coverage.
NOTE: When there is not a date, one of the following messages display to explain why the beneficiary is not eligible.
PTB – Beneficiary not entitled to Part B
RCVD – Beneficiary already received service
DOD – Beneficiary not eligible due to DOD
GDR – Beneficiary not eligible due to sex
AGE – Beneficiary not eligible due to age
SRV – Beneficiary not eligible for the service
VAC – Beneficiary already vaccinated
0000 – Service not applicable
PROF D
Professional Date – This field identifies the date the beneficiary is eligible for preventative service coverage.
NOTE: When there is not a date, one of the following messages display to explain why the beneficiary is not eligible.
PTB – Beneficiary not entitled to Part B
RCVD – Beneficiary already received service
DOD – Beneficiary not eligible due to DOD
GDR – Beneficiary not eligible due to sex
AGE – Beneficiary not eligible due to age
SRV – Beneficiary not eligible for the service
VAC – Beneficiary already vaccinated
0000 – Service not applicable
Map 175K Screen Example
Map 175K Field Descriptions
MID
The beneficiary's Medicare ID number.
LN
The last name of the beneficiary.
FI
The first initial of the beneficiary name.
DOB
The date of birth of the beneficiary.
SEX
The sex of the beneficiary. The valid values are:
F – Female
M – Male
TOTAL SESSIONS
Total Sessions – This field identifies the number of sessions billed for each beneficiary. This occurs five times This is a one-position alphanumeric field.
Note: If a date range is billed on a detail, and a quantity that matches the range is not identified, CWF posts the session as 1 unit. (i.e., 10/25 – 10/27 Unit 1 will post as 1 session).
Note: The following fields display up to 28 occurrences of the maximum session occurrences from the most recent to the oldest received from CWF.
HCPCS
The HCPC code of G0375 or G0376.
FROM
The from date of the claim.
THRU
The through date of the claim.
PER
Period – This field identifies up to five years of counseling data. The valid values are:
1 – One year
2 – Two years
3 – Three years
4 – Four years
5 – Five years
QT
Quantity – This field identifies the number of services billed for each date.
TP
The claim type. The valid values are:
O – Outpatient
B – Part B
PRF
The technicaland professional remaining sessions.
Map 175L Screen Example
Map 175L Field Descriptions
MID
The beneficiary's Medicare ID number.
DOB
The date of birth associated with the Medicare ID number.
REQ DAT
The date of request.
NAME
The name associated with the Medicare ID number.
REC
Record Number First Ten Occurrences – This field displays the Home Health Certification records one through ten on the CWF Reply Record. This number is incremented by one for each of the first ten records found.
HCPCS
Record HCPCS First Ten Occurrences – This field identifies the health insurance record number.
FROM DATE
From Date First Ten Occurrences – This field identifies the Home Health from date.
REC
Record Number Second Ten Occurrences – This field displays the Home Health Certification records eleven through 20 on the CWF Reply Record. This number is incremented by one for each of the second ten records found.
HCPCS
Record HCPCS Second Ten Occurrances – This field identifies the health insurance record number.
FROM DATE
From Date Second Ten Occurrences – This field identifies the Home Health from date.
Map 175M Screen Example
Map 175M Field Descriptions
MID
The beneficiary's Medicare ID number.
NM
The last name of the beneficiary.
IT
The first initial of the beneficiary name.
DB
The date of birth of the beneficiary.
SX
The sex of the beneficiary. The valid values are:
F – Female
M – Male
TECH D
The date the beneficiary is eligible for preventative service coverage.
Note: When there is not a date, one of the following messages display to explain why the beneficiary is not eligible.
PTB – Beneficiary not entitled to Part B
RCVD – Beneficiary already received service
DOD – Beneficiary not eligible due to DOD
GDR – Beneficiary not eligible due to sex
AGE – Beneficiary not eligible due to age
SRV – Beneficiary not eligible for the service
VAC – Beneficiary already vaccinated
0000 – Service not applicable
PROF D
The date the beneficiary is eligible for preventative service coverage.
Note: When there is not a date, one of the following messages display to explain why the beneficiary is not eligible.
PTB – Beneficiary not entitled to Part B
RCVD – Beneficiary already received service
DOD – Beneficiary not eligible due to DOD
GDR – Beneficiary not eligible due to sex
AGE – Beneficiary not eligible due to age
SRV – Beneficiary not eligible for the service
0000 – Service not applicable
Map 175N Screen Example
Map 175N Field Descriptions
MID
The beneficiary's Medicare ID number.
NM
The last name of the beneficiary.
IT
The first initial of the beneficiary name.
DB
The date of birth of the beneficiary.
SX
The sex of the beneficiary. The valid values are:
F – Female
M – Male
HCPC CODE
The HCPC code.
TECH CODE
This field identifies the technical code.
RISK CD
The breast cancer risk indicator for the beneficiary. The valid values are:
Y – High Risk
N – Not High Risk
DATE
Date 1 – This field identifies the date the HCPC code was returned from CWF.
DATE
Date 2 – This field identifies the date the TECH code was returned from CWF.
DATE
Date 3 – This field identifies the date the RISK code was returned from CWF.
Map 175O Screen Example
Map 175O Field Descriptions
MID
The beneficiary's Medicare ID number.
NM
The last name of the beneficiary.
IT
The first initial of the beneficiary name.
DB
The date of birth of the beneficiary.
SX
The sex of the beneficiary. The valid values are:
F – Female
M – Male
PROVIDER NUMBER
The identification number assigned by Medicare to the Hospice provider.
START DATE
The beginning date of a beneficiary's election of the MCCM Hospice provider.
TERM DATE
The ending date of a beneficiary's election of the MCCM Hospice provider.
TRANSFER DATE
The date of the MCCM Hospice provider change of ownership.
Map 175P Screen Example
Map 175P Field Descriptions
MID
The beneficiary's Medicare ID number.
NM
The last name of the beneficiary.
IT
The first initial of the beneficiary name.
DB
The date of birth of the beneficiary.
SX
The sex of the beneficiary. The valid values are:
F – Female
M – Male
START DATE
Hospice election start date (MMDDCCYY)
RECEIPT DATE
Receipt date of the Notice of Election (NOE) (MMDDCCYY).
REVOCATION DATE
Hospice revocation date (MMDDCCYY)
REV IND
Hospice revocation indicator
PROVIDER NUMBER
Hospice provider number.
Map 175Q Screen Example
Map 175Q Field Descriptions
MID
The beneficiary's Medicare ID number.
NM
The last name of the beneficiary.
INITIAL
The first initial of the beneficiary name.
SEX
The sex of the beneficiary. The valid values are:
F – Female
M – Male
PROF-HCPCS
The professional radiation oncology model-specific HCPCS code.
ACT-SOE-DT
Actual starte of episode date.
ACT-EOE-DT
Actual end of episode date.
PROF-DIAG-CD
Professional line item diagnosis code.
RENDERING-NPI
The National provider Identifier (NPI) of the radiation oncologists performing the service.
TAC-ID-NBR
The Tax Identification Number (TIN) of the radiation oncologists performing the service.
TECH-HCPCS
The technical readiation oncoloby model-specific HCPCS code.
TEMP-SOE-DT
Temporary start of episode date.
TEMP-EOE-DT
Temporary end of episode date
TECH-DIAG-CD
Technical line item diagnosis code.
CCN/TIN
Facility/Technical participant provider number.
Map 175R Screen Example
Map 175R Field Descriptions
MID
The beneficiary's Medicare ID number.
NM
The last name of the beneficiary.
INITIAL
The first initial of the beneficiary name.
DOB
The date of birth of the beneficiary.
SEX
The sex of the beneficiary. The valid values are:
F – Female
M – Male
REC
Record number
HCPCS
Pneumococcal pneumonia vaccination HCPCS – up to 10 occurrences
FROM DATE
The most recent 'from' date of service – up to 10 occurrences
NPI
Provider's National Provider Identifier – up to 10 occurrences
DRG Pricer/Grouper (Option 11)
This option allows you to view specific DRG (diagnostic related group) assignment and PPS (prospective payment system) information for inpatient hospital stays as calculated by the Pricer/Grouper software programs within FISS.
From the Inquiry Menu, type 11 in the Enter Menu Selection field and press Enter.
⇒You may also access this screen by typing 11 in the SC field if you are in an inquiry or claim entry screen.
The DRG/PPS Inquiry screen (Map 1781) appears:
Map 1781 Field Descriptions
DIAGNOSIS
ICD diagnosis codes that identify up to nine codes for coexisting conditions on a particular claim. The admitting diagnosis is not entered.
No Title
This field follows the ICD diagnosis code field and identifies the Present On Admission (POA) indicator for every principal and secondary diagnosis and whether the patient's condition is present at the time the order for inpatient admission to a general acute care hospital occurs.
POA
The End of POA Indicator. This is the last character of the POA Indicator. Valid values:
X – The end of POA indicators for principal and, if applicable, other diagnoses in special processing situations that may be identified by CMS in the future. Z – The end of POE indicators for principal and, if applicable other diagnoses. Blank – Not acute care, POA's do not apply.
PROCEDURES
ICD procedure codes that identify the principal procedure performed and up to eight additional procedures during the billing period.
NPI
The providers National Provider Identifier (NPI) number.
The date the beneficiary was discharged (MMDDYY format).
PROV
The provider's Medicare number
REVIEW CODE
Identifies the code used to calculate the standard payment. Valid values are:
00 = Pay with outlier
07 = Pay without cost
01 = Pay days outlier
09 = Pay transfer special DRG post-acute transfers for DRGs 209, 110, 211, 014, 113, 236, 263, 264, 429, 483 11 = Pay transfer special DRG no cost post-acute transfers for DRGs 209, 110, 211, 014, 113, 236, 263, 264, 429, 483
02 = Pay cost outlier
03 = Pay per diem days 04 = Pay average stay only 05 = Pay transfer with cost 06 = Pay transfer no cost
TOTAL CHARGES
The total charge as submitted on the claim.
DOB
The beneficiary's date of birth (MMDDCCYY format).
OR AGE
The beneficiary's age at the time of discharge. This field may be used instead of the DOB field.
APPROVED LOS
The approved length of stay (LOS). This is necessary for Pricer to determine whether day outlier status is applicable in non-transfer cases, and in transfer cases to determine the number of days for which to pay the per diem rate.
COV DAYS
Identifies the number of Medicare Part A days covered for this claim. Pricer uses the relationship between the covered days and the day outlier trim point of the assigned DRG to calculate the rate.
LTR DAYS
Identifies the number of Lifetime Reserve (LTR) days used for a claim.
PAT LIAB
Identifies the patient liability that is due, which is the dollar amount owed by the beneficiary to cover any coinsurance days or non-covered days or charges.
Press ENTER to allow FISS to assign the DRG. The following information will display on the screen under RETURNED FROM GROUPER or RETURNED FROM PRICER
RETURN FROM GROUPER:
GROUPER VERSION
The version of the Grouper program used.
DRG
Identifies the Diagnosis Related Group code assigned by the grouper program.
INIT
INIT identifies the initial DRG code assigned. Used in the event a Hospital Acquired Condition (HAC) impacts the final MS-DRG assignment.
MAJOR DIAG CAT
INIT Identifies the Major Diagnostic Category in which the DRG resides. Valid values are:
RETURN CODE
Identifies the status of the claim when it has returned from the Grouper program.
PROC CD USED
Identifies the procedure code used by the Grouper program for calculation.
DIAG CD USED
Identifies the primary diagnosis code used by the Grouper program for calculation.
SEC DIAG USED
Identifies the secondary diagnosis code used by the Group program for calculation.
RETURN FROM PRICER:
PRICER VERSION
The version of the Pricer program used.
RTN CD
The Return Code that identifies the status of the claim when is is returned from the Pricer program
WAGE INDEX
Identifies the providers' wage index factor for the state where the services were provided to determine reimbursement rates for the services provided.
OUTLIER DAYS
Identifies the number of outlier days that exceed the cutoff point for the applicable DRG.
AVG# LENGTH OF STAY
The predetermined average length of stay for the assigned DRG.
OUTLIER DAYS THRESHOLD
Identifies the number of days of utilization permissible for the claim's DRG code. Day outlier payment is made when the length of stay exceeds the length of stay for a specific DRG plus the CMS-mandated adjustment calculation.
OUTLIER COST THRES
Identifies the Outlier Cost Threshold when the claim has extraordinarily high charges and does not qualify as a day outlier.
INDIRECT TEACHING ADJ#
The amount of adjustment calculated by the Pricer for teaching hospitals.
TOTAL BLENDED PAYMENT
The total PPC payment amount consisting of the Federal, hospital, outlier and indirect teaching portions.
HOSPITAL SPECIFIC PORTION
The hospital specific portion of the total blended payment.
FEDERAL SPECIFIC PORTION
The Federal specific portion of the total blended payment.
DISP# SHARE HOSPTIAL AMT
The percentage of a hospital total Medicare Part A patient days attributable to Medicare patients who are also SSI.
PASS THRU PER DISCHARGE
The pass through per discharge cost.
OUTLIER PORTION
The dollar amount calculated that reflects the outlier portion of the charges.
PTPD + TEP
The pass through per discharge cost plus the total blended payment amount.
STANDARD DAYS USED
The number of regular Medicare Part A days covered for this claim.
LTR DAYS USED
The number of Lifetime Reserve Days used during this benefit period
PROV REIMB
The actual payment amount to the provider for this claim.
MAP178B – DRG/PPS Inquiry Screen
Map178B – The top half of the screen displays the same fields as MAP 1781; therefore the field descriptions below begin with the fields located under RETURNED FROM PRICER.
Map 178B Field Descriptions
RETURN FROM PRICER:
UNCOMP CARE AMT
Uncompensated Care Payment Amount. This amount is published by CMS to the MACs (by provider) entitled to an uncompensated care payment amount add on.
BUNLDE ADJ ATM
The adjustment amount for hospitals participating in the Bundled Payments for Care Improvement Initiative (BPCI) Model 1 (demo code 61).
VAL PURC ADJ AMT
The adjustment amount for hospitals participating in the Value Based Purchase Program.
READMIS ADJ AMT
The reduction adjustment for those hospitals participating in the Hospital Readmissions Reduction program.
PPS STNDRD VALUE
The final standardized amount.
PPS HAC PAY AMT
The Hospital Acquired Condition (HAC) payment reduction amount.
PPS FLX7 AMT
Reserved for future use.
EHR PAY ADJ AMT
The reduction adjustment amount for hospitals not meaningful users of EHR.
MAP1782 – DRG Cost Disclosure Inquiry
Map 1782 Field Descriptions
PVDR
Identifies the provider number
VERSION
Identifies the program version number of the Pricer program.
D – DT
This date identifies which Pricer version to obtain data from.
FROM DT
The provider's effective start date on the provider file.
THRU DT
The provider's end date on the provider file.
DRG NUMBER
The number identifying the specific Diagnosis Related Group (DRG).
DSH OPERATING FACTOR
The operating payment for hospitals serving a disproportionate share of low income patients.
DSH CAPITAL FACTOR
The capital payment for hospitals serving a disproportionate share of low-income patients.
IME OPERATING FACTOR
Identifies the actual IME add-on to operating federal payments.
IME CAPTIAL FACTOR
Identifies the actual IME add-on to operating federal payments.
IME OPERATING RATIO
Identifies the ratio of interns and residents to available beds.
IME CAPITAL RATIO
Identifies the Capital Indirect Medical Education Ration which is the ratio of interns and residents to the average daily census.
XIX RATIO
Identifies the ratio of Medicaid days to total days.
SSI RATIO
Identifies the supplemental security income ratio to covered days.
NEW PROVIDER
Identifies a new provider for capital prospective payment.
URBAN / RURAL
Identifies the type of location and is determined by the DRG Pricer
NUMBER OF BEDS
The number of hospital beds available for lodging inpatients.
LOW-VOL PYMNT
The low-volume payment amount calculated by the IPPS Pricer.
DSH RATIO
The disproportionate share adjustment percentage.
COUNTY CODE
The County Code.
RELATIVE WEIGHT
The relative weight of the DRG amount.
ALOS
The CMS predetermined length of stay based on certain claim data.
OUTLIER DAY CUTOVER
The cut off point for determining day outliers.
OPERATING PAYMENT DSH
The operating payment for those hospitals serving a disproportionate share of low-income patients.
OPERATING PAYMENT IME
The capital payment for indirect medical education.
CAPITAL PAYMENT DSH
The capital payment for hospitals serving disproportionate share of low-income patients.
CAPITAL PAYMENT IME
The capital payment for indirect medical education.
OPERATING PAYMENT
The accumulated FSP and HSP total amount for Operating Payments.
CAPITAL PAYMENT
The accumulated HSP, FSP and Harmless total amount for Capital Payments.
TOTAL PAYMENT
The total amount of payments.
MAP1783 – DRG Cost Disclosure Inquiry
Map 1783 Field Descriptions
PVDR
Identifies the provider number
VERSION
Identifies the program version number of the Pricer program.
D-DT
The date for which the DRG information is being selected.
FROM DT
The beginning date of service (MMDDYY format)
THRU DT
The ending date of service (MMDDYY format)
OPERATING PORTION
COST OUTLIER THRESHOLD
The cost outlier threshold amount.
CASE MIX INDEX
The case mix index from the operating PPS base year.
COST TO CHARGE RATIO
The Cost to Charge ratio of operating costs to charges
LOW-VOL PYMNT
The low-volume payment amount calculated by the IPPS PRICER.
BLENDED RATIO TARGET/DRG
The ratio target amount used during operating PPS transition periods.
BLEND RATIO REG/NAT
The ratio DRG amount used during operating PPS transition periods
TARGET AMOUNT
The target amount (the updated specific rate). Used to determine Health Service Area (HAS) add-on amounts for sole community and Medicare dependents hospitals.
WAGE AMOUNT NATIONAL
The national wage-related rate used to determine the labor portion of the operating federal rate.
WAGE AMOUNT REGIONAL
The regional wage-related amount.
NON-WAGE AMOUNT NATIONAL
The national non-wage-related rate used to determine the labor portion of the operating federal rate.
NON-WAGE AMOUNT REGIONAL
The regional non-wage-related amount.
FED REG – WAGE AMOUNT
The regional wage-related amount.
FED REG – WAGE INDEX
The regional wage index as supplied by CMS to be used for the state in which the services were provided to determine reimbursement rates for services rendered.
FED REG – NON WAGE FED AMOUNT
The total Regional Non-Wage Federal amount.
FED REG – NON WAGE FED RATIO
The Non-Wage Federal Amount Ratio.
FED REG – AMOUNT
The Federal Regional amount.
FED REG – TOTALS
The Federal Regional total.
FED NAT – WAGE AMOUNT
The Federal National wage-related amount.
FED NAT – WAGE INDEX
The National Wage Index as supplied by CMS to be used for the state in which the services were provided to determine reimbursement rates for the services rendered.
FED NAT – NON WAGE FED AMOUNT
The National Non-Wage Federal total amount.
FED NAT – NON WAGE FED RATIO
The Non-Wage Federal Amount Ratio.
FED NAT – AMOUNT
The Federal National amount.
FED NAT – TOTALS
The Federal National total.
TOTAL FED – TOTALS
The accumulated amount by adding the Federal Regional Totals and the Federal National Totals.
HOSPITAL AMOUNT – AMOUNT
The hospital amount.
HOSPITAL AMOUNT – TOTALS
The hospital totals.
BLEND AMOUNT – TOTALS
The blended accumulated amount total by adding the Federal Regional Totals and the Federal National Totals.
HSA AMOUNT
The hospital rate amount.
HSA CALCULATION
Health Service Area (HAS) Calculation – (TARGET AMOUNT – (TOT FED / OUTLIER * OPER DSH)) * HAS FCTR
DRG WT
The payment weight of the Diagnosis Related Group (DRG).
HSA TOT
The total of the Health Service Area (HSA) amount multiplied by the DRG Weight.
MAP1784 – DRG Cost Disclosure Inquiry
Map 1784 Field Descriptions
PVDR
Identifies the provider number
VERSION
Identifies the program version number of the Pricer program.
D-DT
The date for which the DRG information is being selected.
FROM DT
The beginning date of service (MMDDYY format)
THRU DT
The ending date of service (MMDDYY format)
CAPITAL PORTION
COST OUTLIER THRESHOLD
The cost outlier threshold amount, which is the standard operating threshold for computing cost outlier payments.
COST TO CHARGE RATIO
The Cost to Charge ratio of operating costs to charges.
LOW-VOL PYMT
The Low-Volume Payment amount calculated by the IPPS Pricer.
PAYMENT METHODOLOGY
The capital PPS payment methodology based on the value of the PPS Pay Code. Valid values are:
A – Hold Harmless
B – Hold Harmless Fed
C – Fully Prospective
GEOG ADJ FACTOR
The Geographical Adjustment Factor used to adjust the capital federal rate, based on the applicable wage index.
ADJUSTED FEDERAL RATE
The base adjusted federal capital rate.
LARGE URBAN ADD-ON
The federal rate applicable to those hospitals located in a large urban SMSA.
BLEND RATION HOSP/FED
The blended ratio of the Hospital Specific Rate (HSA) and the Federal Rate used to compute capital payments under PPS.
NEW CAPITAL RATIO
The capital to total capital and is applicable for hospitals being reimbursed under the hold harmless payment method for capital.
OLD CAPITAL PAYMENT
The old capital cost per discharge as provided by the hospital or as provided by the latest filed cost report under capital PPS and is applicable for those hospitals being reimbursed under the hold harmless payment method for capital.
HOSPITAL SPECIFIC RATE
The capital base period cost per discharge updated to applicable fiscal year-end.
FEDERAL HOSPITAL
TOTAL FEDERAL AMOUNT
The Total Federal amount.
TOTAL HOSPITAL AMOUNT
The Total Hospital amount
TOTAL
The total Federal and Hospital amounts.
MAP1785 – DRG Cost Disclosure Inquiry
Map 1785 Field Descriptions
PVDR
Identifies the provider number
VERSION
Identifies the program version number of the Pricer program.
D-DT
The date for which the DRG information is being selected.
FROM DT
The beginning date of service (MMDDYY format)
THRU DT
The ending date of service (MMDDYY format)
BM1%
The Bundle Model 1 Discount Percentage.
BASE OPER DRG AMT
The Base Operating DRG Payment Amount. This is the amount a hospital would normally receive for the discharge of a Medicare patient.
BPCI DEMO CODE 1
The Bundled Payment for Care Improvement Indicator. Valid values are:
61 – Bundled Payment for Care Model 1
63 – Bundled Payment for Care Model 3
62 – Bundled Payment for Care Model 2
64 – Bundled Payment for Care Model 4
OPER HSP AMT
The Operating HSP (Hospital Specific Payment) DRG amount.
BPCI DEMO CODE 2
The Bundled Payment for Care Improvement Indicator. Valid values are:
61 – Bundled Payment for Care Model 1
63 – Bundled Payment for Care Model 3
62 – Bundled Payment for Care Model 2
64 – Bundled Payment for Care Model 4
VBP IND
The Value Based Pricing Indicator.
BPCI DEMO CODE 3
The Bundled Payment for Care Improvement Indicator. Valid values are:
61 – Bundled Payment for Care Model 1
63 – Bundled Payment for Care Model 3
62 – Bundled Payment for Care Model 2
64 – Bundled Payment for Care Model 4
VBP ADJ
The Value Based Pricing Adjustment.
BPCI DEMO CODE 4
The Bundled Payment for Care Improvement Indicator. Valid values are:
61 – Bundled Payment for Care Model 1
63 – Bundled Payment for Care Model 3
62 – Bundled Payment for Care Model 2
64 – Bundled Payment for Care Model 4
HRR IND
The Hospital Readmission Reduction (HRR) Program Indicator.
HAC RED IND
Reserved for future use. Valid values for IPPS.
Blank – Hospital Acquired Condition Reduction Program – Non PPS
N – Hospital Acquired Condition Reduction Program – PPS
HRR ADJ
The Hospital Readmission Reduction (HRR) Adjustment.
EHR RED IND
The Electronic Health Record Adjustment Reduction Indicator for provides that are subject to claim adjustments when the provider does not meet the guidelines for use of EHR technology.
UNCOMP CARE AMT
The Uncompensated Care Payment Amount. This is the amount published by CMS for MACs (by provider) entitled to an uncompensated care payment amount add on. The MACs enter the amount for each Federal Fiscal year begin date based on published information.
Claim Summary (Option 12)
You will use this option often because it allows you access to a variety of claim processing information. The following provides instructions on how to:
Check the status of your billing transactions / beneficiary claim history
Check for Medical Review Additional Development Requests (MR ADRs) and non-MR ADRs (home health and hospice only).
View upcoding and downcoding claim information for home health claims
View line item denial information
View Outcome and Assessment Information Set (OASIS) information for Patient-Driven Grouping Model (PDGM) claims (home health only).
From the Inquiry Menu, type 12 in the Enter Menu Selection field and press Enter .
The Claim Summary Inquiry screen (Map 1741) appears:
You can use the following function keys to move within the Claim Summary Inquiry screen and within the different claim pages:
F3 – Exit (return to the Inquiry Menu)
F5 – Scroll back through a list of claims or revenue code pages
F6 – Scroll forward through a list of claims or revenue code pages
F7 – Move one claim page back
F8 – Move one claim page forward
F10 – Move to the left page
F11 – Move to the right page
Shift+Tab– Move from the right to left in valid fields (ex. Move from the MID field to the NPI field)
Map 1741 Screen Example
Map 1741 Field Descriptions
NPI
National provider identifier.
MID
The beneficiary's Medicare ID number.
PROVIDER
Not applicable.
S/LOC
Status and location code assigned to the claim by FISS.
TOB
The type of bill submitted on the CMS-1450 claim form. The first two positions are required for a search. The third position is optional. Leave this field blank to view billing transacations for all bill types submitted by the NPI.
OPERATOR ID
Identifies the operator ID utilizing the screen.
FROM DATE
"From" date of service (MMDDYY format).
TO DATE
"Through" date of service (MMDDYY format).
DDE SORT
This field is not functional through the Inquiry Menu. Refer to the "Claims Corrections" section of this manual.
MEDICAL REVIEW SELECT
Not in use.
DCN
The claim document control number. This field can be used in conjunction with the Invoice NO/DCN Trans, Option 88 on the Inquiry Menu screen.
First Line of Data
MID
The beneficiary's Medicare ID number.
PROV/MRN
Medicare PTAN (provider number) assigned to your facility.
S/LOC
Status/location. This code is assigned to the claim by FISS. Refer to the FISS Overview section of this manual for additional information.
TOB
Type of bill. The type of bill code submitted on the CMS-1450 claim form.
ADM DT
Admission date. The date the beneficiary was admitted for care.
FRM DT
"From" date of service (MMDDYY format).
THRU DT
"Through" date of service (MMDDYY format).
REC DT
Received date. The date CGS originally received the claim or the date the claim was corrected from the Return to Provider (RTP) file.
Second Line of Data
SEL
Selection. This field is used to select the claim you wish to view.
LAST NAME
Last name of the beneficiary.
FIRST INIT
First initial of the beneficiary's name.
TOT CHG
Total charge. The total charge submitted on the CMS-1450 claim form.
PROV REIMB
Provider reimbursement. The amount reimbursed to the provider for an individual claim.
PD DT
Paid date. The date the claim will pay (for claims in P B9996) or was paid (P B9997). For claims in RTP (T B9997), this is the date the claim went to the RTP status/location. For claims rejected (R B9997) or denied (D B9997), this is the date the claim rejected or denied.
CAN DT
Cancel date. The date the original claim was canceled.
REAS
Reason code. The code assigned by FISS describing what is happening to the claim (edit).
NPC
Non-payment code. The code indicating why payment was not made.
Values are:
B Benefits exhausted N All other reasons R Spell of illness benefits refused, certification refused, failure to submit evidence, provider responsible for not filing timely,ro Waiver of Liability W Workers compensation X MSP cost avoided Z System set for type of bills 322 – MSP Primary Payer
NOTE: this code displays on home health Requests for Anticipated Payment (RAPs) when:
there is another insurer that is primary to Medicare.
the "From" date of a RAP falls within a Medicare Advantage plan enrollment period.
# DAYS
Number of days. The number of days the claim has been in the Return to Provider (RTP) status. This field is only functional through the Claim and Attachments Corrections Menu. Refer to the Claims Corrections section of this manual for additional information.
FISS Inquiry Screens MAP 171E, 171A, 171D, and 171G
Once you have selected to view a claim from the Claim Summary Inquiry screen (MAP 1741), and press F8 to access Page 02 of the claim, you have the ability to press F11 to move to the right, which will display MAP171E, Press F11 again, and MAP 171A will display, press F11 again, and MAP 171D displays, and press F11 again and Map 171G (home health only) will display. Refer to the following screen prints and field descriptions.
Map 171E Screen Example
Map 171E Field Descriptions
The MID, TOB, and S/LOC fields are system generated from Page 01 of the claim.
CL
Claim line item number (1 – 450).
NDC FIELD
National Drug Code (NDC) information. No longer required by Hospice providers.
NDC QUANTITY
The NDC quantity. No longer required by Hospice providers.
QUALIFIER
The units of measurement qualifier. No longer required by Hospice providers.
RETURN HIPPS1
Identifies the HIPPS codes returned from the Internet Quality Information Evaluation System (iQIES). Applicable to inpatient rehabilitation, home health agency or skilled nursing facility/swing bed facilities.
RETURN HIPPS2
Identifies the HIPPS codes returned from iQIES. Applicable to skilled nursing facility/swing bed.
MOLDX
Identifies the Molecular Diagnostic Services test ID. Not applicable to home health and hospice claims.
LLR NPI
Line Level Rendering Physician's NPI number.
L
Last name of the physician.
F
First name of the physician.
M
Middle name of the physician.
SC
Special Code.
LLO NPI
Line Level Ordering National Provider Identifier (NPI). For institutional outpatient claims with advanced diagnostic imaging services subject to the Appropriate Use Criteria (AUC). Review SE20002 for additional information.
Map 171A Screen Example
Map 171A Field Descriptions
Fields prior to the start of the revenue code line item information (first four rows of information) are system generated from Page 01 of the claim.
REP PAYEE
Identifies a Medicare beneficiary with a Rep Payee.
UTN
Unique Tracking Number – assigned to a prior authorization request.
PGM
Prior authorization program indicator – a four-position alphanumeric field that identifies the prior authorization program ID matching to the item/services on the claim.
Value Code 05/Other. Identifies whether value code 05 is present on the claim.
MSP BLOOD DEDUCTIBLES
Medicare Secondary Payer Blood Deductibles.
MSP CASH DEDUCTIBLES
Medicare Secondary Payer Cash Deductibles.
MSP COINSURANCE
Medicare Secondary Payer Coinsurance.
ANSI ESRD-RED/ PSYCH/HBCF
ANSI End Stage Renal Disease Reduction/Psychiatric Coinsurance/Hemophilia Blood Clotting Factor.
ANSI VALCD-05
/OTHER
ANSI Value Code-05/Other. Identifies the 2-position ANSI group code and 3-position ANSI reason (adjustment) code. The ANSI data for the value codes are reported on the Remittance Advice for the Value Code 05/Other amount.
OUTLIER
The apportioned line level outlier amount returned from the MSP module.
Medicare Secondary Payer Payer-1. Identifies the amount entered by the provider (if available) or apportioned by FISS as payment from the primary payer. FISS, based on the amount used in payment calculation and the value code for the primary payer, apportions this amount.
MSP PAYER-2
Medicare Secondary Payer Payer-2. Identifies the amount entered by the provider (if available) or apportioned by FISS as payment from the secondary payer. FISS, based on the amount used in payment calculation and the value code for the secondary payer, apportions this amount.
OTAF
Obligated to Accept Payment in Full. Identifies the line item apportioned amount entered by the provider (if applicable) or apportioned amount calculated by the MSPPAY module of the obligated to accept as payment in full, when value code 44 is present.
MSP DENIAL IND
Medicare Secondary Payer Denial Indicator. Identifies to the MSPPAY module that an insurer primary to Medicare has denied this line item. The valid values are:
" " – not denied
D – denied
OCE FLAGS
Flag 1 – Service Indicator – valid values are:
B – Non-allowed item or service for OPPS
M – Medical Review changes a HIPPS code
P – Pricer upcode/downcode; The Pricer program in FISS changes the HIPPS code to "early" or "late" based on the beneficiary's adjacent episode history posted to the Common Working File (CWF) and/or the claim contains more or less therapy revenue codes than indicated by the HIPPS code submitted.
Flag 2 – Payment Indicator Flag 3 – Discounting Formula Number Flag 4 – Line Item Denial or Rejection Flag Flag 5 – Packing Flag Flag 6 – Payment Adjustment Flag Flag 7 – Payment Method Flag Flag 8 – Line Item Action Flag Flag 9 – Composite Adjustment Flag 10 – Claim Receipt Flag
MSP PAYER – 1 ID
Medicare Secondary Payer Payer-1 ID – Displays 1-position alphanumeric code identifying the specific payer. If Medicare is primary, this field will be blank. The valid values are:
1 – Medicaid 2 – Blue Cross 3 – Other 4 – None A – Working Aged B – ESRD beneficiary in a 30-month coordination period with an employer group health plan C – Conditional payment D – Auto no-fault E – Worker's Compensation F – Public Health Service or other Federal Agency G – Disabled H – Black Lung L – Liability
MSP PAYER – 2 ID
Medicare Secondary Payer Payer-2 ID – Displays 1-position alphanumeric code identifying the specific payer. If Medicare is secondary, this field will be blank. The valid values are:
1 – Medicaid 2 – Blue Cross 3 – Other 4 – None A – Working Aged B – ESRD beneficiary in a 12-month coordination period with an employer group health plan C – Conditional payment D – Auto no-fault E – Worker's Compensation F – Public Health Service or other Federal Agency G – Disabled H – Black Lung L – Liability
PAT REIMB
Patient Reimbursement. This field identifies the system generated calculated line amount to be paid to the patient on the basis of the amount entered by the provider on Page 03 of the claim, in the "Due From PAT" field.
PAT RESP
Patient Responsibility. Identifies the amount for which the individual receiving services is responsible. The amount is calculated as follows:
If Payer 1 indicator is C or Z, the amount equals: cash deductible + coinsurance + blood deductible.
If Payer 1 indicator is not C or Z, the amount equals: MSP blood + MSP cash deductible + MSP coinsurance.
PAT PAID
Patient paid. Identifies the line item patient paid amount calculated by the system. This amount is the lower of (patient reimbursement + patient responsibility) or the remaining patient paid (after the preceding lines have reduced the amount entered on Page 03 of the claim).
REDUCT-AMT
Reduction amount. A 10 percent reduction in conjunction with Group Code "CO".
ANSI
ANSI Group Code and the Claim Adjustment Reason Codes related to the reduction amount.
PROV REIMB
Provider Reimbursement. Identifies the system generated calculated line amount to be paid to the provider.
LABOR
Identifies the labor amount of the payment as calculated by Pricer.
NON-LABOR
Identifies the non-labor amount of the payment as calculated by Pricer.
MED REIMB
Medicare Reimbursement. Identifies the total Medicare reimbursement for the line item, which is the sum of the patient reimbursement and the provider reimbursement.
CONTR
ADJUSTMENT
Contractor Adjustment. Identifies the total contractual adjustment. The calculation is: submitted charge – deductible – wage adjusted coinsurance – blood deductible – value code 71 – psychiatric reduction – value code 05/other – reimbursement amount.
Note: For MSP claims, the MSP deductible, MSP blood deductible, and MSP coinsurance is used in the above calculation in place of the deductible, blood deductible, and coinsurance amounts.
ANSI
ANSI Group – ANSI Adjustment Code – Identifies the 2-position ANSI group code and 3-position ANSI reason (adjustment) code. The ANSI data for the value codes are reported on the Remittance Advice.
PRICER AMT
Pricer Amount. Identifies the total reimbursement received from Pricer.
PRICER RTC
Pricer Return Code. Identifies the return code from the OPPS Pricer.
PAY METHOD
Payment Method. Identifies the payment method returned from OCE. Valid values are:
1 – paid standard OPPS amount (status indicators S, T, V, X, or P)
2 – services not paid under OPPS (status indicator A)
3 – not paid (status indicators W, Y, or E) or not paid under OPPS (status indicators B, C or Z)
4 – acquisition cost paid (status indicator F)
5 – additional payment for drug or biological (status indicator G)
6 – additional payment for device (status indicator H)
7 – additional payment for new drug or new biological (status indicator J)
9 – no additional payment included in line items with APCS (status indicator N, or no HCPCS code and certain revenue codes, or HCPCS codes Q0082 (activity therapy), G0129 (occupational therapy), or G0177 (partial hospitalization program services)
IDE/NDC/UPC
Identifies IDE, NDC, and UPC.
ASC GRP
Identifies the ASC group code for the indicated revenue code.
%
ASC Percentage. Identifies the percentage used by the ASC Pricer in its calculation for the indicated revenue code.
Map 171D Screen Example
Map 171D Field Descriptions
SC
Screen Control. A feature that allows you to access other FISS inquiry options.
DCN
Document Control Number. Displays the claim's identification number assigned by FISS when the claim is received.
MID
Beneficiary's Medicare ID number
RECEIPT DATE
Identifies the actual receipt date. This is automatically entered by FISS.
TOB
Type of Bill. Identifies the type of bill that applies to the claim.
STATUS
Identifies the claim's status in the system (P, D, R, S, or T).
LOCATION
Further identifies the claim's location in the system.
TRAN DT
Transaction Date. Identifies the date of the latest update activity.
STMT COV DT
Statement Covers Date. Identifies the beginning date of service.
TO
Statement Covers "To" Date. Identifies the ending date of service.
PROVIDER ID
Provider Number. Identifies your facility's National Provider Identifier (NPI).
BENE NAME
Beneficiary Name. Identifies the name of the beneficiary.
NONPAY CD
Non-Pay Code. Identifies the reason for Medicare's decision not to make payment. Valid values are:
B
Benefits exhausted
N
All other reasons
P
Payment Requested
R
Spell of illness benefits refused, certification refused, failure to submit evidence, provider responsible for not filing timely,ro Waiver of Liability
W
Workers Compensation
X
MSP cost avoided
Z
MSP Primary Payer
GENER HARDCPY
Generate hardcopy. Instructs system to generate a specific type of hard copy document. Valid values are:
2 Medical ADR
3 Non-medical ADR
4 MSP ADR
5 MSP cost avoidance ADR
7 ADR to beneficiary
8 MSN (line item) or partial benefit denial letter (BDL)
9 MSN (claim level) or full BDL
MR INCLD IN COMP
Composite Medical Review Included in Composite Rate.
CL MR IND
Complex Manual Medical Review Indicator. Identifies if all services on the claim received complex manual medical review. Valid values:
""The services did not receive manual medical review. Y Medical records received and this service received complex manual medical review. A "Y" will display when the OCE FLAGS field on Map 171A displays an "M" (Medical Review changes a HIPPS code). N Medical records were not received and this service received routine manual medical review.
TPE-TO-TPE
Tape to Tape flag. Displays the tape-to-tape flag indicating the system to either perform or skip a function. If the value in this field is "X", the claim data information is not posted to the Common Working File (CWF). If this field is blank, the claim data from the finalized (status/location P B9997, R B9997, or D B9997) billing transaction did post to CWF. Whenever claim data has posted to CWF, a cancel or adjustment must be submitted to remove or change this information. Valid values and the functions include:
USER ACT CODE
User Action Code. For intermediary use for medical review and reconsideration only. Valid values are:
A – pay per waiver – full technical B – pay per waiver – full medical C – provider liability – full medical – subject to waiver provision D – beneficiary liability – full – subject to waiver provision E – pay claim – line full F – pay claim partial – claim must be updated to reflect liability G – provider liability – full technical – subject to waiver provision H – full/partial denial with multiple liabilities – claim must be updated to reflect liability I – full provider liability – medical – not subject to waiver provision J – full provider liability – technical – not subject to waiver provision K – full beneficiary liability – not subject to waiver provision L – full provider liability – code changed to reflect actual service M – pay per waiver – line or partial line N – provider liability – line or partial line O – beneficiary liability – line or partial line P – open biopsy changed to closed biopsy Q – release with no medical review performed R – CWF denied but medical review was performed Z – force claim to be re-edited by medical policy 5 – set systematically from the reason code file to identify claims for which special processing is required 7 – force claim to be re-edited by medical policy edits in the 5XXXX range 8 – claim was suspended via an OCE MED review reason 9 – claim has been identified as a first claim review
WAIV IND
Waiver Indicator. Identifies whether the provider has their presumptive waiver status. This field is no longer used.
MR REV URC
Medical Review Utilization Review Committee Reversal.
DEMAND
Medical Review Demand Reversal
REJ CD
Reject Code. Identifies the reason code for which the claim is being denied (on full claim denials only).
MR HOSP RED
Medical Review Hospice Reduced. For hospice claims, this field identifies the line item(s) has been reduced to a lesser charge by medical review. Valid values are:
Y – Reduced
" " – Not reduced
RCN IND
Reconsideration Indicator. Only used on home health claims. Valid values are:
A – finalized count affirmed B – finalized no adjustment count (pay per waiver) R – finalized count reversal (adjustment) U – reconsideration
MR HOSP RO
Medical Review Regional Office Referred. For hospice claims, if the claim has been referred to the CMS Regional Office for questionable revocation, the medical review operator will indicate so by entering a Y in this field, otherwise the field will be blank.
ORIG UAC
Original User Action Code. For intermediary use only.
MED REV RSNS
Medical Review Reasons. Identifies a specific error condition relative to medical review. There are up to nine medical review reasons that can be captured per claim. This field only displays medical review reasons specific to claim level.
OCE MED REV
RSNS
OCE Medical Review Reasons.
Unlabeled
Identifies the line number of the revenue code. The line number is located above the revenue code field on this Map. To move to another revenue code, press F6 to scroll down and F5 to scroll up.
REV
Revenue Code.
HCPC/MOD IN
HCPCS Code/Modifier. Valid values are:
U – upcoding D – downcoding
" " – no downcoding
HCPC
Healthcare Common Procedure Coding System. Indicates 5-position HCPCS associated with the revenue code.
MODIFIERS
Healthcare Common Procedure Coding System Modifier.
SERV DATE
Service date. Line item date of service associated with the revenue code.
COV-UNT
Covered units. Reflects the number of covered visits associated with the revenue code.
COV-CHRG
Covered charges. Represents the covered charges associated with the revenue code.
ADR REASON
CODES
Additional Development Request. ADR reason codes used when additional information has been requested.
FMR REASON
CODES
Focused Medical Review Suspense Codes. Identifies the medical review suspense codes when a claim is edited based on the medical policy parameter file.
ODC REASON
CODES
Original Denial Reason Code. Identifies the original denial reason codes.
ORIG
Original HCPCS or HIPPS code, or modifiers billed.
ORIG REV
CODE
Original revenue code billed.
MR
Complex Manual Medical Review Indicator. Identifies if all services on the claim received complex manual medical review. Valid values are:
" " – services did not receive manual medical review Y – medical records received and services received complex manual medical review N – medical records were not received and services received routine manual medical review
OCE OVR
Override. Overrides the way the OCE module controls the line item. Valid values are:
0 – OCE line item denial or rejection is not ignored 1 – OCE line item denial or rejection is ignored 2 – External line item denial. Line item is denied even if no OCE edits. 3 – External line item reject. Line item is rejected even if no OCE edits. 4 – External line item adjustment. Technical charge rules apply.
CWF OVR
CWF Home Health Override. Overrides the way the OCE module controls the line item.
NCD OVR
National Coverage Determination Override Indicator. Identifies whether the line has been reviewed for medical necessity and should bypass the NCD edits, the line has no covered charges and should bypass the NCD edits, or the line should not bypass the NCD edits. Valid values are:
" " – NCD edits are not bypassed Y – the line has been reviewed for medical necessity and bypasses the NCD edits D – the line has no covered charges and bypasses the NCD edits
NCD DOC
National Coverage Determination Documentation Indicator. Identifies whether the documentation was received for the necessary medical service. Valid values are:
Y – the documentation supporting the medical necessity was received. N – the documentation supporting the medical necessity was not received.
NCD RESP
National Coverage Determination Response Code. Identifies the response code that is returned from the NCD edits. Valid values are:
" " – default 0 – the HCPCS/diagnosis code matched the NCD edit table pass criteria. The line continues through the internal local medical necessity edits. 1 – the line continues through the internal local medical necessity edits because: the HCPCS code was not applicable to the NCD edit table process, the date of services was not within the range of the effective dates for the codes, the override indicator is set to Y or D, or the HCPCS code field is blank. 2 – none of the diagnoses supported the medical necessity of the claim, but the documentation indicator shows that the documentation to support medical necessity is provided. The line suspends for medical review. 3 – the HCPCS/diagnosis code matched the NCD edit table list ICD deny codes. The line suspends and indicates that the service is not covered and is to be denied as beneficiary liable due to noncoverage by statute. 4 – none of the diagnosis codes on the claim support the medical necessity for the procedure and no additional documentation is provided. This line suspends as not medically necessary and will be denied. 5 – diagnosis codes were not passed to the NCD edit module for the NCD HCPCS code. The claim suspends and will move to the Return to Provider (RTP) file.
NCD #
National Coverage Determination Number. This field identifies the NCD number associated with the beneficiaries claim denial. This is an eight-position alphanumeric field.
OLUAC
Original Line User Action Code. Identifies the original line user action code and is only used when there is a line user action code and a corresponding medical review denial reason code in the Benefits Savings portion of the claim.
LUAC
Line User Action Code. This is a 2-position field. The 1st position indicates the cause of the denial reason for the specific revenue line (see the USER ACT CODE field of this FISS Guide chapter for valid values). The 2nd position indicates the reconsideration code. A value equal to R indicates that reconsideration has been performed.
NON COV-UNT
Noncovered units. Contains the number of units that are being denied, if applicable.
NON COV-CHRG
Noncovered charges. Identifies the total of denied/rejected/noncovered charges for each line item being denied.
DENIAL REAS
Denial Reason. Identifies the reason code associated with the denial for the revenue code line.
OVER CODE
Override Code. Overrides the system generated ANSI codes from the denial reason code file. The valid values are:
A – override system generated ANSI code
" " – system default
ST/LC OVER
Status/location Override. Overrides the reason code file status. Only used by CGS. Valid values are:
D – denied line item for the reason code. R – rejected the line item for the reason code
" " – processed claim with no override action
MED TEC
Medical Technical Denial Indicator. Identifies the appropriate Medical Technical Denial indicator used when performing the medical review denial of a line item. The valid values are:
A – home health only – not intermittent care – technical and waiver was applied B – home health only – not homebound – technical and waiver was applied C – home health only – lack of physician's orders – technical deletion and waiver was not applied D – home health only – records not submitted after the request – technical deletion and waiver was not applied M – medical denial and waiver was applied S – medical denial and waiver was not applied T – technical denial and waiver was applied U – technical denial and waiver was not applied
ANSI ADJ
ANSI Adjustment Reason Code. Identifies the ANSI adjustment reason code associated with the denial reason for each line item.
ANSI GRP
ANSI Group Code. Contains the ANSI group code associated with the denial reason for each line item.
ANSI REMARKS
ANSI Remarks Code. Contains the ANSI remarks codes associated with the denial reason for each line item.
TOTAL
Contains the sum of all revenue code noncovered units.
LINE ITEM
REASON CODES
Identifies the reason code that is assigned for suspending the line item.
Map 171G Screen Example (Home Health only)
Map 171G Field Descriptions
The MID, TOB, and S/LOC fields are system generated from Page 01 of the claim.
Each of the 8 OASIS items lines include an OA (OASIS Assessment) field and MR (Medical Review) field. The OA field displays the OASIS item sent from iQIES to FISS. The MR field is used by the CGS Medical Review staff to enter corrections when, based on their review of the full medical record, they find OASIS data is not supported.
M1033-HSTRY-FALLS
OA (OASIS Assessment)
MR (Medical Review)
This field indicates if there are risk factors for hospitalization-falls. One position numeric field.
Valid Values: 0 – Unchecked (No) 1 – Checked (Yes) 9 – No iQIES Assessment found
M1033-WEIGHT-LOSS
OA
MR
This field indicates if there are risk factors for hospitalization-weight loss. One position numeric field.
Valid Values: 0 – Unchecked (No) 1 – Checked (Yes) 9 – No iQIES Assessment found
M1033-MLTPL HOSPZTN
OA
MR
This field indicates if there are risk factors for hospitalization-multiple hospitalizations. One position numeric field.
Valid Values: 0 – Unchecked (No) 1 – Checked (Yes) 9 – No iQIES Assessment found
M1033-MLTPL-ED-VISIT
OA
MR
This field indicates if there are risk factors for hospitalization-multiple emergency department visits. One position numeric field.
Valid Values: 0 – Unchecked (No) 1 – Checked (Yes) 9 – No iQIES Assessment found
M1033-MNTL-BHV-DCLN
OA
MR
This field indicates if there are risk factors for hospitalization-mental behavior decline. One position numeric field.
Valid Values: 0 – Unchecked (No) 1 – Checked (Yes) 9 – No iQIES Assessment found
M1033-COMPLIANCE
OA
MR
This field indicates if there are risk factors for hospitalization-compliance. One position numeric field.
Valid Values: 0 – Unchecked (No) 1 – Checked (Yes) 9 – No iQIES Assessment found
M1033-5PLUS-MDCTN
OA
MR
This field indicates if there are risk factors for hospitalization-currently taking 5 or more medications. One position numeric field.
Valid Values: 0 – Unchecked (No) 1 – Checked (Yes) 9 – No iQIES Assessment found
M1033-CRNT-EXHSTN
OA
MR
This field indicates if there are risk factors for hospitalization-exhaustion. One position numeric field.
Valid Values: 0 – Unchecked (No) 1 – Checked (Yes) 9 – No iQIES Assessment found
M1033-OTHER RISK
OA
MR
This field indicates if there are risk factors for hospitalization-other risks. One position numeric field.
Valid Values: 0 – Unchecked (No) 1 – Checked (Yes)
9 – No iQIES Assessment found
M1033-NONE-ABOVE
OA
MR
This field indicates if there are risk factors for hospitalization-none of the above. One position numeric field.
Valid Values:
0 – Unchecked (No) 1 – Checked (Yes) 9 – No iQIES Assessment found
M1800-CRNT-GROOMING
OA
MR
This field indicates Grooming: Current ability to tend safely to personal hygiene needs (specifically: washing face and hands, hair care, shaving or make up, teeth or denture care, or fingernail care). Two position numeric field.
Valid Values: 00 – Able to groom self unaided, with or without the use of assistive devices or adapted methods 01 – Grooming utensils must be placed within reach before able to complete grooming activities. 02 – Someone must assist the patient to groom self. 03 – Patient depends entirely upon someone else for grooming needs. 99 – No iQIES Assessment found
M1810-DRESS-UPPER
OA
MR
This field indicates Current Ability to Dress Upper Body safely (with or without dressing aids) including undergarments, pullovers, front-opening shirts and blouses, managing zippers, buttons, and snaps. Two position numeric field.
Valid Values: 00 – Able to get clothes out of closets and drawers, put them on and remove them from the upper body without assistance. 01 – Able to dress upper body without assistance if clothing is laid out or handed to the patient. 02 – Someone must help the patient put on upper body clothing. 03 – Patient depends entirely upon another person to dress the upper body. 99 – No iQIES Assessment found
M1820-DRESS-LOWER
OA
MR
This field indicates Current Ability to Dress Lower Body safely (with or without dressing aids) including undergarments, slacks, socks or nylons, shoes. Two position numeric field.
Valid Values: 00 – Able to obtain, put on, and remove clothing and shoes without assistance. 01 – Able to dress lower body without assistance if clothing and shoes are laid out or handed to the patient. 02 – Someone must help the patient put on undergarments, slacks, socks or nylons, and shoes. 03 – Patient depends entirely upon another person to dress the lower body. 99 – No iQIES Assessment found
M1830-CRNT-BATHG
OA
MR
This field indicates Bathing: Current ability to wash entire body safely. Excludes grooming (washing face, washing hands, and shampooing hair). Two position numeric field.
Valid Values: 00 – Able to bathe self in shower or tub independently, including getting in and out of tub/shower. 01 – With the use of devised, is able to bathe self in shower or tub independently, including getting in and out of the tub/shower. 02 – Able to bathe in shower or tube with the intermittent assistance of another person.
For intermittent supervision or encouragement or reminders, OR
To get in and out of the shower or tube, OR
For washing difficult to reach areas.
03 – Able to participate in bathing self in shower or tub, but requires presence of another person throughout the bath for assistance or supervision. 04 – Unable to use the shower or tub, but able to bathe self independently with or without the use of devices at the sink, in chair, or on commode. 05 – Unable to use the shower or tub, but able to participate in bathing self in bed, at the sink in bedside chair, or on commode, with the assistance or supervision of another person. 06 – Unable to participate effectively in bathing and is bathed totally by another person. 99 – No iQIES Assessment found
M1840-CRNT TOILTG
OA
MR
This field indicates Toilet Transferring: Current ability to get to and from the toilet or bedside commode safely and transfer on and off toilet/commode. Two position numeric field.
Valid Values: 00 – Able to get to and from the toilet and transfer independently with or without a device. 01 – When reminded, assisted, or supervised by another person, able to get to and from the toilet and transfer. 02 – Unable to get to and from the toilet but is able to use a bedside commode (with or without assistance). 03 – Unable to get to and from the toilet or bedside commode but is able to use a bedpan/urinal independently. 04 – Is totally dependent in toileting. 99 – No iQIES Assessment found
M1850-CRNT-TRNSFRNG
OA
MR
This field indicates Transferring: Current ability to move safely from bed to chair, or ability to turn and position self in bed if patient is bedfast Two position numeric field.
Valid Values: 00 – Able to independently transfer. 01 – Able to transfer with minimal human assistance or with use of an assistive device. 02 – Able to bear weight and pivot during the transfer process but unable to transfer self. 03 – Unable to transfer self and is unable to bear weight or pivot when transferred to another person. 04 – Bedfast, unable to transfer but is able to turn and position slef in bed. 05 – Bedfast, unable to transfer and is unable to turn and position self. 99 – No iQIES Assessment found
M1860-CRNT-AMBLTN
OA
MR
This field indicates Ambulation/Locomotion: Current ability to walk safely, once in a standing position, or use a wheelchair, once in a seated position, on a variety of surfaces. Two position numeric field.
Valid Values: 00 – Able to independently walk on even and uneven surfaces and negotiate stairs with or without railings (specifically: needs no human assistance or assistive device). 01 – With the use of a one-handed device (for example, cane, single crutch, hemi-walker), able to independently walk or even and uneven surfaces and negotiate stairs with or without railings. 02 – Requires use of a two-handed device (for example, walker, or crutches) to walk alone on a level surface and/or requires human supervision or assistance to negotiate stairs or steps or uneven surfaces. 03 – Able to walk only with the supervision or assistance of another person at all times. 04 – Chairfast, unable to ambulate but is able to wheel self independently. 05 – Chairfast, unable to ambulate and is unable to wheel self. 06 – Bedfast, unable to ambulate or be up in a chair. 99 – No iQIES Assessment found
Archived Claims
FISS archives claim data on processed claims after 18 months from the date the claim is processed. Archived claims can be identified by status/location P O9998 or R O9998 (the letter "O" as in "offline" and not a "0" (zero)).
These claims can be accessed by selecting 12 (Claims) from the Inquiry Menu; typing your NPI in the NPI field, and entering the beneficiary's Medicare number in the MID field. Then tab to the S/LOC field and, enter P O9998 or R O9998. Press Enter. Archived claims do not display the beneficiary's name or provider reimbursement (PROV REIMB) amount, and if selected (type an S in the SEL field) all claim pages appear blank. The message "ADJUSTMENT CLAIM IS PRESENTLY OFFLINE PF10 TO RETRIEVE" will display.
Although the claim data is archived, you are able to retrieve an archived claim to inquire into how it was submitted and processed. For additional information on how to retrieve an archived claim, refer to the "Claims Correction" section of this manual.
Revenue Codes (Option 13)
This option is helpful if you need to verify revenue codes that can be billed with specific bill types. This screen also provides information to verify what additional information (e.g., units, HCPCS code) must accompany the revenue code.
From the Inquiry Menu, type 13 in the Enter Menu Selection field and press Enter.
You may also access this screen by typing 13 in the SC field if you are in an inquiry or claim entry screen.
The Revenue Code Table Inquiry screen (Map 1761) appears:
To view revenue code information, type the revenue code in the REV CD field and press Enter.
The REV CD field is a 4-digit field. If you enter a 3-digit revenue code and press Enter, FISS will add a zero to the first position.
To see all of the revenue code information for all types of bill (TOB), press F6 to scroll forward.
To make additional inquiries, simply enter a new revenue code over the previously entered code and press Enter. If you enter a new 3-digit revenue code over the previously entered code, the first digit must be a zero, or enter the 3-digit revenue code in the first 3 positions and delete the 4th digit before pressing Enter.
Press F3 to exit the Revenue Code Table Inquiry screen and return to the Inquiry Menu.
Map 1761 Field Descriptions
REV CD
Revenue code. A 4-digit field that represent the type of service, supply, or equipment being provided.
EFF DT
Effective date. The date the revenue code became effective (MMDDYY format).
IND
Effective date indicator. This date instructs the system to either use the "from" date of the claim or the system run date to perform edits for this revenue code. Values are:
F Claim from date R Claim receipt date D Claim discharge date
TRM DT
Termination date. The date the revenue code became invalid. (MMDDYY format).
NARR
Narrative. The English-language description for the revenue code.
TOB
Type of bill. The first two digits of the type of bill followed by an 'X' denoting the frequency.
ALLOW:
Allowable. This field indicates whether the revenue code is valid for the type of bill. Values are:
Y Yes N No
EFF-DT
Allowable effective date. The date the revenue code became a valid code (MMDDYY format).
TRM-DT
Allowable termination date. The date the revenue code was no longer valid (MMDDYY format).
HCPC:
Healthcare Common Procedure Code System. This field indicates whether the revenue code requires a HCPCS. Values are:
Y Yes N No V Validation of HCPCS is required
EFF-DT
HCPCS effective date. The beginning date the HCPCS code became required for this revenue code (MMDDYY format).
TRM-DT
HCPCS termination date. The date the HCPCS code was no longer required for this revenue code (MMDDYY format).
UNITS:
Units required. This field indicates whether units must be entered for this revenue code. Values are:
Y Yes N No
EFF-DT
Unit's effective date. The beginning date units became required for this revenue code (MMDDYY format).
TRM-DT
Unit's termination date. The date units were no longer required for this revenue code (MMDDYY format).
RATE:
Rate. This field indicates whether a rate must be entered for this revenue code. Values are:
Y Yes N No
Note: This field is currently not functional, and will always show "N".
EFF-DT
Rate's effective date. The beginning date for the requirement to enter a rate for this revenue code (MMDDYY format).
TRM-DT
Rate's termination date. The end date for the requirement to enter a rate for this revenue code (MMDDYY format).
HCPC Codes (Option 14)
This option is helpful if you need to inquire about Healthcare Common Procedure Coding System (HCPCS) code reimbursement or verify which revenue codes are allowable with HCPCS codes.
From the Inquiry Menu, type 14 in the Enter Menu Selection field and press Enter.
You may also access this screen by typing 14 in the SC field if you are in an inquiry or claim entry screen.
The HCPC Information Inquiry screen (Map 1771) appears:
Use your Tab key to move to the HCPC field and type the HCPCS code. Press Enter. FISS will automatically insert information in the CARRIER and LOC fields based on your geographic location.
Note for Hospice Providers: To determine if the HCPC code is allowable for hospice revenue codes, you must also enter an "R" in the IND field, and then press Enter.
Use the following function keys to move around the screen:
F3 – Exit (return to the Inquiry Menu)
F5 – Scroll up one page
F6 – Scroll down one page
F11 – Scroll right
F10 – Scroll left
Press F11 to move the screen to the right. Map 1772 will display. The type of data that displays will depend on the type of HCPCS code you enter. Press F10 to move back to the left of Map 1771. Refer to the following for more information.
If the HCPCS code is a durable medical equipment (DME) item, Map 1772 will display the new, rental and used rates for that DME item (screen example on the next page). Press F10 to move back to the left to Map 1771.
If the code is any other type of HCPCS code (non-DME), Map 1772 will display the 60 percent, 62 percent, rehabilitation, and professional service rates. Press F10 to move back to the right to Map 1771.
To inquire about other HCPCS codes, enter the HCPCS code over the previously entered HCPC and press Enter.
Press F3 to exit the HCPCS Information Inquiry screen and return to the Inquiry Menu.
Map 1772 Field Descriptions
CARRIER
Carrier. The carrier number assigned to your provider file. System generated.
LOC
The two position locality code which identifies the area where the provider is located.
HCPC
Healthcare Common Procedure Coding System. The HCPCS code to be reviewed on the screen.
MOD
HCPC Modifier. Multiple fees will be identified for the HCPCS code based on the modifier.
IND
HCPC indicator. Type an "R" to display hospice allowable revenue codes.
EFF DT
Effective date. The date the code became effective (MMDDYY format).
TERM DT
Termination date. The termination date for the code (MMDDYY format).
PROVIDER
The Medicare provider number assigned to your facility.
DRUG CODE
This field identifies whether the HCPCS code is a drug. The valid values are:
E – HCPCS is a drug
" " – HCPCS is not a drug
EFF. DATE
Effective date. The effective date for the rate listed (MMDDYY format).
TRM. DATE
Termination date. The termination date for the rate listed (MMDDYY format).
EFF
Effective date indicator. This indicator instructs the system to either use the 'from' and 'through' dates of the claim or the system run date to perform edits for this HCPCS. Values are:
F Claim from date R Claim receipt date D Discharge date
OVR
Override code. This field instructs the system in applying the services towards deductible and coinsurance. Values are:
0 Apply deductible and coinsurance 1 Do not apply deductible 2 Do not apply coinsurance 3 Do not apply deductible or coinsurance 4 No need for total charges (used for multiple HCPCS for single revenue code centers) 5 Rural health clinic or comprehensive outpatient rehabilitation facility psychiatric M Employer group health plan (EGHP) (only used on the 0001 total line for Medicare Secondary Payer (MSP)) N Non-EGHP (only used on the 0001 total line for MSP) X Bypass cost avoided MSP edits Y MSP cost avoided
FEE
Fee Indicator. The fee indicator received in the Physician Fee Schedule file. Valid values: B Bundled procedure R Rehab/Audiology Function Test/CORF Services
" " Default
OPH
Outpatient Hospital Indicator. The outpatient hospital indicator received in the physician fee schedule abstract test file. Valid values: O Fee applicable in Hospital Outpatient Setting 1 Fee not applicable in Hospital Outpatient Setting
" " Default
CAT
Category Code. This field identifies the category of the DME equipment. The valid values are:
1 Inexpensive or other routinely purchased DME 2 DME items requiring frequent maintenance and substantial servicing 3 Certain customized DME items 4 Prosthetic and orthotic devices 5 Capped rental DME items 6 Oxygen and oxygen equipment
PC/TC
Professional Component/Technical Component. Valid values are:
0 Pay the Health Professional Shortage Area (HPSA) bonus 1 Globally billed. Professional component for this service qualifies for the HPSA bonus payment 2 Professional component only, pay the HPSA bonus 3 Technical component only, do not pay the HPSA bonus 4 Global test only. Professional component of this service qualifies for the HPSA bonus payment 5 Incident codes, do not pay the HPSA bonus 6 Laboratory physician interpretation codes, pay the HPSA bonus 7 Physical therapy service, do not pay the HPSA bonus 8 Physician interpretation codes, pay the HPSA bonus 9 Concept of PC/TC does not apply, do not pay the HPSA bonus
ANES BASE VAL
Anesthesia base value. The anesthesia base values.
TYP
HCPCS Type. An 'M' indicator will display when the HCPCS associated with the revenue line originated from the Medicare physician fee schedule.
MSI
Multiple services indicator. The value of '5' identifies services that are subject to the multiple procedure payment reduction (MPPR).
ALLOWABLE
REVENUE CODES
Allowable revenue codes. The allowable revenue codes this HCPCS code may use in billing. This is a four-position field. When the last digit shows an "X," each variable for that revenue code is allowable. If this field is blank, the system will allow a HCPCS code on any revenue code.
HCPC
DESCRIPTION
HCPCS description. The English narrative description of the HCPCS code.
Map 1772 Field Descriptions – DME HCPCS
NEW
New purchase price. The price for the item if it was purchased new.
RENTAL
Monthly rental amount. The monthly rental charge in dollars for this particular HCPCS code.
USED
Used purchase price. The price for the item if it was purchased used.
Map 1772 Field Descriptions – non-DME HCPCS
60%RATE
60% reimbursement rate. The rate the system will use for calculating reimbursement for the HCPCS.
62% RATE or
62%/REDU
62% lab reimbursement rate. The rate the system will use for calculating reimbursement for the lab HCPCS. When the MSI field equals a '5', this field will dispay "62%/REDU" or the reduced therapy fee amount.
REHAB
Rehabilitation rate. The rate used by the system to calculate reimbursement for the HCPCS code for rehabilitation services billed.
PROF
Professional service rate. The rate used by the system to calculate reimbursement for the HCPCS code for professional services
NFACPE
Non-facility amount practice expense (PE) relative value units (RVUs). This field reflects the 20 percent reduction in non-facility PE RVUs.
DX/Proc Codes ICD-9 (Option 15)
This option is helpful if you need to confirm the validity of ICD-9 diagnosis or procedure codes. Note that ICD-9 codes are only valid for services provided prior to October 1, 2015.
From the Inquiry Menu, type 15 in the Enter Menu Selection field and press Enter.
You may also access this screen by typing 15 in the SC field if you are in an inquiry or claim entry screen.
The ICD-9-CM Code Inquiry screen (Map 1731) appears:
To inquire about a diagnosis code, enter the diagnosis code in the STARTING ICD9 CODE field and press Enter. Do not type the decimal point or zero-fill the code. To review a complete list of diagnosis codes, leave the STARTING ICD9 CODE field blank, and press Enter.
While FISS enables you to validate diagnosis codes, you should still have a current ICD-9-CM coding book in your office.
If more than one of the same code is listed, be sure to review the description, effective and termination dates, and use the most current code that applies to the service dates on your claim.
Press F6 to scroll forward through the list of diagnosis codes.
To make an additional inquiry, type the new diagnosis code over the previously entered diagnosis code and press Enter.
To inquire about a procedure code, type the letter P followed by the procedure code in the STARTING ICD9 CODE field and press Enter. To review a complete list of procedure codes, enter only the letter P in the STARTING ICD9 CODE field and press Enter.
Press F3 to exit and return to the Inquiry Menu.
Map 1731 Field Descriptions
STARTING ICD9 CODE
ICD-9-CM code. The ICD-9-CM code identifying a specific diagnosis or procedure.
DESCRIPTION
ICD-9-CM description. The narrative for the ICD-9-CM code.
EFFECTIVE/
TERM DATE
Effective/termination date. The effective and/or termination date for the ICD-9-CM code in MMDDYY format. (Up to three occurrences of dates can appear.) All ICD-9 codes will display a termination code of 093015.
Adjustment Reason Codes (Option 16)
This option allows you to view adjustment reason codes and their narratives. Use these codes to identify reasons for an adjustment. Adjustment reason codes must be submitted on adjustment and cancellation claims when using FISS to submit these type of billing transactions. Refer to the "Claims Correction" section of this manual for additional information about using FISS to submit adjustment and cancellation claims.
From the Inquiry Menu, type 16 in the Enter Menu Selection field and press Enter.
You may also access this screen by typing 16 in the SC field if you are in an inquiry or claim entry screen.
The Adjustment Reason Codes Inquiry screen (Map 1821) appears:
Press Enter to view a complete listing of adjustment reason codes on Map 1821, or type an adjustment reason code in the REASON CODE field and press Enter to display Map 1822.
On Map 1821, press F6 to scroll forward through the list of adjustment reason codes. Press F5 to scroll backwards.
Type S in the S field to select a specific code. Press Enter to view Map 1822.
You can only select one code at a time.
The Adjustment Reason Code Update Scrn Inquiry (Map 1822) appears. The difference between Map 1821 and Map 1822 is that Map 1822 allows you to see the full narrative.
Press F7 to return to Map 1821. Press F3 to return to the Inquiry Menu.
Map 1821 Field Descriptions
MNT:
Identifies your operator ID and today's date. For intermediary use only.
CLAIM TYPES:
Claim types. The claim types identified for each adjustment reason code. The claim types are:
I Inpatient/SNF O Outpatient H Home Health/CORF A All Claims
PLAN CODE:
Plan Code. For intermediary use only.
REASON CODE:
Adjustment reason code. To review a particular adjustment reason code, enter the adjustment reason code value in this field. This field can be used instead of the S (selection) field described below.
S
Selection. This field is used to make a selection to view information for a particular adjustment reason code.
PC
Plan Code. For intermediary use only.
RC
Adjustment reason code. This field displays the adjustment reason codes.
HC
HIGLAS adjustment reason code. This field identifies the HIGLAS (Healthcare Integrated General Ledger Accounting System) adjustment reason code.
TYPE
Claim type. The type of claim associated with this reason code. (Refer to the "CLAIM TYPES" field, above, for valid values.)
NARRATIVE
Narrative. The description for the adjustment reason code.
Map 1822 Field Descriptions
MNT:
Identifies the last operator who created or revised this screen and the date. For intermediary use only.
CLAIM TYPES:
The claim types identified for each adjustment reason code. Valid claim types are:
I Inpatient/SNF O Outpatient H Home Health/CORF A All Claims
PLAN CODE:
Plan Code. For intermediary use only.
REASON CODE
Adjustment reason code identifying the reason for an adjustment.
HIGLAS REASON
CODE
HIGLAS reason code. Used to crosswalk the FISS adjustment reason code to the HIGLAS adjustment reason code.
CLAIM TYPE
Claim type. The type of claim associated with this reason code. (Refer to the "CLAIM TYPES" field, above, for valid values.)
NARRATIVE
Narrative. The description for the adjustment reason code.
Reason Codes (Option 17)
The Reason Codes Inquiry screen provides an explanation/description of the reason code on your claim. You will use this option often to determine what actions are necessary to correct claims in the Return to Provider (RTP) file (T B9997). Rather than selecting option 17 from the Inquiry Menu, you will most likely access the reason codes by pressing F1 when you are in the Claims Entry or Claims Correction options in FISS.
From the Inquiry Menu, type 17 in the Enter Menu Selection field and press Enter.
You may also access this screen by typing 17 in the SC field if you are in an inquiry or claim entry screen or by pressing F1 while you are inquiring, entering or correcting a claim.
The Reason Codes Inquiry screen (Map 1881) appears:
Enter the reason code in the REAS CODE field and press Enter.
Reason codes are found at the bottom left corner of the FISS claim pages. Whenever a reason code appears on your claim, the easiest way to access it is to press your F1 key. Note that having a reason code present on your claim does not mean that it needs correction. For example, even when a claim is in a "P" (paid) status, FISS still assigns a reason code to the claim. Refer to the "Claims Corrections" section of this manual to further understand when you need to correct a claim.
Please note that you may need to press F6 to scroll forward to see all of the reason code narrative.
To see the ANSI reason code that corresponds to the FISS reason code press your F8 key. The ANSI Related Reason Codes Inquiry screen (Map 1882) appears.
Map 1881 Field Descriptions
MNT:
Identifies the last operator who created or revised this screen and the date. For intermediary use only.
PLAN IND
Plan indicator. For intermediary use only.
REAS CODE
Reason code. The reason code identifies a specific condition assigned to the claims during processing. The following identifies the meaning of the first digit of the reason code.
First Digit of Reason Code
Meaning
Example
1
Consistency Edits
11801 (missing/invalid point of origin, previously known as source of admission)
3
FISS
37402 (claims not submitted sequentially)
38107 (system cannot match final claim to processed RAP)
5
Medical
Review
56900 (no response to additional development request)
A-Z
(except W)
CWF
C7080 (A line item date of service overlaps a date of service on an inpatient claim.)
U5181 (occurrence code 27 required when claim overlaps certification or recertification period)
W
Integrated
Outpatient
Code Editor
W7A01 (invalid first diagnosis code)
3
FISS
32402 (invalid HCPCS code)
NARR TYPE
Narrative type. An "E" indicates the narrative is for external users.
EFF DATE
Effective date. The effective date of the reason code.
MSN REAS
Medicare Summary Notice Reason. If a denial is made on the claim, the denial reason code in this field generates the narrative for the Notes section of the Medicare Summary Notice (MSN).
EFF DATE
Effective Date. The effective date for the alternate reason.
TERM DATE
Termination Date. The termination date for the alternate reason.
EMC ST/LOC
Electronic media claims status and location. The status and location set up for automated claims that encounter the reason code. If this field is blank, the HC/PRO ST/LOC field will apply.
HC/PRO ST/LOC
Hardcopy/Quality Improvement Organization (QIO) Status/Location.
The status and location set up for hardcopy or QIO claims, which encounter the reason code.
PP LOC
Post-pay location. This field identifies the post-pay location for postpay development activities.
CC IND
Clean claim indicator. This field instructs the system whether to pay interest. Values are:
A PIP other. B PIP clean. C Non-PIP other. D Non-PIP clean. E Additional information was requested (non-PIP). F Additional information was requested (PIP). G A reply was received from the Common Working File (CWF) providing a date of death, which required development in order to process the claim (non-PIP). H A reply was received from CWF providing a date of death, which required development in order to process the claim (PIP). I A non-definitive response was received from CWF requiring development (non-PIP). J A non-definitive response was received from CWF requiring development (PIP). K A definitive response was not received from CWF within 7 days (delayed response) (non-PIP). L A definitive response was not received from CWF within 7 days (delayed response) (PIP). M The claim was manually set to non-clean. This will only occur in rare situations such as a claim requiring development external to the intermediary's operation (non-PIP). N The claim was manually set to non-clean. This will only occur in rare situations such as a claim requiring development external to the intermediary's operation (PIP). O The claim is a sequential claim in which the prior claim was pending (non-PIP). P The claim is a sequential claim in which the prior claim was pending (PIP).
TPTP
A – B
For intermediary use only.
NPCD
A – B
For intermediary use only.
HD CPY
A – B
For intermediary use only.
NB ADR
For intermediary use only.
CAL DY
For intermediary use only.
C/L
Identifies if the reason code applies to the claim or a line item.
NARRATIVE
Narrative for the specific reason code.
Map 1882 Field Descriptions
MNT:
Identifies the last operator who created or revised this screen and the date. For intermediary use only.
REASON CODE:
Reason code. The reason code identifies a specific condition assigned to the claims during processing.
PIMR ACTIVITY CODE:
Program integrity management reporting (PIMR) activity code. The PIMR activity code for which the reason code is being categorized. Valid values are:
AI Automated CCI edit AL Automated locally developed edit AN Automated national edit CP Prepay complex probe review DB TPL or demand bill claim review MR Manual routine review PS Prepay complex provider specific review RO Reopening SS Prepay complex service specific review
DENIAL CODE:
PIMR denial reason code. The denial reason code for which the reason code is being categorized. Valid values are:
100001 Documentation Does Not Support Service 100002 Investigation/Experimental 100003 Item/Services Excluded From Medicare Coverage 100004 Requested Information Not Received 100005 Services Not Billed Under The Appropriate Revenue Or Procedure Code (Include Denials Due To Unbundling In This Category 100006 Services Not Documented In Record 100007 Services Not Medically Reasonable And Necessary 100008 Skilled Nursing Facility Demand Bills 100009 Daily Nursing Visits Are Not Intermittent/ Part Time 100010 Specific Visits Did Not Include Personal Care Service 100011 Home Health Demand Bills 100012 Ability To Leave Home Unrestricted 100013 Physician's Order Not Timely 100014 Service Not Ordered/Not Included In Treatment Plan 100015 Services Not Included In Plan Of Care 100016 No Physician Certification (E.G. Home Health) 100017 Incomplete Physician Order 100018 No Individual Treatment Plan 100019 Other
MR INDICATOR:
Complex manual medical review. Identifies whether the service received complex manual medical review. Valid values are:
" " The services did not receive manual medical review. Y Medical records received. This service received complex manual medical review. N Medical records were not received. This service received routine manual medical review
CWF NCD IND:
Common Working File National Coverage Determination Indicator – This field will identify if the reason code is associated with a CWF NCD reason code. The field will be populated with a Y (yes) or N (no).
" " The medical policy parameter is not PCA-related and is not included in the PCA transfer files. Y The medical policy parameter is PCA-related and is included in the PCA transfer files. N The medical policy parameter is not PCA-related and is not included in the PCA transfer files.
LMRP/NCD ID:
Local medical review policy (LMRP) (currently known as local coverage determination (LCD)) and/or national coverage determination (NCD) identification number. The LMRP/NCD ID number that are assigned to the FMR reason code for reporting on the Medicare Summary Notice. Intermediary/CMS defined.
ADJ REASONS
Adjustment reasons. This field provides the American National Standards Institute (ANSI) code that explains why an adjustment is being processed.
GROUPS
Groups. This field provides the ANSI code indicating the financial responsibility for the amount of the adjustment or identifies a postinitial adjudication adjustment in the X12 835 case segment. The five group codes are:
PR Patient responsibility CO Contractual obligations OA Other adjustment CR Correction to or reversal of a prior decision 96 Noncovered charges
REMARKS
Remarks. This field provides the ANSI code that identifies the reason for non-payment. This is a five-position alphanumeric field, with four occurrences.
APPEALS (A)
Appeals (A). This field provides the ANSI code indicating the appeal rights related to the initial Part A determination.
APPEALS (B)
Appeals (B). This field provides the ANSI code indicating the appeal rights related to the initial Part B determination. Not applicable to hospice.
EMC CATEGORY
Electronic media claim category code. This field provides the ANSI code that identifies the EMC category of the claim returned on a 277 claim status response.
HC CATEGORY
Hard copy claim category code. This field provides the ANSI code that identifies the hard copy category of the claim returned on a 277 claim status response.
EMC STATUS
Electronic media claim status code. This field provides the ANSI code that identifies the EMC status of the claim returned on a 277 claim status response.
HC STATUS
Hard copy claim status code. This field provides the ANSI code that identifies the hard copy status of the claim returned on a 277 claim status response.
Invoice NO/DCN Trans (Option 88)
This option gives provides the ability to look up claims associated with an Accounts Receivalbe (AR) by using the document control number (DCN).
From the Inquiry Menu, type 88 in the Enter Menu Selection field and press Enter.
You may also access this screen by typing 88 in the SC field if you are in an inquiry or claim entry screen.
The INVOICE NO/DCN TRANSLATOR Inquiry screen (Map HDCN) appears:
Map HDCN Field Descriptions
FISS DCN
Enter the FISS document control number (DCN) of the claim to populate the Invoice Number field. Up to five DCNs can be entered.
INVOICE NUMBER
Enter the HIGLAS invoice number to populate the FISS DCN field. Up to five DCNs can be entered.
Zip Code File (Option 19)
This option is applicable to ambulance providers. It provides the geographic area definitions (rural, urban, and super rural) by zip code and by state.
From the Inquiry Menu, type 19 in the Enter Menu Selection field and press Enter.
You may also access this screen by typing 19 in the SC field if you are in an inquiry or claim entry screen.
The Zip Code Inquiry screen (Map 1171) appears.
Enter a Zip Code in the ZIP CODE field, and Press Enter.
Map 1171 Field Descriptions
ZIP CODE
Identifies the Zip Code on the Zip Code file.
PLUS-FOUR
Identifies the Zip Code 4 digit extension.
SEL
The selection field. Tye "S" in the SEL field to access Map 1172 which displays the list of extensions associated with a zip code and a plus-four flag indicator.
ZIP
Identifies the Zip Code on the Zip Code file. The first Zip Code on the Zip Code file displays first.
PLUS-FOUR
Identifies the Zip Cod 4 digit extension.
CARRIER
Identifies the carrier number assignede to the HCPC.
LOC
Identifies the locality identification number for the area (or county) where the provider is located.
RURAL IND
Identifies the rural indicator. Valid values are:
U – Urban
R – Rural
B – Rural Bonus
RURAL IND2
Identifies the rural indicator. Valid values are:
U – Urban
R – Rural
B – Rural Bonus
PIND
Identifies the ASP price bucket indicator. Valid values are:
A through Z with the exception of H, I, O, R, S = ASP price bucket indicators
PLUS4-FLAG
Identifies the plus 4 flag indicator. Valid values are:
0 – No +4 Extnesion
1 – +4 Extension
STATE
Identifies the state associated with the Zip Code.
OSC Repository Inquiry (Option 1A)
This option is used to retain the history of all Occurrence Span Codes (OSCs) billed by Long Term Care Hospital (LTCH), Inpatient Psychiatric Facility (IPF), and Inpatient Rehabilitation Facility (IRF) providers.
From the Inquiry Menu, type 1A in the Enter Menu Selection field and press Enter.
You may also access this screen by typing 1A in the SC field if you are in an inquiry or claim entry screen.
The DDE OSC Repository Inquiry screen (Map 11A1) appears.
Enter the beneficiary Medicare number in the MID field and the admission date in the ADMIT DATE field, and press Enter.
Map 1171 Field Descriptions
PROVIDER
Identifies your Medicare provider number.
MID
The beneficiary's Medicare number.
ADMIT DATE
The beneficiary's admission date.
DOCUMENT CONTROL NUMBER
Identifies the document control number (DCN) of the claim.
OSC
The occurrence span code that identifies events that relate to the payment of the claim.
FROM DATE
Identifies the occurrence span from date related to the claim.
TO DATE
Identifies the occurrence span to date related to the claim.
Claim Count Summary (Option 56)
This option provides a summary of all of your facility's billing transactions that are currently processing within FISS by status/location and type of bill. This option will assist you in getting a quick picture of where all of your processing claims are located in FISS. CGS recommends that you check option 56 when you first sign into FISS for the day. This screen is only updated in the evening, Monday through Friday. By reviewing option 56, you can easily identify if there are claims:
On the payment floor (P B9996), which means your claim has been approved for payment;
In an Additional Development Request (ADR) status (S B6001), which means that CGS has requested that you submit additional information; or
In a Return to Provider (RTP) status (T B9997), which means that the claim needs to be corrected by your facility.
From the Inquiry Menu, type 56 in the Enter Menu Selection field and press Enter.
You may also access this screen by typing 56 in the SC field if you are in an inquiry or claim entry screen.
The Claim Summary Totals Inquiry screen (Map 1371) appears:
To obtain the summary of billing transactions, press Enter.
If you are authorized to view other provider number information (branch office), you will have access to the PROVIDER field to enter another provider number.
You may also enter a specific status/location (e.g., T B9997) in the S/LOC field, or a category type in the CAT field to narrow the selection.
Once the information is displayed, you can identify where your claims are within FISS by looking at the S/LOC field. Option 56 identifies how many claims are in a particular status/location. The CAT column identifies the first two digits of the type of bill and the category code for each specific status/location. The CLAIM COUNT column provides the number of claims in that specific status/location. Refer to the field description for a complete list of CAT codes. You may need to press F6 to see the complete list of status/locations.
In the home health provider screen example above, this provider can quickly identify:
There are a grand total (GT) of 17 claims for a total charge of $15,429.08 and payment amount of $7,786.55.
The status/location P B9996 (payment floor) has a total count (TC) of four claims. The four claims have a total charge of $00.00 and a total payment of $7,786.55. All four claims are type of bill (TOB) 32X (CAT code 32). The total charge amount $00.00 indicates that the 32X TOB billing transactions are requests for anticipated payments (RAPs).
The status/location S B6001 (Additional Development Request (ADR) status) has a total count (TC) of one claim with the TOB 32X (CAT codes 32).
The status/location T B9997 (Return to Provider (RTP) status) has a total count (TC) of seven claims. All claims are TOB 32X (CAT code 32) and all were placed in RTP because of clerical errors (CAT code NM).
Option 56 only displays claims that are currently processing in FISS. Claims that are finalized in the system (i.e., with status/locations of R B9997, P B9997, D B9997) are not included within this option. In addition, option 56 only displays claims by status/location code. You can use option 56 in conjunction with option 12 if you want to identify which claims are in a particular status/location code.
If you want to know specifically which six claims are in P B9996, press F3 to exit option 56. Select 12 (Claims) from the Inquiry Menu and press Enter. Type your facility's NPI number in the NPI field, then tab to the S/LOC field and enter P B9996. Press Enter. All the claims for your facility that are in status/location P B9996 will appear. See below. Remember that you may need to press F6 to scroll forward to see all claims.
When you view option 56, pay particular attention to whether you have claims in status/locations S B6001 and T B9997. These two status/locations require that you take action.
Claims in S B6001 require that you submit the information being requested via the ADR. Select option 12 (Claims) from the Inquiry Menu to determine which claims were selected, and what documentation you need to submit to respond to the ADR. For information about identifying and responding to ADRs, refer to the "Claims (Option 12)" information found earlier in this chapter.
Claims in the RTP status/location, T B9997, require that you make the necessary corrections to the claims. Select 03 (Claims Correction) from the Main Menu to correct claims. Refer to the "Claims Corrections" section in this manual for more information on correcting claims.
The TOTAL PAYMENT column identifies the payment amount for those claims that have been approved for payment (on the payment floor) and are in status/location (P B9996).
Option 56 updates when the system cycle runs each night, Monday through Friday. Therefore, if option 56 indicates that you have two claims to correct, and you immediately correct both claims, option 56 will continue to indicate that you have two claims to correct until the screen updates during the nightly cycle. Please note that nightly cycles do not typically run on Federal holidays.
After suppressing the view of a claim, it will no longer display in the RTP file; however, when viewing Claim Count Summary (option 56) or the Claim Inquiry (option 12) screens, the claim may still appear in status/location T B9997 for several weeks, until FISS purges suppressed claims to the "I" status.
Once you have reviewed the information on option 56, press F3 to exit and return to the Inquiry Menu. You can then select 12 (Claims) from the Inquiry Menu to view the specific claims within each status/location.
Map 1371 Field Descriptions
PROVIDER
Your Provider Transaction Access Number (PTAN).
S/LOC
Status/Location. Enter a specific status/location code in this field to view the number of billing transactions in that specific status/location. CGS suggests leaving this blank so you can see the status/locations of all the billing transactions currently processing.
CAT
Category. Enter a specific category to view the number of billing transaction under that specific category. CGS suggests leaving this blank so you can see all claims currently processing. See below for the valid CAT codes.
NPI
Your facility's National Provider Identifier (NPI) number.
S/LOC
This identifies the current status/location of the claims.
CAT
The Category field identifies different items within the list. Valid values are:
## – First two digits of the type of bill, e.g., 11, 13, 32, 34, 72, 74, 81, 82. GT – Grand total of claims currently in process. TC – Total count of claims in a particular status/location. AD – An adjustment NM – Non-medical indicates the claim was placed in RTP because of a clerical error. MP – Medical policy indicates the claim was placed in RTP because of nonclerical error.
CLAIM COUNT
The total claim count for each specific status/location.
TOTAL CHARGES
The total dollar amount of charges submitted by the provider for the total number of claims identified in the claim count.
TOTAL PAYMENT
The total dollar payment amount calculated by the system. An amount will only show in this column for claims on the payment floor (P B9996).
Home Health Pymt Totals (Option 67)
The Home Health Pymt Totals (Map 1B41) screen tracks your outlier payment and Home Health Prospective Payment System (HH PPS) payment totals for the purpose of applying the annual limitation. Data for up to three years is available. Once the HH PPS claim (3X9 TOB) or adjustment (3X7, 3XG, 3XH, or 3XI TOB) has processed (FISS S/LOC P B9997), they are available to view using this inquiry option.
From the Inquiry Menu, type 67 in the Enter Menu Selection field and press Enter.
You may also access this screen by typing 67 in the SC field if you are in an inquiry or claim entry screen.
The Home Health Payment Totals Inquiry screen (Map 1B41) appears:
Type your facility’s Provider Transaction Access Number (PTAN) in the PROVIDER field.
Tab to the NPI field and type your facility’s National Provider Identifier (NPI), and press Enter.
The Home Health Payment Totals Inquiry (Map 1B41) screen displays the total home health payment and outlier totals for up to three years.
The payment information is updated only after HH PPS claims/adjustments are in FISS status/location (S/LOC) P B9997 (paid).
Please note that the "TO" date on your HH PPS billing transaction determines the calendar year where the payment was applied and where the claim’s detail information can be accessed.
To display a list of claims that comprise the outlier and payment totals for a specific year, type an S in the SEL field next to that year. Press Enter.
The Home Health Payment Totals Detail (MAP 1B42) screen appears with individual claim data and the value code amount listed under the corresponding value code. You may need to press F6 to scroll forward to view the entire listing of claims data available on the "Detail" screen.
To return to the Home Health Payment Totals Inquiry (Map 1B42) screen, press F7. To return to the Inquiry Menu, press F3.
Map 1B41 Field Descriptions
PROVIDER
Your Provider Transaction Access Number (PTAN).
NPI
Your facility's National Provider Identifier (NPI) number.
SEL
Selection. This field is used to view claim data for a particular year.
YEAR
The calendar year in which the outlier and payment totals are comprised.
OUTLIER TOTAL
The total outlier payments made on HH PPS home health claims for a calendar year. Note that Requests for Anticipated Payment (RAPs), (type of bill 322), are excluded from this total. The "TO" date on the HH PPS claim determines the calendar year in which the outlier is applied.
PAYMENT TOTAL
The total HH PPS payment made on home health claims for a calendar year. Note that Requests for Anticipated Payment (RAPs), (type of bill 322), are excluded from this total. The "TO" date on the HH PPS claim determines the calendar year in which the outlier is applied.
Map 1B42 Field Descriptions
PD DT SRCH
Enter a paid date to search for specific records for the same provider and NPI number.
PROVIDER
Your Provider Transaction Access Number (PTAN).
NPI
Your facility's National Provider Identifier (NPI) number
YEAR
The calendar year that was selected to view the claim detail data.
TO DATE
The month and day of the "through" date of the claim.
MID
The beneficiary's Medicare ID number on the claim.
DCN
The document control number of the claim.
VALUE CD 17
The dollar amount associated with the outlier payment on the claim.
VALUE CD 64
The dollar amount associated with the HH PPS payment from the Part A trust fund.
VALUE CD 65
The dollar amount associated with the HH PPS payment from the Part B trust fund
PAID DATE
The claim paid date (displayed in a CCYYMMDD format).
TOTAL PAID
The total claim payment amount for each of the three value codes (17, 64, and 65) for an individual claim displayed.
TOTALS:
The total amount paid for all HH PPS payments. Note: a total HH PPS payment amount for all calendar year HH PPS claims/adjustments will only appear on the last page of this screen. You will need to press the F6 key in order to scroll forward to reach the last page.
ANSI Reason Codes (Option 68)
This option allows you to view the narrative for the ANSI (American National Standards Institute) codes. ANSI reason codes appear on remittance advices, and provide additional information, such as provider appeal rights and claims processing determinations.
From the Inquiry Menu, type 68 in the Enter Menu Selection field and press Enter.
You may also access this screen by typing 68 in the SC field if you are in an inquiry or claim entry screen.
The ANSI Standard Codes Inquiry screen (Map 1581) appears:
Type a record type, (A, C, G, R, S, or T) in the RECORD TYPE field and press Enter to display the ANSI reason codes for that particular record type.
A = Appeals
C = Adjustment reason
G = Groups
R = Reference remarks
S = Claim status
T = Claim category
Press F6 to page forward through the various ANSI reason codes. Press F5 to scroll backwards.
Type S in the S field to view the entire narrative for the ANSI reason code and press Enter.
The ANSI Standard Reason Codes Inquiry screen (Map 1582) appears.
Press F7 to return to Map 1581.
To display one specific ANSI code, type the appropriate record type (e.g., A, C, G, R, S, or T) in the RECORD TYPE field. Type the ANSI Standard Code that you wish to view in the STANDARD CODE field and press Enter. The Map 1582 will display.
When Record Type ‘C’ is selected, Map 1582 will include a next page (F8) option. Press F8 to display the CARC RARC Group Combinations Inquiry screen (Map 1583).
When the Record Type ‘C’ was selected, press F8 to display Map 1583, or press F7 to return to Map 1581.
Press F7 to return to Map 1582. Press F7 again to return to Map 1581.
Map 1581 Field Descriptions
RECORD TYPE
The record type for the ANSI standard code. Valid values are:
A Appeals C Adjustment Reasons G Groups R Reference Remarks S Claim Status T Claim Category
STANDARD CODE
The standard code within the above record type.
S
The selection field used to view the entire narrative of a specific ANSI code.
RT
The record type of the ANSI code being selected.
CODE
The ANSI code being selected.
TERM DT
The date that the ANSI code was deactivated. (MMDDYY)
NARRATIVE
The description of the ANSI code.
Map 1582 Field Descriptions
MNT:
Identifies the last operator who created or revised his screen and the date. For intermediary use only.
RECORD
TYPE
The record type for the ANSI code.
STANDARD CODE
The ANSI code within the above record type.
NARRATIVE
The description of the ANSI code.
Map 1583 Field Descriptions
MNT:
Identifies the last operator who created or revised his screen and the date. For intermediary use only.
CARC
Identifies the claim adjustment reason code (CARC)
SCENARIO
Identifies defined business scenarios. Only displays if a Record Type 'C' is selected. Valid values are:
1 – Additional information required – missing/invalid/incomplete documentation
2 – Additional information required – missing/invalid/incomplete data from submitted claim
3 – Billed service not covered by health plan
4 – Benefit for billed service not separately payable
PAGE 01 OF 01
Identifies the page number.
SEL
Intermediary use only.
RARC
Identifies the remittance advice remark code (RARC).
GROUP CODES
Identifies the group code. Up to four occurrences may display.
CAQH/MAC
Identifies whether the code combinations have been approved by the CAQH Committee on Operating Rules for Information Exchange (CORE). Valid values are:
C Code combination is approved
M The MAC has added the code combination and is awaiting approval from CAQH CORE
CR#
Identifies the change request number that made the change to CARC/RARC/GROUP combination.
ADD DATE
Identifies the date for which the CARC/RARC/GROUP combination were added.
USER ID
The job number identifying that the update or add is based on a system change.
MAINT DATE
Identifies the last maintenance date for this file.
ERR
Error Code.
USER ID
Intermediary use only
MNT DATE
Identifies the last maintenance date for this file.
Check History (Option FI)
This option identifies the three most recent Medicare payments issued to your facility.
From the Inquiry Menu, type FI in the Enter Menu Selection field and press Enter.
The Check History screen (Map 1B01) appears.
To view current check history, type your:
National Provider Identifier (NPI) in the NPI field; or
Provider Transaction Access Number (PTAN) in the PROV field and your NPI in the NPI field.
Press Enter to see check history for the three most recent reimbursements that were distributed to your facility either by check or Electronic Funds Transfer (EFT). The PTAN will display in the PROV field, after you type the NPI in the NPI field and press Enter.
Please note that one day is added to the paid date (DATE field) that appears in the Check History screen. For example, although the Check History screen above shows 1024 (MMDD) in the DATE field, the screen was viewed on 10/23. The RA/ERA for the paid amount $916.56 will be dated 10/23. In addition, when viewing each individual claim record in FISS, that appears on that RA/ERA, the paid date will display as 10/23.
Check numbers that start with the letters EFT (e.g., EFT1234567) indicate that your facility receives its reimbursement via Electronic Funds Transfer (EFT).
Map 1B01 Field Descriptions
PROV
Your Provider Transaction Access Number (PTAN).
NPI
Your facility's National Provider Identifier (NPI).
CHECK #
The check number or EFT transaction number associated with the issued payment.
DATE
The date of the issued payment (YYMMDD format).
AMOUNT
The dollar amount of the payment issued. This amount can reflect all payments from Medicare (e.g., claims, cost report settlements, etc).
Dx/Proc Codes ICD-10 (Option 1B)
This option is helpful if you need to confirm the validity of ICD-10-CM (diagnosis) or ICD-10-PCS (procedure) codes. ICD-10-CM coding became effective October 1, 2015.
From the Inquiry Menu, type 1B in the Enter Menu Selection field and press Enter.
You may also access this screen by typing 1B in the SC field and pressing Enter, if you are in an inquiry or claim entry screen.
The ICD-10-CM Code Inquiry screen (Map 1C31) appears:
To inquire about a diagnosis code, type a D in the DIAG/PROC field and the diagnosis code in the STARTING ICD 10 CODE field and press Enter. Do not type the decimal point or zero-fill the code. To review a complete list of diagnosis codes, leave the STARTING ICD 10 CODE field blank, and press Enter.
If more than one of the same code is listed, be sure to review the description, effective and termination dates, and use the most current code that applies to the service dates on your claim.
Press F6 to scroll forward through the list of diagnosis codes.
To make an additional inquiry, type a D in the DIAG/PROC field and the other diagnosis code over the previously entered diagnosis code and press Enter.
To inquire about a procedure code, type the letter P in the DIAG/PROC field and the procedure code in the STARTING ICD 10 CODE field and press Enter. To review a complete list of procedure codes, type the letter P in the DIAG/PROC field and press Enter. Leave the STARTING ICD 10 CODE field blank.
Press F3 to exit and return to the Inquiry Menu.
Map 1731 Field Descriptions
DIAG/PROC
Identifies whether this is an ICD-10 diagnosis or procedure code. Valid values are:
D Diagnosis code
P Procedure code
STARTING ICD 10 CODE
ICD-10-CM code. The ICD-10-CM code identifying a specific diagnosis or procedure.
D/P
Identifies whether this is an ICD-10 diagnosis or procedure code (D or P).
ICD 10 CODE
The ICD-10 code used to identify a specific diagnosis or procedure.
SEQ CODE
Identifies the number of times CMS has terminated and then reactivated a given ICD-10 code with a different meaning.
DESCRIPTION
The ICD-10-CM code description.
EFFECTIVE/
TERM DATE
Effective/termination date. The effective and/or termination date for the ICD-10 code in MMDDYY format. (Up to three occurrences of dates can appear.)
CMHC Payment Totals (Option 1C)
This option is used to display the Community Mental Health Center (CMHC) payment and outlier totals for the current year and one previous year.
From the Inquiry Menu, type 1C in the Enter Menu Selection field and press Enter.
You may also access this screen by typing 1C in the SC field and pressing Enter, if you are in an inquiry or claim entry screen.
The CMHC Payment Totals Inquiry screen (Map 1D61) appears.
Map 1731 Field Descriptions
PD DT SRCH
Identifies the ability to search using the paid date for specific recores of the provider and NPI number.
PROVIDER
Identifies your Medicare provider number.
NPI
Identifies your National Provider Identifier (NPI) number.
YEAR
Identifies claim information for that year when an "S" is entered (by that year).
FR DATE
Identifies the From date of the paid claims.
MID
The Medicare number assigned to the beneficiary.
DCN
Identifies the Document Control Number assigned to the claim.
VALUE CD 17
Identifies the amount for Value Code 17.
OPPS PYMT
Identifies the amount for OPS payment.
RTC
Identifies the amount for Return Code from IOCE/OCE.
PAID DATE
Identifies the date the claim was paid.
TOTAL PAID
Identifies the total amount paid.
TOTALS
Identifies the total amount of value code 17 and OPPS Payment for all records.
Prov Practice Addr Quer (Option 1D)
This option allows providers to view the practice location address for an off-campus, outpatient, or provider-based department of a hospital.
Effective April 1, 2019, system edits were activated that require the service facility address reported on the claim to be an exact match to the provider practice file address provided in this screen. For additional information, please reference CMS MLN Matters article SE18023
From the Inquiry Menu, type 1D in the Enter Menu Seletion field and press Enter.
You may also access this screen by typing 1C in the SC field and pressing Enter, if you are in an inquiry or claim entry screen.
The PROV PRACTICE ADDR QUER screen (MAP1AB1) appears.
Map 1731 Field Descriptions
NPI
The providers National Provider Identifier (NPI) number.
OSCARE
Online Survey Certification and Reporting System (OSCAR).
SEL
Enter an "S" in thie field to select each record for the OSCAR and/or NPI.
NPI
The providers National Provider Identifier (NPI) number.
OSCAR
Online Survey Certification and Reporting System (OSCAR).
PRAC EFF DT
The effective date of the Practice.
PRAC TERM DT
The termination date of the Practice.
ADDRESS
The Practice Provider's address information.
ZIP
The Practice Provider's zip code.
To access additional information, type an S in the SEL field. Map 1AB2 will display.
Map 1AB2 Field Descriptions
NPI
The providers National Provider Identifier (NPI) number.
OSCAR
Online Survey Certification and Reporting System (OSCAR).
PRAC EFF DT
The effective date of the Practice.
PRAC TERM DT
The termination date of the Practice. When there is no actual practice termination date, the default value of 123119999 will display.
PRACTICE LOCATION KEY
The Practice Location Key from the PECOS Extract file.
OTHER PRACTICE
Identifies where the PECOS record is for an other practice.
TYPE OF PRACTICE
The Practice type.
ADDRESS 1
Address line 1 for the provider's practice location.
ADDRESS 2
Address line 2 for the provider's practice location.
CITY
The city for the provider's practice location.
STATE
The state for the provider's practice location.
ZIP
The zip for the provider's practice location.
NPI EFF DT
The effective date of the provider's NPI.
NPI TERM DT
The termination date of the provider's NPI. When there is no actual termination date, the default value of 123119999 will display.
New HCPC Screen (Option 1E)
This option is helpful if you need to inquire about Healthcare Common Procedure Coding System (HCPCS) code reimbursement or verify which revenue codes are allowable with HCPCS codes.
From the Inquiry Menu, type 1E in the Enter Menu Selection field and press Enter.
You may also access this screen by typing 1E in the SC field if you are in an inquiry or claim entry screen.
The New HCPC Information Inquiry screen (Map 1E01) appears:
Use your Tab key to move to the HCPC field and type the HCPCS code. Press Enter. FISS will automatically insert information in the CARRIER and LOC fields based on your geographic location.
To determine if the HCPC code is allowable for hospice revenue codes, you must also enter an "R" in the IND field, and then press Enter.
Use the following function keys to move around the screen:
F3 – Exit (return to the Inquiry Menu)
F5 – Scroll up one page
F6 – Scroll down one page
F11 – Scroll right
F10 – Scroll left
Press F11 to move the screen to the right. The New HCPC Rates Inquiry screen (Map 1E02) will display. Press F10 to move back to the left of Map 1E01.
To inquire about other HCPCS codes, enter the HCPCS code over the previously entered HCPC and press Enter.
Press F3 to exit the HCPCS Information Inquiry screen and return to the Inquiry Menu.
Map 1E01 Field Descriptions
CARRIER
Carrier. The carrier number assigned to your provider file. System generated.
LOC
The two-position locality code which identifies the area where the provider is located.
HCPC
Healthcare Common Procedure Coding System. The HCPCS code to be reviewed on the screen.
MOD
HCPC Modifier. Multiple fees will be identified for the HCPCS code based on the modifier.
IND
HCPC indicator. Type an "R" to display hospice allowable revenue codes.
FEE TYPE
This identifies the fee file the HCPC was obtained from. The valid values are:
ISNF
RHHI
OTHR
CLAB
CLFS
IDME
ABST
MAMM
DRUG
AMBF
SUP1
SUP2
EFF. DT
Effective date. The date the code became effective (MMDDYY format).
TRM. DT
Termination date. The termination date for the code (MMDDYY format).
PROVIDER
The Medicare provider number assigned to your facility.
EFF. DATE
Effective date. The effective date for the rate listed (MMDDYY format).
TRM. DATE
Termination date. The termination date for the rate listed (MMDDYY format).
EFF
Effective date indicator. This indicator instructs the system to either use the 'from' and 'through' dates of the claim or the system run date to perform edits for this HCPCS. Values are:
F Claim from date R Claim receipt date D Discharge date
OVR
Override code. This field instructs the system in applying the services towards deductible and coinsurance. Values are:
0 Apply deductible and coinsurance 1 Do not apply deductible 2 Do not apply coinsurance 3 Do not apply deductible or coinsurance 4 No need for total charges (used for multiple HCPCS for single revenue code centers) 5 Rural health clinic or comprehensive outpatient rehabilitation facility psychiatric M Employer group health plan (EGHP) (only used on the 0001 total line for Medicare Secondary Payer (MSP)) N Non-EGHP (only used on the 0001 total line for MSP) X Bypass cost avoided MSP edits Y MSP cost avoided
FEE
Fee Indicator. The fee indicator received in the Physician Fee Schedule file. Valid values: B Bundled procedure R Rehab/Audiology Function Test/CORF Services
" " Default
OPH
Outpatient Hospital Indicator. The outpatient hospital indicator received in the physician fee schedule abstract test file. Valid values: O Fee applicable in Hospital Outpatient Setting 1 Fee not applicable in Hospital Outpatient Setting
" " Default
CAT
Category Code. This field identifies the category of the DME equipment. The valid values are:
1 Inexpensive or other routinely purchased DME 2 DME items requiring frequent maintenance and substantial servicing 3 Certain customized DME items 4 Prosthetic and orthotic devices 5 Capped rental DME items 6 Oxygen and oxygen equipment
PC/TC
Professional Component/Technical Component. Valid values are:
0 Pay the Health Professional Shortage Area (HPSA) bonus 1 Globally billed. Professional component for this service qualifies for the HPSA bonus payment 2 Professional component only, pay the HPSA bonus 3 Technical component only, do not pay the HPSA bonus 4 Global test only. Professional component of this service qualifies for the HPSA bonus payment 5 Incident codes, do not pay the HPSA bonus 6 Laboratory physician interpretation codes, pay the HPSA bonus 7 Physical therapy service, do not pay the HPSA bonus 8 Physician interpretation codes, pay the HPSA bonus 9 Concept of PC/TC does not apply, do not pay the HPSA bonus
ANES BASE VAL
Anesthesia base value. The anesthesia base values.
TYP
HCPCS Type. An 'M' indicator will display when the HCPCS associated with the revenue line originated from the Medicare physician fee schedule.
MSI
Multiple services indicator. The value of '5' identifies services that are subject to the multiple procedure payment reduction (MPPR).
ALLOWABLE
REVENUE CODES
Allowable revenue codes. The allowable revenue codes this HCPCS code may use in billing. This is a four-position field. When the last digit shows an "X," each variable for that revenue code is allowable. If this field is blank, the system will allow a HCPCS code on any revenue code.
HCPC
DESCRIPTION
HCPCS description. The English narrative description of the HCPCS code.
Map 1E02 Field Descriptions
EFF DT
Effective date. The date the code became effective (MMDDYY format).
TRM DT
Termination date. The termination date for the code (MMDDYY format).
60%RATE
60% reimbursement rate. The rate the system will use for calculating reimbursement for the HCPCS.
62% RATE
62% lab reimbursement rate. The rate the system will use for calculating reimbursement for the lab HCPCS. When the MSI field equals a '5', this field will dispay "62%/REDU" or the reduced therapy fee amount.
REHAB
Rehabilitation rate. The rate used by the system to calculate reimbursement for the HCPCS code for rehabilitation services billed.
PROF
Professional service rate. The rate used by the system to calculate reimbursement for the HCPCS code for professional services
NFACPE
Non-facility amount practice expense (PE) relative value units (RVUs). This field reflects the 20 percent reduction in non-facility PE RVUs.
VAR COIN
This field identifies the Variable Coinsurance percentage received from CMS on the Drug Fee file.
HCPC DESCRIPTION
HCPCS description. The English narrative description of the HCPCS code.
OUD DEMO 99 (Option 1F)
This option allows providers to view Opioid Use Disorder (OUD) Model Provider CAP information.
From the Inquiry Menu, type 1F in the Enter Menu Selection field and press Enter.
You may also access this screen by typing 14 in the SC field if you are in an inquiry or claim entry screen.
The OUD DEMO 99 Inquiry screen (Map 1E91) appears:
Enter your Medicare Certification Number (also referred to as Medicare provider number or Provider Transaction Access Number (PTAN) in the CCN field, and your National Provider Identifier in the NPI field. Press ENTER to view OUD Model Provider CAP information.
Map 1E91 Field Descriptions
EFF DATE
Effective date
TERM DATE
Termination date
PROVIDER TYPE
Provider type. Possible values:
N = 1 – 9, where:
1 = Physician
2 = Group Practice
3 = Hospital Outpatient Department
4 = Federally Qualified Health Center
5 = Rural Health Clinic
6 = Community Mental health Center
7 = Certified Community Behavioral Health Clinic
8 = Opioid Treatment Program
9 = Critical Access Hospital
CAP YEAR
CAP year
CAP LIMIT USED
Current number of claims billing HCPC G2172 for that provider in that CAP year.
CAP LIMIT MAX
Maximum number of claims billing HCPC G2172 that can be billed for that provider in that CAP year.
AMT PAID
Total amount paid for HCPC G2172.
CLMS
Total claims paid for HCPC G2172.
COST SHR AMT
Total cost sharing amount for HCPCS G2067 – G2080.
CLMS
Total claims paid for HCPCS G2067 – G2080.
COST SHR AMT
Total cost sharing amount for HCPCS G2068 – G2088.
CLMS
Total claims paid for HCPCS G2068 – G2088.
Chapter 4 – Claims and Attachments Menu Options
The Fiscal Intermediary Standard System (FISS) Claims/Attachments option (FISS Main Menu option 02) allows you to enter the following billing transactions via Direct Data Entry or DDE:
Access the Claims/Attachments Menu
From the FISS Main Menu, type 02 in the Enter Menu Selection field and press Enter.
The Claim and Attachments Entry Menu screen (Map 1703) appears:
From the Claim and Attachments Entry Menu (Map 1703), enter the appropriate claims entry option in the Enter Menu Selection field and press Enter.
Inpatient (20) – used to enter inpatient (11X type of bills)
Outpatient (22) – used to enter outpatient (13X, 14X, type of bills)
Home Health (26) – used to enter home health RAPs (322 type of bill) and final claims (329 type of bill). This option is also used to enter individual vaccine claims, outpatient therapy services and other types of services billed by home health providers on 34X type of bills.
Hospice (28) – use to enter hospice claims (81X or 82X type of bill).
NOE/NOA (49) – use to enter hospice notices of election (NOEs) (8XA type of bill), notices of election termination/revocation (NOTRs) (8XB type of bills) or to cancel an NOE (8XD type of bill)
Roster Bill Entry (87) – use to enter flu and pneumonia roster bills.
When Page 01 of the claim appears, FISS automatically inserts default information into the type of bill (TOB) field and the status/location (S/LOC) field. A list of the default TOBs is provided below. You may need to change this information to reflect the most appropriate bill type. Do not change the default S/LOC field.
In the screen example below, because option 26 was selected, FISS inserted the default home health TOB of 322.
MAP1719 (Press F11 one time from Page 03) contains Claim Adjustment Segment (CAS) information, required on all Medicare Secondary Payer (MSP) claims.
Page 04 (Map 1714) contains space for remarks.
Page 05 (Map 1715) contains insureds information.
Page 06 (Map 1716) contains Medicare payment information upon processing of the claim.
Use the following keys to move around the FISS claim pages:
Tab – Moves your cursor from left to right, placing it in a valid field Shift + Tab – Moves your cursor from right to left, placing it in a valid field F3 – Exits the entry process and returns to the Claims/Attachments Menu (note that you will lose your work if you press F3 during claim entry) F5 – Scrolls back through a list (billing transactions, revenue codes, diagnosis and procedure codes, charges, etc.) F6 – Scrolls forward through a list F7 – Moves backward one page (e.g., FISS Page 03 to FISS Page 02) F8 – Moves forward one page (e.g., FISS Page 01 to FISS Page 02) F9 – Updates/submits the claim into FISS F10 – Moves to the left F11 – Moves to the right
After you've entered your appropriate type of bill, and before you begin to enter your claim information, press Enter. This allows you access to all of the fields required for your bill type.
Begin entering data on Page 01 of the claim and continue until the appropriate fields are completed. The easiest way to move from field to field is to use your Tab key.
When keying dollar amounts in the VALUE CODES – AMOUNTS fields, you may type or omit the decimal point as you choose (i.e., $45.92 can be keyed as 45.92 or 4592; $1500.00 can be keyed as 1500.00 or 150000). However, it is important to ensure that the appropriate cents value is entered, regardless of whether the decimal point is used.
For home health and hospice providers, when a five-digit core based statistical area (CBSA) code is entered in the VALUE CODE AND AMOUNTS field (value code 61 or G8). Two zeroes must be added behind the CBSA code (i.e., CBSA code 19000 must be entered as 1900000 or 19000.00). If you do not add two zeroes, the CBSA code will be incorrect (i.e., entering the CBSA code as 19000 instead of 1900000 will result in FISS reading the code as 190 instead of 19000).
Page 01 of the claim allows space for ten condition codes, ten occurrence codes/dates, and nine values codes/amounts. However, you can enter up to 30 condition codes, 30 occurrence codes/dates, and up to 36 value codes/amounts. To access the additional space for these fields, press F6 to scroll forward.
Field Descriptions for Page 01 – Map 1711
SC
Screen control. Used to access the Inquiry screens while entering a claim.
N/A
MID
The beneficiary's Medicare ID number.
FL 60
TOB
Type of Bill (system generated; you may need to change this depending on the TOB you are entering).
FL 4
S/LOC
Status/location code (system generated).
N/A
NPI
National Provider Identifier.
FL 56
PAT CNTL #
Patient Control Number.
FL 3a
STMT DATES FROM/TO
Statement covers period.
FL 6
DAYS COV
Number of covered days billed. Not applicable to home health and hospice claims.
N/A
N-C
Number of noncovered days billed. Not applicable to home health and hospice claims.
N/A
CO
Number of coinsurance days used. Not applicable to home health and hospice claims.
N/A
LTR
Number of lifetime reserve days used. Not applicable to home health and hospice claims.
N/A
LAST
Beneficiary's last name.
FL 8
FIRST
Beneficiary's first name.
FL 8
MI
Beneficiary's middle initial.
FL 8
DOB
Beneficiary's date of birth (MMDDCCYY).
FL 10
ADDR 1-6
Beneficiary's street address, city and state.
FL 9
ZIP
Beneficiary's zip code (5- or 9-digit).
FL 9
SEX
Beneficiary's sex (M or F).
FL 11
ADMIT DATE
Admission date.
FL 12
TYPE
Priority (type) of admission.
FL 14
SRC
Point of Origin (previously known as source of admission).
FL 15
STAT
Beneficiary's status code.
FL 17
COND CODES
Condition codes.
FL 18-28
OCC CDS/DATES
Occurrence codes and dates.
FL 31-34
SPAN CODES/ DATES
Occurrence span codes and dates.
FL 35-36
FAC ZIP
Facility zip code of the provider or the subpart (5- or 9- digit field)
FL 1
DCN
Document Control Number. Not used on claims entry – for adjustments/cancellations only.
N/A
VALUE CODES – AMOUNTS
Value codes and amounts.
FL 39-41
ANSI
ANSI codes (system generated after claim is processed).
Enter revenue code information on Page 02 of the claim. This page will hold up to 14 revenue code lines. To enter additional revenue code lines, press F6 to scroll down to access the second revenue code page (REV CD PAGE 02). There are 33 revenue code pages and 450 total revenue code lines available.
The CL field identifies the line number of the revenue code and is automatically generated by the system. These will display after pressing Enter.
The REV field is a four-position field. You may key a zero before the revenue code (e.g., 0420) or key the three-digit code (e.g., 420) and then use your Tab key to go to the next field.
You do not need to enter information in the RATE field. When appropriate, FISS inserts this information during claims processing.
When keying dollar amounts in the TOT CHARGE field, the decimal point is optional (i.e., $1500.00 can be keyed as 1500.00 or 150000). However, you must key two digits for the cents.
If after you key your revenue codes, you realize you need to delete a revenue code line:
Key the letter "D" in the first position of the revenue code that you wish to delete.
Press the HOME key on your keyboard so that your cursor is placed in the upper left hand corner of the screen (the "Page" field).
Press Enter.
If after you key the 0001 total revenue code line, you realize an additional revenue code needs to be added, key the added revenue code line below the 0001 line. You do not need to rekey the revenue codes that you have already entered. Be sure to update your total charge amount on the 0001 line to reflect the addition of the revenue code charge, and then press the HOME key on your keyboard so that your cursor is placed in the upper left hand corner of the screen (the "Page" field). Press Enter. FISS will automatically reorder the revenue code line that you added to appear above the 0001 line.
Field Descriptions for Page 02 – Map 1712
The MID, TOB, and S/LOC fields are system generated from Page 01 of the claim.
Field Name
Description
UB-04 Form Locator (FL)
UTN
Unique Tracking Number
N/A
PROG
Prior Authorization Program Indicator
N/A
REP PAYEE
Identifies a Medicare beneficiary with a Rep Payee. Valid values are:
From Page 02 of the claim, press F11 one time and Map 171E will display.
Map 171E is used to input a unique Molecular Diagnostic Services (MolDX) test ID into the claim at the detail line level. Refer to MM10760 for additional information.
MAP 171E is also used for institutional outpatient claims with advanced diagnostic imaging services subject to the Appropriate Use Criteria (AUC). Review SE20002 for additional information.
Map 171E is no longer used by home health and hospice providers.
From Page 02 of the claim, press F11 one time and Map 171E will display.
If applicable for your provider type, enter the MolDX ID in the MOLDX field.
Note: If you press F11 again, Map 171A will display; press F11 again and Map 171D displays. Typically, these screens are not used during claim entry and will display information after the claim has processed. Refer to the "Inquiry Menu" section for information about Map 171A and 171D.
From Map 171E, press F8 to page forward to Page 03 of the claim and continue entering claim information
Field Descriptions for Page 02 – Map 171E
The MID, TOB, and S/LOC fields are system generated from Page 01 of the claim.
Field Name
Description
UB-04 Form Locator (FL)
CL
Claim line item number (1 – 450).
N/A
NDC FIELD
National Drug Code information. Enter the 11-digit NDC code (without hyphens).
N/A
NDC QUANTITY
Enter the NDC quantity. If NDC QUANTITY is 50 enter 50.0.
N/A
QUALIFIER
Enter the units of measurement qualifier. Valid values are:
F2 – International Unit
GR – Gram
ME – Milligram
ML – Milliliter
UN – Unit
N/A
RETURN HIPPS 1
Home health only – Identifies the HIPPS codes returned from the Quality Information Evaluation System (QIES). Not used for data entry.
N/A
RETURN HIPPS2
Home health only – Identifies the HIPPS codes returned from the Quality Information Evaluation System (QIES). Not used for data entry.
N/A
MOLDX
Identifies the Molecular Diagnostic Services test ID. Not applicable to home health and hospice claims.
N/A
LLR NPI
Line Level Rendering Physician's NPI number. Not applicable to home health and hospice claims.
N/A
L
Last name of the physician. Not applicable to home health and hospice claims.
N/A
F
First name of the physician. Not applicable to home health and hospice claims.
N/A
M
Middle name of the physician. Not applicable to home health and hospice claims.
N/A
SC
Physician Specialty Code. Not applicable to home health and hospice claims.
N/A
LLO NPI
Line Level Ordering National Provider Identifier (NPI). For institutional outpatient claims with advanced diagnostic imaging services subject to the Appropriate Use Criteria (AUC). Review SE20002 for additional information.
Enter payer information, applicable diagnosis and procedure codes, and physician information.
The payer code "Z" (Medicare is the primary payer) is automatically entered by FISS. The payer name "Medicare" does not have to be entered in the PAYER field. FISS will insert it automatically. Line A reflects the primary payer, line B reflects the secondary payer, and line C reflects the tertiary payer. Refer to the field descriptions for a list of valid payer codes.
The DIAG CODES field is a seven position field followed by a one position field for the Present on Admission (POA) indicator code. Because the POA indicator is not applicable for home health and hospice providers, you will need to press your Tab key twice to move your cursor to the correct field to key additional diagnosis codes.
The DIAG CODES and the PROCEDURE CODES AND DATES fields allow for up to 25 codes, by pressing F6 to move forward. Press F5 to move backward.
If entering an MSP claim, press F11 to access the MSP Payment Information screen, Map 1719. If MSP does not apply, press F8 to go to Page 04 of the claim.
For information about entering MSP claims, refer to the Page 03 – MAP 1719 information, which follows the MAP1713 field descriptions.
From FISS Page 03 (MAP 1713), press F11 twice to MAP171F to enter the service facility location for an off-campus, outpatient, provider-based department of a hospital. Screen print and field descriptions can be found later.
Field Descriptions for Page 03 – Map 1713
The MID, TOB, and S/LOC fields are system generated from information on Page 01 of the claim.
Field Name
Description
UB-04 Form Locator (FL)
NDC CD
National drug code. Not used by home health or hospice providers.
FL 43
OFFSITE ZIP
Identifies offsite Clinic/Outpatient department zip codes. It determines the claim line HPSA/PSA bonus eligibility.
N/A
ADJ MBI
Identifies the submitted ID indicator and submitted Medicare Beneficiary Identifier on adjustments and cancels.
N/A
IND
Auto populated with an M on adjustments and cancels when the MBI is entered on MAP1741 (Claim Summary Inquiry) screen. An H will display on adjustments and cancels when a MID is entered on MAP1741.
N/A
CD
Primary payer code. Valid values are:
Z – Medicare
The following payer codes are only used on lines B (secondary payer) and C (tertiary payer) to identify supplemental insurers. 1 – Medicaid 2 – Blue Cross 3 – Other
A – primary (FISS will automatically insert the payer name "Medicare" when a "Z" is entered in the CD field.) B – secondary C – tertiary
FL 50
OSCAR
Online Survey Certification and Reporting System (OSCAR). Also known as PTAN. Automatically added by FISS.
FL 51
RI
Release of Information.
FL 52
AB
Assignment of Benefits.
FL 53
EST AMT DUE
Estimated amount due.
FL 55
DUE FROM PATIENT
Estimated amount due from patient.
N/A
SERV FAC NPI
NPI of the nursing facility, hospital or hospice inpatient facility where the patient received services. (Hospice providers only)
N/A
MEDICAL RECORD NBR
Beneficiary's medical record number.
FL 3b
COST RPT DAYS
Informational only – do not enter information.
N/A
NON COST RPT DAYS
Informational only – do not enter information.
N/A
DIAG CODES
ICD-9-CM or ICD-10-CM diagnosis codes. The diagnosis code field is a seven position field followed by a one position field for the Present on Admission (POA) indicator code. Do not enter decimal points. Press F6 if you need to enter additional diagnosis codes.
FL 67A – Q
END OF POA IND
Identifies the end of Present On Admission (POA) indicator. Valid values are:
V – The end of POA indicators for principal and, if applicable, other diagnoses.
X – The end of POA indicators for principal and, if applicable, other diagnoses in special processing situations that may be identified in the future
Blank – Not acute care, POAs do not apply.
N/A
ADMITTING DIAGNOSIS
ICD-10-CM diagnosis code indicating reason for admission. Do not enter decimal points.
FL 69
E CODE
ICD-10-CM diagnosis code indicating external cause of injury. Do not enter decimal points.
FL 72
HOSPICE TERM ILL IND
Hospice Terminal Illness Indicator. Do not enter information.
N/A
IDE
Investigational Device Exemption (IDE) number.
N/A
GAF
Identifies the Geographic Adjustment Factors for state, carrier and locality at the claim level. Not used by home health or hospice providers.
N/A
PRV
The ICD-10-CM code describing the reason for seeking care. Not used by home health or hospice providers.
N/A
PROCEDURE CODES AND DATES
ICD-10-CM procedure codes/dates. Do not enter decimal points. Press F6 to display additional procedure codes fields.
FL 74a – e
ESRD HRS
End Stage Renal Disease (ESRD) hours/duration of dialysis.
N/A
ADJ REAS CD
Reason for adjustment of claim (not for use on claim entry – use with claim adjustment/cancel).
N/A
REJ CD
Reject code. For CGS use only.
N/A
NONPAY CD
Nonpayment code. For CGS use only.
N/A
ATT TAXO
The attending physician taxonomy codes.
N/A
ATT PHYS NPI
Attending physician's national provider identifier.
Attending physician's specialty code. (This code is applied by FISS based on whether the NPI appears and/or matches an NPI on the Provider Enrollment, Chain, and Ownership System (PECOS).)
If the attending NPI on the claim in not present in the PECOS record, FISS will place a '99' in the 'SC' field.
If the attending NPI on the claim is present in the PECOS record, but the name on the claim does not match the name in the PECOS record, the 'SC' field will be left blank.
If the attending NPI on the claim is present in the phys/non-phys file and the name on the claim matches the name in the PECOS record, the specialty code of the first matching record will be placed in the 'SC' field.
N/A
OPR PHYS NPI
Operating physician's national provider identifier.
Operating physician's specialty code. (This code is applied by FISS based on whether the NPI appears and/or matches an NPI on the Provider Enrollment, Chain, and Ownership System (PECOS).)
If the operating NPI on the claim is not present in the PECOS record, FISS will place a '99' in the 'SC' field.
If the operating NPI on the claim is present in the PECOS record, but the name on the claim does not match the name in the PECOS record, the 'SC' field will be left blank.
If the operating NPI on the claim is present in the phys/non-phys file and the name on the claim matches the name in the PECOS record, the specialty code of the first matching record will be placed in the 'SC' field.
N/A
OTH OPR NPI
Other operating physician's national provider identifier.
FL 78 – 79
L
Other physician's last name.
FL 78 – 79
F
Other physician's first name.
FL 78 – 79
M
Other physician's middle initial (not required).
FL 78 – 79
SC
Other physician's specialty code. (This code is applied by FISS based on whether the NPI appears and/or matches an NPI on the Provider Enrollment, Chain, and Ownership System (PECOS).)
If the other NPI on the claim in not present in the PECOS record, FISS will place a '99' in the 'SC' field.
If the other NPI on the claim is present in the PECOS record, but the name on the claim does not match the name in the PECOS record, the 'SC' field will be left blank.
If the other NPI on the claim is present in the phys/non-phys file and the name on the claim matches the name in the PECOS record, the specialty code of the first matching record will be placed in the 'SC' field.
N/A
REN PHYS NPI
Rendering physician's national provider identifier.
Referring physician's national provider identifier.
For hospice notice of elections (NOEs) and claims, enter the NPI of the physician responsible for certifying the patient as terminally ill, if different than the attending physician
For home health outpatient therapy claims (type of bill 34X), enter the referring physician's NPI.
For home health 32X type of bills, enter the NPI of the physician responsible for certifying/recertifying the eligibility for home health services.
Referring physician's specialty code. (This code is applied by FISS based on whether the NPI appears and/or matches an NPI on the Provider Enrollment, Chain, and Ownership System (PECOS).)
If the operating NPI on the claim in not present in the PECOS record, FISS will place a '99' in the 'SC' field.
If the operating NPI on the claim is present in the PECOS record, but the name on the claim does not match the name in the PECOS record, the 'SC' field will be left blank.
If the operating NPI on the claim is present in the phys/non-phys file and the name on the claim matches the name in the PECOS record, the specialty code of the first matching record will be placed in the 'SC' field.
N/A
The majority of the information necessary on a claim is entered into the first three claim pages within FISS. If you have no remarks to make regarding this claim, you can press F9 at this point to store your claim as no further information is required. If, after you press F9, an error appears, see the information titled Saving your Claim later in this chapter.
If entering an MSP claim, press F11 to access the MSP Payment Information screen, Map 1719.
Enter the claim adjustment segment (CAS) information in the Primary Payer 1 MSP Payment Information screen. The prior payer's 835 Electronic Remittance Advice (ERA) typically includes CAS information.
Press F6 to access the "MSP Payment Information" screen for primary payer 2 (if there is one).
press F5 to move back to the primary payer 1 "MSP Payment Information" screen.
If the CAS code information is not available from the prior payer, providers need to determine the appropriate Group Code and Claim Adjustment Reason Code (CARC) to submit. This information is available from the following websites:
CAQH (Access the current version of the CORE Code Combinations)
Field Descriptions for Page 03 – Map 1719
The MID, TOB, and S/LOC fields are system generated from information on Page 01 of the claim.
Field Name
Description
UB-04 Form Locator (FL)
RI
Residual Payment Indicator – allows for secondary payment. FISS will auto populate an X when CARC codes 27, 35, 119 or 149 are present.
N/A
PAID DATE
Enter the paid date shown on the primary payer's remittance advice (MMDDYY format).
N/A
PAID AMOUNT
The payment amount made by the primary payer
N/A
GRP
The ANSI group code. Valid values are:
CO
Contractual Obligation
PI
Payer Initiated Reductions
OA
Other Adjustment
PR
Patient Responsibility
N/A
CARC
Claim Adjustment Reason Code (CARC) shown on the primary payer's remittance advice. CARC codes explain the difference between the billed amount and the amount paid by the primary payer.
N/A
AMT
The dollar amount associated with the group/CARC combination.
When you submit claims to CGS, using the REMARKS field is optional. However, we encourage you to enter any pertinent information that assists with the processing of the claim. CGS may also use this field to relay information back to the provider when the claim is in process or processed. There are 3 pages available for remarks. To use additional pages, press F6 to scroll forward and F5 to scroll backward
Field Descriptions for Page 04 – Map 1714
The MID, TOB, and S/LOC, fields are system generated from information on Page 01 of the claim.
Field Name
Description
UB-04 Form Locator (FL)
REMARKS
Additional pertinent information to assist the processing of the claim. Three pages are available to make remarks. Each page holds 10 lines of remarks. Press F6 to scroll forward to the next remark page.
FL 80
47 PACEMAKER
Attachment screen indicator. This function should not be used.
N/A
48 AMBULANCE
Attachment screen indicator. This function should not be used.
N/A
40 THERAPY
Attachment screen indicator. This function should not be used.
N/A
41 HOME HEALTH
Attachment screen indicator. This function should not be used.
N/A
58 HPB CLAIMS (MED B)
N/A
N/A
E1 ESRD ATTACH
Attachment screen indicator. This function should not be used.
N/A
ANSI CODES
ANSI reason codes.
N/A
GROUP
Adjustment group code identifying the general category of the adjustment.
N/A
ADJ REASONS
Claim adjustment standard reason code identifying the reason for the adjustment.
If Medicare is the primary payer, it is not necessary for the insured's information to be entered on Line A. However, if the beneficiary has supplemental insurance, key the insured's supplemental insurance information on Line B.
press F8 to go to Page 06 of the claim.
Field Descriptions for Page 05 – Map 1715
The MID, TOB, and S/LOC fields are system generated from information on Page 01 of the claim.
Two separate lines are available for the insured's information. When Medicare is primary, it is not necessary to enter information on Line A. Only enter supplemental insurance information on Line B. The field names below are listed in the order they are entered.
Field Name
Description
UB-04 Form Locator (FL)
INSURED NAME
Name of policyholder, last name (then press the Tab key) and first name.
FL 58
SEX
Identifies the sex (M or F) of the insured.
FL 11
DOB
Identifies the insured's date of birth.
FL 10
REL
Relationship code of patient to the insured.
FL 59
CERT.-SSN-
MID
Certificate/Social Security No./Medicare ID No./Identification No.
FL 60
GROUP NAME
Name of group (payer/other coverage).
FL 61
INS GROUP NUMBER
Insurance policy group number.
FL 62
TREAT. AUTH. CODE
Treatment Authorization Code. Not required for home health claims with dates of service on or after January 1, 2020.
For claims where Medicare is primary, Page 06 of the claim should be left blank.
If the claim is for services unrelated to an MSP record and you are submitting it for conditional Medicare payment, complete the MSP ADDITIONAL INSURER INFORMATION area.
If you need to go back and review information before saving the claim, use your F7 and F8 keys to page backward and forward. You can also press your HOME key to move your cursor into the PAGE field then type the page number you wish to review and press Enter.
When you have completed entering information on the claim, press F9 to store your claim in FISS. See Saving your Claim later in this section.
Field Descriptions for Page 06 – Map 1716
The MID, TOB, and S/LOC fields are system generated from information on Page 01 of the claim.
Field Name
Description
1ST INSURERS ADDRESS 1, 2
These fields are left blank when Medicare is the primary payer.
CITY
ST
ZIP
2ND INSURERS ADDRESS 1, 2
CITY
ST
ZIP
The following payment and pricer data will appear after FISS has completed processing of the claim.
Crossover Indicator. The code which identifies the Medicare payer on the claim. Valid values are:1 Primary, 2 Secondary, 3 Tertiary
PARTNER ID
The trading partner's identification number. Access the Coordination of Benefits Agreement page on the CMS website and select the COBA Trading Partners Customer Service Contacts document from the "Downloads" section to associate the identification number with the insurer's name.
PAID DATE
Date of payment.
PROVIDER PAYMENT
Amount paid to provider.
PAID BY PATIENT
N/A
REIMB RATE
Provider's specific reimbursement rate (per diem or percentage).
RECEIPT DATE
Date claim was received by FISS.
PROVIDER INTEREST
Amount of interest paid to the provider on this claim.
CHECK/EFT NO
Identification number of the check or the electronic funds being transferred.
CHECK/EFT ISSUE DATE
Date check was issued or the date the electronic funds transfer were released.
PAYMENT CODE
Payment method of the check or electronic funds transfer. Valid values are:
ACH = Automated clearing house or electronic funds transfer CHK = check NON = non-payment data
PIP PAY AS CASH
Periodic Interim Payment (PIP) indicator. A "Y" displays when the provider payment method is PIP, or when the Adjustment Reason Code equals RI indicating a Recovery Auditor-initiated adjustment.
HOSPICE PRIOR DYS
Identifies the prior hospice benefit period days.
DRG
N/A
OUTLIER AMT
Capital outlier payment. Outlier portion of the PPS payment.
TTL BLENDED PAYMENT
N/A
FED SPEC
N/A
INIT DRG
The initial Diagnostic Related Diagnosis (DRG) code assigned. Used in the event a Hospital Acquired Condition (HAC) impacts the final MS-DRG assignment.
GRH ORIG REIMB AMT
N/A
TECH PROV DAYS
Technical provider liable days. Days present on benefit savings record or days reflected in Occurrence Span Code 77 if benefit savings not present.
TECH PROV CHARGES
Charges present on benefit savings record.
OTHER INS IND
N/A
CLINIC CODE
N/A
IOCE CLM PR FL
Integrated Outpatient Code Editor Claim Processed Flag
Valid values:
0 – Claim processed 1 – Claim could not be processed (TOB 83X or other invalid bill type) 2 – Claim could not be processed (claim has no line items) 3 – Claim could not be processed (condition code 21 is present) 4 – Error – Claim could not be processed as input values are not valid or are incorrectly formatted 9 – Error – OCE cannot run
Once you have entered all the pertinent information on the claim pages, press F9 to update (store/save) the claim. If there are no errors on the claim, FISS will automatically display a new, blank Page 01 (Map 1711) and the message RECORD SUCCESSFULLY ADDED will appear at the bottom of the screen. Your cursor will be in the MID field. You can begin entering a new claim, or you can press F3 to return to the Claim and Attachments Entry Menu.
If, after you press F9, you do not see the message RECORD SUCCESSFULLY ADDED at the bottom of your screen, there is missing or invalid information on the claim. At least one reason code, identifying the problem with the claim, will appear in the bottom left-hand corner of the screen. See the example below.
Press F1 to access the Reason Codes Inquiry screen (Map 1881). The reason code narrative that appears will provide you with information about the problem.
Once you have reviewed the narrative, press F3 one time to return to the claim. Make the correction and press F9 again. If the RECORD SUCCESFULLY ADDED message appears, you have successfully entered the claim. If this message does not appear, another reason code will display indicating that you still have missing or invalid information on your claim. Press F1 again to see the narrative for the reason code. When you have finished reviewing the narrative, press F3 one time to return to the claim. Make your correction and press F9. Repeat this process until the RECORD SUCCESSFULLY ADDED message appears. The claim will not be stored or saved until all reason codes are resolved and you see the RECORD SUCCESSFULLY ADDED message at the bottom of the screen. If you press F3 without getting the RECORD SUCCESSFULLY ADDED message, the claim information is lost and you will need to re-key the entire claim.
More than one reason code may appear at the bottom of your screen. Pressing F1 displays the first reason code. You should correct the reason codes one at a time, beginning with the first reason code. Sometimes, by correcting the first code, other related codes will also be corrected. Sometimes new codes will appear. Continue to work through the reason codes until you see the RECORD SUCCESSFULLY ADDED message.
If, as you are working on your claim, you are unable to determine how to correct the error, call the Provider Contact Center for assistance.
If you are viewing a FISS Claim Page and press F3 before the RECORD SUCCESSFULLY ADDED message appears, you will lose the claim data you entered. FISS does not save the claim information until all errors on the claim are corrected.
Even though you may be required to fix errors (reason codes) before your claim is accepted into the system, the claim could still go to the Return to Provider (RTP) file for other corrections. It is very important to check the RTP (claims correction) status/location T B9997 in FISS to see if you have claims to correct.
Roster billing is a quick and convenient way to bill for vaccinations (flu, pneumonia or COVID-19). To submit a roster bill through the Roster Bill Entry option, you must have given the same type of vaccination to five or more people on the same date of service. Each type of vaccination must be billed on a separate roster bill. You cannot have pneumonia and flu shots on the same roster bill.
If you administered a vaccine to fewer than five Medicare beneficiaries on the same day, you must submit the claim(s) individually from the Claims and Attachments Entry Menu.
From the Claims and Attachments Entry Menu, type 87 and press Enter.
The Vaccine Roster for Mass Immunizers screen (Map 1681) appears:
The RECEIPT DATE is system generated.
Complete the following fields:
Date of Serv (MMDDYY)
Type of Bill (key only the first two digits of the type of bill)
NPI (National Provider Identifier)
Fac. Zip
Revenue Code (up to 2 lines)
HCPC (up to 2 lines)
Charges per Beneficiary (up to 2 lines)
Before completing the patient information, press ENTER.
Medicare ID Number
Last Name
First Name
Init (optional field)
Birth Date (MMDDCCYY)
Sex
Admit Type
Before you can access the ADMIT TYPE field, you will need to press the Enter key after keying the first beneficiary's Medicare number, Last Name, First Name, Birth Date, and Sex code information. After you press ENTER, FISS will allow access to the ADMIT TYPE field for that first beneficiary, and any additional beneficiary information that needs to be entered.
The Roster Bill screen allows entry of up to 10 beneficiaries; however, only four beneficiaries can be entered on the first screen. To continue the entry of information for the remaining beneficiaries, press F6 to enter the next four beneficiaries and press F6 again to enter the last two beneficiaries. When you have more than 10 beneficiaries to enter, refer to the "shortcut" information found below.
Press F9 to submit the Roster Bill information into FISS. If the entered information is accepted, the message RECORD SUCCESSFULLY ADDED will display. You can continue to enter additional roster bill information or press F3 to return to the Claim and Attachments Entry Menu.
If, after you press F9, you do not see the message RECORD SUCCESSFULLY ADDED at the bottom of your screen, there is missing or invalid information entered on the roster bill. Some names may "disappear" from the list because their specific identification information was correct. Other names may remain because of identification problems (e.g., wrong Medicare ID, invalid date of birth, etc.). Reason codes explaining problems with the information will appear at the bottom left of the screen. Press F1 to review the reason code narrative and then press F3 one time to return to the roster bill. Correct the error and press F9 again. If additional reason codes display, continue this process (F1, F3, F9) until all reason codes are eliminated. Your roster bill will not be stored or saved until all reason codes are resolved and you see the RECORD SUCCESSFULLY ADDED message at the bottom of the screen.
Shortcut: You can use a shortcut to enter beneficiary information on the roster billing screen when you have more than 10 beneficiaries that received the same vaccine on the same day. After entering the required data above the "PATIENT INFORMATION" section of the roster bill screen, leave the MID Number field blank, but enter the rest of the beneficiary specific information. Enter the remaining nine beneficiaries' information accurately, and then press the F9 key to submit the claim information. The accurate information for the nine will disappear and the information for the beneficiary with the blank MID Number field will remain along with the vaccination information at the top of the roster bill screen. Keep accurately entering and submitting (F9) the information for the remaining beneficiary – nine at a time – until all have been billed. You can then correct your intentional error of leaving the MID Number field blank and submit the first beneficiary's information to Medicare by pressing F9.
An example of a completed roster bill (how it looks before pressing F9) is pictured below.
Field Descriptions for Vaccine Roster for Mass Immunizers screen – Map 1681
Field Name
Description
RECEIPT DATE
System generated.
OSCAR
Online Survey Certification and Reporting System (OSCAR). No longer applicable.
DATE OF SERV
Date vaccine was administered. MMDDYY
TYPE OF BILL
Type of bill. Enter only the first 2 positions of the type of bill. HHAs enter 34 in this field.
NPI
National Provider Identifier.
TAXO. CD
Taxonomy code. Not required for home health and hospice providers.
FAC ZIP
Facility zip code of the provider or the subpart.
REVENUE CODE
Enter the appropriate revenue code(s).
HCPC
Enter the appropriate Healthcare Common Procedure Code System (HCPCS) code(s).
CHARGES PER BENEFICIARY
Total charge per patient for the revenue codes indicated.
MID NUMBER
Beneficiary's Medicare ID number.
LAST NAME
Beneficiary's last name.
FIRST NAME
Beneficiary's first name.
INIT
Beneficiary's middle initial. (optional)
BIRTH DATE
Beneficiary's date of birth. MMDDCCYY
SEX
Beneficiary's sex.
ADMIT DATE
Date of the admission (MMDDYY).
ADMIT TYPE
Admission type. Required for claims received on/after April 1, 2011. Valid type of admission codes include:
1 – Emergency
2 – Urgent
3 – Elective
4 – Newborn
5 – Trauma
9 – Information not available
Note: FISS does not allow access to the ADMIT TYPE field, until you press the Enter key. Therefore, enter the roster bill information for one beneficiary, and then press ENTER to allow access to the ADMIT TYPE field.
From the FISS Main Menu, type 02 in the Enter Menu Selection field and press Enter.
The Claim and Attachments Entry Menu screen (Map 1703) appears:
Entering Medicare Claim Information
From the Claim and Attachments Entry Menu (Map 1703), enter the appropriate claims entry option in the Enter Menu Selection field and press Enter.
Inpatient (20) – used to enter inpatient (11X type of bills)
Outpatient (22) – used to enter outpatient (13X, 14X, type of bills)
Home Health (26) – used to enter home health RAPs (322 type of bill) and final claims (329 type of bill). This option is also used to enter individual vaccine claims, outpatient therapy services and other types of services billed by home health providers on 34X type of bills.
Hospice (28) – use to enter hospice claims (81X or 82X type of bill).
NOE/NOA (49) – use to enter hospice notices of election (NOEs) (8XA type of bill), notices of election termination/revocation (NOTRs) (8XB type of bills) or to cancel an NOE (8XD type of bill)
Roster Bill Entry (87) – use to enter flu and pneumonia roster bills.
When Page 01 of the claim appears, FISS automatically inserts default information into the type of bill (TOB) field and the status/location (S/LOC) field. A list of the default TOBs is provided below. You may need to change this information to reflect the most appropriate bill type. Do not change the default S/LOC field.
In the screen example below, because option 26 was selected, FISS inserted the default home health TOB of 322.
Page 01 – Map 1711
There are six claim pages within FISS:
Page 01 (Map 1711) contains general patient information, condition codes, occurrence codes, occurrence span codes, and value codes.
Page 02 (Map 1712) contains revenue code information, HCPCS codes, charges and service dates.
MAP1719 (Press F11 one time from Page 03) contains Claim Adjustment Segment (CAS) information, required on all Medicare Secondary Payer (MSP) claims.
Page 04 (Map 1714) contains space for remarks.
Page 05 (Map 1715) contains insureds information.
Page 06 (Map 1716) contains Medicare payment information upon processing of the claim.
Use the following keys to move around the FISS claim pages:
Tab – Moves your cursor from left to right, placing it in a valid field Shift + Tab – Moves your cursor from right to left, placing it in a valid field F3 – Exits the entry process and returns to the Claims/Attachments Menu (note that you will lose your work if you press F3 during claim entry) F5 – Scrolls back through a list (billing transactions, revenue codes, diagnosis and procedure codes, charges, etc.) F6 – Scrolls forward through a list F7 – Moves backward one page (e.g., FISS Page 03 to FISS Page 02) F8 – Moves forward one page (e.g., FISS Page 01 to FISS Page 02) F9 – Updates/submits the claim into FISS F10 – Moves to the left F11 – Moves to the right
After you've entered your appropriate type of bill, and before you begin to enter your claim information, press Enter. This allows you access to all of the fields required for your bill type.
Begin entering data on Page 01 of the claim and continue until the appropriate fields are completed. The easiest way to move from field to field is to use your Tab key.
When keying dollar amounts in the VALUE CODES – AMOUNTS fields, you may type or omit the decimal point as you choose (i.e., $45.92 can be keyed as 45.92 or 4592; $1500.00 can be keyed as 1500.00 or 150000). However, it is important to ensure that the appropriate cents value is entered, regardless of whether the decimal point is used.
For home health and hospice providers, when a five-digit core based statistical area (CBSA) code is entered in the VALUE CODE AND AMOUNTS field (value code 61 or G8). Two zeroes must be added behind the CBSA code (i.e., CBSA code 19000 must be entered as 1900000 or 19000.00). If you do not add two zeroes, the CBSA code will be incorrect (i.e., entering the CBSA code as 19000 instead of 1900000 will result in FISS reading the code as 190 instead of 19000).
Page 01 of the claim allows space for ten condition codes, ten occurrence codes/dates, and nine values codes/amounts. However, you can enter up to 30 condition codes, 30 occurrence codes/dates, and up to 36 value codes/amounts. To access the additional space for these fields, press F6 to scroll forward.
Field Descriptions for Page 01 – Map 1711
SC
Screen control. Used to access the Inquiry screens while entering a claim.
N/A
MID
The beneficiary's Medicare ID number.
FL 60
TOB
Type of Bill (system generated; you may need to change this depending on the TOB you are entering).
FL 4
S/LOC
Status/location code (system generated).
N/A
NPI
National Provider Identifier.
FL 56
PAT CNTL #
Patient Control Number.
FL 3a
STMT DATES FROM/TO
Statement covers period.
FL 6
DAYS COV
Number of covered days billed. Not applicable to home health and hospice claims.
N/A
N-C
Number of noncovered days billed. Not applicable to home health and hospice claims.
N/A
CO
Number of coinsurance days used. Not applicable to home health and hospice claims.
N/A
LTR
Number of lifetime reserve days used. Not applicable to home health and hospice claims.
N/A
LAST
Beneficiary's last name.
FL 8
FIRST
Beneficiary's first name.
FL 8
MI
Beneficiary's middle initial.
FL 8
DOB
Beneficiary's date of birth (MMDDCCYY).
FL 10
ADDR 1-6
Beneficiary's street address, city and state.
FL 9
ZIP
Beneficiary's zip code (5- or 9-digit).
FL 9
SEX
Beneficiary's sex (M or F).
FL 11
ADMIT DATE
Admission date.
FL 12
TYPE
Priority (type) of admission.
FL 14
SRC
Point of Origin (previously known as source of admission).
FL 15
STAT
Beneficiary's status code.
FL 17
COND CODES
Condition codes.
FL 18-28
OCC CDS/DATES
Occurrence codes and dates.
FL 31-34
SPAN CODES/ DATES
Occurrence span codes and dates.
FL 35-36
FAC ZIP
Facility zip code of the provider or the subpart (5- or 9- digit field)
FL 1
DCN
Document Control Number. Not used on claims entry – for adjustments/cancellations only.
N/A
VALUE CODES – AMOUNTS
Value codes and amounts.
FL 39-41
ANSI
ANSI codes (system generated after claim is processed).
N/A
Page 02 – Map 1712
Enter revenue code information on Page 02 of the claim. This page will hold up to 14 revenue code lines. To enter additional revenue code lines, press F6 to scroll down to access the second revenue code page (REV CD PAGE 02). There are 33 revenue code pages and 450 total revenue code lines available.
The CL field identifies the line number of the revenue code and is automatically generated by the system. These will display after pressing Enter.
The REV field is a four-position field. You may key a zero before the revenue code (e.g., 0420) or key the three-digit code (e.g., 420) and then use your Tab key to go to the next field.
You do not need to enter information in the RATE field. When appropriate, FISS inserts this information during claims processing.
When keying dollar amounts in the TOT CHARGE field, the decimal point is optional (i.e., $1500.00 can be keyed as 1500.00 or 150000). However, you must key two digits for the cents.
If after you key your revenue codes, you realize you need to delete a revenue code line:
Key the letter "D" in the first position of the revenue code that you wish to delete.
Press the HOME key on your keyboard so that your cursor is placed in the upper left hand corner of the screen (the "Page" field).
Press Enter.
If after you key the 0001 total revenue code line, you realize an additional revenue code needs to be added, key the added revenue code line below the 0001 line. You do not need to rekey the revenue codes that you have already entered. Be sure to update your total charge amount on the 0001 line to reflect the addition of the revenue code charge, and then press the HOME key on your keyboard so that your cursor is placed in the upper left hand corner of the screen (the "Page" field). Press Enter. FISS will automatically reorder the revenue code line that you added to appear above the 0001 line.
Field Descriptions for Page 02 – Map 1712
The MID, TOB, and S/LOC fields are system generated from Page 01 of the claim.
Field Name
Description
UB-04 Form Locator (FL)
UTN
Unique Tracking Number
N/A
PROG
Prior Authorization Program Indicator
N/A
REP PAYEE
Identifies a Medicare beneficiary with a Rep Payee. Valid values are:
Y – Exclude RRB beneficiary services from the prior authorization program
Blank – Subject RRB beneficiary services to prior authorization
N/A
PROV VAL TYPE
Provider validation type. Valid values are:
RP (Rendering Provider)
OP (Operating Physician)
CP (Ordering / Referring Physician)
AP (Attending Physician)
FA (Facility)
N/A
CL
Claim line item number (1 – 450).
N/A
REV
Revenue code.
FL 42
HCPC
Healthcare Common Procedure Coding System (HCPCS) code.
FL 44
MODIFS
Modifiers.
FL 44
RATE
Per unit rate for revenue code line item service. Not used for claim entry.
FL 44
TOT UNT
Total units.
FL 46
COV UNT
Covered units.
FL 46
TOT CHARGE
Total charges per revenue code line.
FL 47
NCOV CHARGE
Noncovered charges billed per revenue code line.
FL 48
SERV DATE
Date service was provided.
FL 45
RED IND
Therapy Reduction Indicator. Valid values:
P = partial (if all units except 1 were reduced) R = all units were reduced. M = multiple surgery reduction
Not used for claim entry.
N/A
Press F8 to page forward to Page 03 of the claim and continue entering claim information.
Page 02 – MAP 171E
From Page 02 of the claim, press F11 one time and Map 171E will display.
Map 171E is used to input a unique Molecular Diagnostic Services (MolDX) test ID into the claim at the detail line level. Refer to MM10760 for additional information.
MAP 171E is also used for institutional outpatient claims with advanced diagnostic imaging services subject to the Appropriate Use Criteria (AUC). Review SE20002 for additional information.
Map 171E is no longer used by home health and hospice providers.
From Page 02 of the claim, press F11 one time and Map 171E will display.
If applicable for your provider type, enter the MolDX ID in the MOLDX field.
Note: If you press F11 again, Map 171A will display; press F11 again and Map 171D displays. Typically, these screens are not used during claim entry and will display information after the claim has processed. Refer to the "Inquiry Menu" section for information about Map 171A and 171D.
From Map 171E, press F8 to page forward to Page 03 of the claim and continue entering claim information
Field Descriptions for Page 02 – Map 171E
The MID, TOB, and S/LOC fields are system generated from Page 01 of the claim.
Field Name
Description
UB-04 Form Locator (FL)
CL
Claim line item number (1 – 450).
N/A
NDC FIELD
National Drug Code information. Enter the 11-digit NDC code (without hyphens).
N/A
NDC QUANTITY
Enter the NDC quantity. If NDC QUANTITY is 50 enter 50.0.
N/A
QUALIFIER
Enter the units of measurement qualifier. Valid values are:
F2 – International Unit
GR – Gram
ME – Milligram
ML – Milliliter
UN – Unit
N/A
RETURN HIPPS 1
Home health only – Identifies the HIPPS codes returned from the Quality Information Evaluation System (QIES). Not used for data entry.
N/A
RETURN HIPPS2
Home health only – Identifies the HIPPS codes returned from the Quality Information Evaluation System (QIES). Not used for data entry.
N/A
MOLDX
Identifies the Molecular Diagnostic Services test ID. Not applicable to home health and hospice claims.
N/A
LLR NPI
Line Level Rendering Physician's NPI number. Not applicable to home health and hospice claims.
N/A
L
Last name of the physician. Not applicable to home health and hospice claims.
N/A
F
First name of the physician. Not applicable to home health and hospice claims.
N/A
M
Middle name of the physician. Not applicable to home health and hospice claims.
N/A
SC
Physician Specialty Code. Not applicable to home health and hospice claims.
N/A
LLO NPI
Line Level Ordering National Provider Identifier (NPI). For institutional outpatient claims with advanced diagnostic imaging services subject to the Appropriate Use Criteria (AUC). Review SE20002 for additional information.
N/A
Page 03 – Map 1713
Enter payer information, applicable diagnosis and procedure codes, and physician information.
The payer code "Z" (Medicare is the primary payer) is automatically entered by FISS. The payer name "Medicare" does not have to be entered in the PAYER field. FISS will insert it automatically. Line A reflects the primary payer, line B reflects the secondary payer, and line C reflects the tertiary payer. Refer to the field descriptions for a list of valid payer codes.
The DIAG CODES field is a seven position field followed by a one position field for the Present on Admission (POA) indicator code. Because the POA indicator is not applicable for home health and hospice providers, you will need to press your Tab key twice to move your cursor to the correct field to key additional diagnosis codes.
The DIAG CODES and the PROCEDURE CODES AND DATES fields allow for up to 25 codes, by pressing F6 to move forward. Press F5 to move backward.
If entering an MSP claim, press F11 to access the MSP Payment Information screen, Map 1719. If MSP does not apply, press F8 to go to Page 04 of the claim.
For information about entering MSP claims, refer to the Page 03 – MAP 1719 information, which follows the MAP1713 field descriptions.
From FISS Page 03 (MAP 1713), press F11 twice to MAP171F to enter the service facility location for an off-campus, outpatient, provider-based department of a hospital. Screen print and field descriptions can be found later.
Field Descriptions for Page 03 – Map 1713
The MID, TOB, and S/LOC fields are system generated from information on Page 01 of the claim.
Field Name
Description
UB-04 Form Locator (FL)
NDC CD
National drug code. Not used by home health or hospice providers.
FL 43
OFFSITE ZIP
Identifies offsite Clinic/Outpatient department zip codes. It determines the claim line HPSA/PSA bonus eligibility.
N/A
ADJ MBI
Identifies the submitted ID indicator and submitted Medicare Beneficiary Identifier on adjustments and cancels.
N/A
IND
Auto populated with an M on adjustments and cancels when the MBI is entered on MAP1741 (Claim Summary Inquiry) screen. An H will display on adjustments and cancels when a MID is entered on MAP1741.
N/A
CD
Primary payer code. Valid values are:
Z – Medicare
The following payer codes are only used on lines B (secondary payer) and C (tertiary payer) to identify supplemental insurers. 1 – Medicaid 2 – Blue Cross 3 – Other
A – primary (FISS will automatically insert the payer name "Medicare" when a "Z" is entered in the CD field.) B – secondary C – tertiary
FL 50
OSCAR
Online Survey Certification and Reporting System (OSCAR). Also known as PTAN. Automatically added by FISS.
FL 51
RI
Release of Information.
FL 52
AB
Assignment of Benefits.
FL 53
EST AMT DUE
Estimated amount due.
FL 55
DUE FROM PATIENT
Estimated amount due from patient.
N/A
SERV FAC NPI
NPI of the nursing facility, hospital or hospice inpatient facility where the patient received services. (Hospice providers only)
N/A
MEDICAL RECORD NBR
Beneficiary's medical record number.
FL 3b
COST RPT DAYS
Informational only – do not enter information.
N/A
NON COST RPT DAYS
Informational only – do not enter information.
N/A
DIAG CODES
ICD-9-CM or ICD-10-CM diagnosis codes. The diagnosis code field is a seven position field followed by a one position field for the Present on Admission (POA) indicator code. Do not enter decimal points. Press F6 if you need to enter additional diagnosis codes.
FL 67A – Q
END OF POA IND
Identifies the end of Present On Admission (POA) indicator. Valid values are:
V – The end of POA indicators for principal and, if applicable, other diagnoses.
X – The end of POA indicators for principal and, if applicable, other diagnoses in special processing situations that may be identified in the future
Blank – Not acute care, POAs do not apply.
N/A
ADMITTING DIAGNOSIS
ICD-10-CM diagnosis code indicating reason for admission. Do not enter decimal points.
FL 69
E CODE
ICD-10-CM diagnosis code indicating external cause of injury. Do not enter decimal points.
FL 72
HOSPICE TERM ILL IND
Hospice Terminal Illness Indicator. Do not enter information.
N/A
IDE
Investigational Device Exemption (IDE) number.
N/A
GAF
Identifies the Geographic Adjustment Factors for state, carrier and locality at the claim level. Not used by home health or hospice providers.
N/A
PRV
The ICD-10-CM code describing the reason for seeking care. Not used by home health or hospice providers.
N/A
PROCEDURE CODES AND DATES
ICD-10-CM procedure codes/dates. Do not enter decimal points. Press F6 to display additional procedure codes fields.
FL 74a – e
ESRD HRS
End Stage Renal Disease (ESRD) hours/duration of dialysis.
N/A
ADJ REAS CD
Reason for adjustment of claim (not for use on claim entry – use with claim adjustment/cancel).
N/A
REJ CD
Reject code. For CGS use only.
N/A
NONPAY CD
Nonpayment code. For CGS use only.
N/A
ATT TAXO
The attending physician taxonomy codes.
N/A
ATT PHYS NPI
Attending physician's national provider identifier.
Attending physician's specialty code. (This code is applied by FISS based on whether the NPI appears and/or matches an NPI on the Provider Enrollment, Chain, and Ownership System (PECOS).)
If the attending NPI on the claim in not present in the PECOS record, FISS will place a '99' in the 'SC' field.
If the attending NPI on the claim is present in the PECOS record, but the name on the claim does not match the name in the PECOS record, the 'SC' field will be left blank.
If the attending NPI on the claim is present in the phys/non-phys file and the name on the claim matches the name in the PECOS record, the specialty code of the first matching record will be placed in the 'SC' field.
N/A
OPR PHYS NPI
Operating physician's national provider identifier.
Operating physician's specialty code. (This code is applied by FISS based on whether the NPI appears and/or matches an NPI on the Provider Enrollment, Chain, and Ownership System (PECOS).)
If the operating NPI on the claim is not present in the PECOS record, FISS will place a '99' in the 'SC' field.
If the operating NPI on the claim is present in the PECOS record, but the name on the claim does not match the name in the PECOS record, the 'SC' field will be left blank.
If the operating NPI on the claim is present in the phys/non-phys file and the name on the claim matches the name in the PECOS record, the specialty code of the first matching record will be placed in the 'SC' field.
N/A
OTH OPR NPI
Other operating physician's national provider identifier.
FL 78 – 79
L
Other physician's last name.
FL 78 – 79
F
Other physician's first name.
FL 78 – 79
M
Other physician's middle initial (not required).
FL 78 – 79
SC
Other physician's specialty code. (This code is applied by FISS based on whether the NPI appears and/or matches an NPI on the Provider Enrollment, Chain, and Ownership System (PECOS).)
If the other NPI on the claim in not present in the PECOS record, FISS will place a '99' in the 'SC' field.
If the other NPI on the claim is present in the PECOS record, but the name on the claim does not match the name in the PECOS record, the 'SC' field will be left blank.
If the other NPI on the claim is present in the phys/non-phys file and the name on the claim matches the name in the PECOS record, the specialty code of the first matching record will be placed in the 'SC' field.
N/A
REN PHYS NPI
Rendering physician's national provider identifier.
Referring physician's national provider identifier.
For hospice notice of elections (NOEs) and claims, enter the NPI of the physician responsible for certifying the patient as terminally ill, if different than the attending physician
For home health outpatient therapy claims (type of bill 34X), enter the referring physician's NPI.
For home health 32X type of bills, enter the NPI of the physician responsible for certifying/recertifying the eligibility for home health services.
Referring physician's specialty code. (This code is applied by FISS based on whether the NPI appears and/or matches an NPI on the Provider Enrollment, Chain, and Ownership System (PECOS).)
If the operating NPI on the claim in not present in the PECOS record, FISS will place a '99' in the 'SC' field.
If the operating NPI on the claim is present in the PECOS record, but the name on the claim does not match the name in the PECOS record, the 'SC' field will be left blank.
If the operating NPI on the claim is present in the phys/non-phys file and the name on the claim matches the name in the PECOS record, the specialty code of the first matching record will be placed in the 'SC' field.
N/A
The majority of the information necessary on a claim is entered into the first three claim pages within FISS. If you have no remarks to make regarding this claim, you can press F9 at this point to store your claim as no further information is required. If, after you press F9, an error appears, see the information titled Saving your Claim later in this chapter.
If entering an MSP claim, press F11 to access the MSP Payment Information screen, Map 1719.
Page 03 – Map 1719
Enter the claim adjustment segment (CAS) information in the Primary Payer 1 MSP Payment Information screen. The prior payer's 835 Electronic Remittance Advice (ERA) typically includes CAS information.
Press F6 to access the "MSP Payment Information" screen for primary payer 2 (if there is one).
press F5 to move back to the primary payer 1 "MSP Payment Information" screen.
If the CAS code information is not available from the prior payer, providers need to determine the appropriate Group Code and Claim Adjustment Reason Code (CARC) to submit. This information is available from the following websites:
CAQH (Access the current version of the CORE Code Combinations)
Field Descriptions for Page 03 – Map 1719
The MID, TOB, and S/LOC fields are system generated from information on Page 01 of the claim.
Field Name
Description
UB-04 Form Locator (FL)
RI
Residual Payment Indicator – allows for secondary payment. FISS will auto populate an X when CARC codes 27, 35, 119 or 149 are present.
N/A
PAID DATE
Enter the paid date shown on the primary payer's remittance advice (MMDDYY format).
N/A
PAID AMOUNT
The payment amount made by the primary payer
N/A
GRP
The ANSI group code. Valid values are:
CO
Contractual Obligation
PI
Payer Initiated Reductions
OA
Other Adjustment
PR
Patient Responsibility
N/A
CARC
Claim Adjustment Reason Code (CARC) shown on the primary payer's remittance advice. CARC codes explain the difference between the billed amount and the amount paid by the primary payer.
N/A
AMT
The dollar amount associated with the group/CARC combination.
N/A
Page 03 – Map 171F
Map 171F is no applicable to home health and hospice providers.
Field Descriptions for Page 03 – Map 171F
The MID, TOB, and S/LOC fields are system generated from information on Page 01 of the claim.
Field Name
Description
ADDRESS 1
The Service Facility address 1.
ADDRESS 2
The Service Facility address 2.
CITY
The Service Facility city.
STATE
The Service Facility state.
ZIP
The Service Facility zip code.
Page 04 – Map 1714
When you submit claims to CGS, using the REMARKS field is optional. However, we encourage you to enter any pertinent information that assists with the processing of the claim. CGS may also use this field to relay information back to the provider when the claim is in process or processed. There are 3 pages available for remarks. To use additional pages, press F6 to scroll forward and F5 to scroll backward
Field Descriptions for Page 04 – Map 1714
The MID, TOB, and S/LOC, fields are system generated from information on Page 01 of the claim.
Field Name
Description
UB-04 Form Locator (FL)
REMARKS
Additional pertinent information to assist the processing of the claim. Three pages are available to make remarks. Each page holds 10 lines of remarks. Press F6 to scroll forward to the next remark page.
FL 80
47 PACEMAKER
Attachment screen indicator. This function should not be used.
N/A
48 AMBULANCE
Attachment screen indicator. This function should not be used.
N/A
40 THERAPY
Attachment screen indicator. This function should not be used.
N/A
41 HOME HEALTH
Attachment screen indicator. This function should not be used.
N/A
58 HPB CLAIMS (MED B)
N/A
N/A
E1 ESRD ATTACH
Attachment screen indicator. This function should not be used.
N/A
ANSI CODES
ANSI reason codes.
N/A
GROUP
Adjustment group code identifying the general category of the adjustment.
N/A
ADJ REASONS
Claim adjustment standard reason code identifying the reason for the adjustment.
N/A
APPEALS
ANSI appeal codes.
N/A
Page 05 – Map 1715
If Medicare is the primary payer, it is not necessary for the insured's information to be entered on Line A. However, if the beneficiary has supplemental insurance, key the insured's supplemental insurance information on Line B.
press F8 to go to Page 06 of the claim.
Field Descriptions for Page 05 – Map 1715
The MID, TOB, and S/LOC fields are system generated from information on Page 01 of the claim.
Two separate lines are available for the insured's information. When Medicare is primary, it is not necessary to enter information on Line A. Only enter supplemental insurance information on Line B. The field names below are listed in the order they are entered.
Field Name
Description
UB-04 Form Locator (FL)
INSURED NAME
Name of policyholder, last name (then press the Tab key) and first name.
FL 58
SEX
Identifies the sex (M or F) of the insured.
FL 11
DOB
Identifies the insured's date of birth.
FL 10
REL
Relationship code of patient to the insured.
FL 59
CERT.-SSN-
MID
Certificate/Social Security No./Medicare ID No./Identification No.
FL 60
GROUP NAME
Name of group (payer/other coverage).
FL 61
INS GROUP NUMBER
Insurance policy group number.
FL 62
TREAT. AUTH. CODE
Treatment Authorization Code. Not required for home health claims with dates of service on or after January 1, 2020.
FL 63
Page 06 – Map 1716
For claims where Medicare is primary, Page 06 of the claim should be left blank.
If the claim is for services unrelated to an MSP record and you are submitting it for conditional Medicare payment, complete the MSP ADDITIONAL INSURER INFORMATION area.
If you need to go back and review information before saving the claim, use your F7 and F8 keys to page backward and forward. You can also press your HOME key to move your cursor into the PAGE field then type the page number you wish to review and press Enter.
When you have completed entering information on the claim, press F9 to store your claim in FISS. See Saving your Claim later in this section.
Field Descriptions for Page 06 – Map 1716
The MID, TOB, and S/LOC fields are system generated from information on Page 01 of the claim.
Field Name
Description
1ST INSURERS ADDRESS 1, 2
These fields are left blank when Medicare is the primary payer.
CITY
ST
ZIP
2ND INSURERS ADDRESS 1, 2
CITY
ST
ZIP
The following payment and pricer data will appear after FISS has completed processing of the claim.
Crossover Indicator. The code which identifies the Medicare payer on the claim. Valid values are:1 Primary, 2 Secondary, 3 Tertiary
PARTNER ID
The trading partner's identification number. Access the Coordination of Benefits Agreement page on the CMS website and select the COBA Trading Partners Customer Service Contacts document from the "Downloads" section to associate the identification number with the insurer's name.
PAID DATE
Date of payment.
PROVIDER PAYMENT
Amount paid to provider.
PAID BY PATIENT
N/A
REIMB RATE
Provider's specific reimbursement rate (per diem or percentage).
RECEIPT DATE
Date claim was received by FISS.
PROVIDER INTEREST
Amount of interest paid to the provider on this claim.
CHECK/EFT NO
Identification number of the check or the electronic funds being transferred.
CHECK/EFT ISSUE DATE
Date check was issued or the date the electronic funds transfer were released.
PAYMENT CODE
Payment method of the check or electronic funds transfer. Valid values are:
ACH = Automated clearing house or electronic funds transfer CHK = check NON = non-payment data
PIP PAY AS CASH
Periodic Interim Payment (PIP) indicator. A "Y" displays when the provider payment method is PIP, or when the Adjustment Reason Code equals RI indicating a Recovery Auditor-initiated adjustment.
HOSPICE PRIOR DYS
Identifies the prior hospice benefit period days.
DRG
N/A
OUTLIER AMT
Capital outlier payment. Outlier portion of the PPS payment.
TTL BLENDED PAYMENT
N/A
FED SPEC
N/A
INIT DRG
The initial Diagnostic Related Diagnosis (DRG) code assigned. Used in the event a Hospital Acquired Condition (HAC) impacts the final MS-DRG assignment.
GRH ORIG REIMB AMT
N/A
TECH PROV DAYS
Technical provider liable days. Days present on benefit savings record or days reflected in Occurrence Span Code 77 if benefit savings not present.
TECH PROV CHARGES
Charges present on benefit savings record.
OTHER INS IND
N/A
CLINIC CODE
N/A
IOCE CLM PR FL
Integrated Outpatient Code Editor Claim Processed Flag
Valid values:
0 – Claim processed 1 – Claim could not be processed (TOB 83X or other invalid bill type) 2 – Claim could not be processed (claim has no line items) 3 – Claim could not be processed (condition code 21 is present) 4 – Error – Claim could not be processed as input values are not valid or are incorrectly formatted 9 – Error – OCE cannot run
Saving Your Claim
Once you have entered all the pertinent information on the claim pages, press F9 to update (store/save) the claim. If there are no errors on the claim, FISS will automatically display a new, blank Page 01 (Map 1711) and the message RECORD SUCCESSFULLY ADDED will appear at the bottom of the screen. Your cursor will be in the MID field. You can begin entering a new claim, or you can press F3 to return to the Claim and Attachments Entry Menu.
If, after you press F9, you do not see the message RECORD SUCCESSFULLY ADDED at the bottom of your screen, there is missing or invalid information on the claim. At least one reason code, identifying the problem with the claim, will appear in the bottom left-hand corner of the screen. See the example below.
Press F1 to access the Reason Codes Inquiry screen (Map 1881). The reason code narrative that appears will provide you with information about the problem.
Once you have reviewed the narrative, press F3 one time to return to the claim. Make the correction and press F9 again. If the RECORD SUCCESFULLY ADDED message appears, you have successfully entered the claim. If this message does not appear, another reason code will display indicating that you still have missing or invalid information on your claim. Press F1 again to see the narrative for the reason code. When you have finished reviewing the narrative, press F3 one time to return to the claim. Make your correction and press F9. Repeat this process until the RECORD SUCCESSFULLY ADDED message appears. The claim will not be stored or saved until all reason codes are resolved and you see the RECORD SUCCESSFULLY ADDED message at the bottom of the screen. If you press F3 without getting the RECORD SUCCESSFULLY ADDED message, the claim information is lost and you will need to re-key the entire claim.
More than one reason code may appear at the bottom of your screen. Pressing F1 displays the first reason code. You should correct the reason codes one at a time, beginning with the first reason code. Sometimes, by correcting the first code, other related codes will also be corrected. Sometimes new codes will appear. Continue to work through the reason codes until you see the RECORD SUCCESSFULLY ADDED message.
If, as you are working on your claim, you are unable to determine how to correct the error, call the Provider Contact Center for assistance.
If you are viewing a FISS Claim Page and press F3 before the RECORD SUCCESSFULLY ADDED message appears, you will lose the claim data you entered. FISS does not save the claim information until all errors on the claim are corrected.
Even though you may be required to fix errors (reason codes) before your claim is accepted into the system, the claim could still go to the Return to Provider (RTP) file for other corrections. It is very important to check the RTP (claims correction) status/location T B9997 in FISS to see if you have claims to correct.
Entering a Roster Bill
Roster billing is a quick and convenient way to bill for vaccinations (flu, pneumonia or COVID-19). To submit a roster bill through the Roster Bill Entry option, you must have given the same type of vaccination to five or more people on the same date of service. Each type of vaccination must be billed on a separate roster bill. You cannot have pneumonia and flu shots on the same roster bill.
If you administered a vaccine to fewer than five Medicare beneficiaries on the same day, you must submit the claim(s) individually from the Claims and Attachments Entry Menu.
From the Claims and Attachments Entry Menu, type 87 and press Enter.
The Vaccine Roster for Mass Immunizers screen (Map 1681) appears:
The RECEIPT DATE is system generated.
Complete the following fields:
Date of Serv (MMDDYY)
Type of Bill (key only the first two digits of the type of bill)
NPI (National Provider Identifier)
Fac. Zip
Revenue Code (up to 2 lines)
HCPC (up to 2 lines)
Charges per Beneficiary (up to 2 lines)
Before completing the patient information, press ENTER.
Medicare ID Number
Last Name
First Name
Init (optional field)
Birth Date (MMDDCCYY)
Sex
Admit Type
Before you can access the ADMIT TYPE field, you will need to press the Enter key after keying the first beneficiary's Medicare number, Last Name, First Name, Birth Date, and Sex code information. After you press ENTER, FISS will allow access to the ADMIT TYPE field for that first beneficiary, and any additional beneficiary information that needs to be entered.
The Roster Bill screen allows entry of up to 10 beneficiaries; however, only four beneficiaries can be entered on the first screen. To continue the entry of information for the remaining beneficiaries, press F6 to enter the next four beneficiaries and press F6 again to enter the last two beneficiaries. When you have more than 10 beneficiaries to enter, refer to the "shortcut" information found below.
Press F9 to submit the Roster Bill information into FISS. If the entered information is accepted, the message RECORD SUCCESSFULLY ADDED will display. You can continue to enter additional roster bill information or press F3 to return to the Claim and Attachments Entry Menu.
If, after you press F9, you do not see the message RECORD SUCCESSFULLY ADDED at the bottom of your screen, there is missing or invalid information entered on the roster bill. Some names may "disappear" from the list because their specific identification information was correct. Other names may remain because of identification problems (e.g., wrong Medicare ID, invalid date of birth, etc.). Reason codes explaining problems with the information will appear at the bottom left of the screen. Press F1 to review the reason code narrative and then press F3 one time to return to the roster bill. Correct the error and press F9 again. If additional reason codes display, continue this process (F1, F3, F9) until all reason codes are eliminated. Your roster bill will not be stored or saved until all reason codes are resolved and you see the RECORD SUCCESSFULLY ADDED message at the bottom of the screen.
Shortcut: You can use a shortcut to enter beneficiary information on the roster billing screen when you have more than 10 beneficiaries that received the same vaccine on the same day. After entering the required data above the "PATIENT INFORMATION" section of the roster bill screen, leave the MID Number field blank, but enter the rest of the beneficiary specific information. Enter the remaining nine beneficiaries' information accurately, and then press the F9 key to submit the claim information. The accurate information for the nine will disappear and the information for the beneficiary with the blank MID Number field will remain along with the vaccination information at the top of the roster bill screen. Keep accurately entering and submitting (F9) the information for the remaining beneficiary – nine at a time – until all have been billed. You can then correct your intentional error of leaving the MID Number field blank and submit the first beneficiary's information to Medicare by pressing F9.
An example of a completed roster bill (how it looks before pressing F9) is pictured below.
Field Descriptions for Vaccine Roster for Mass Immunizers screen – Map 1681
Field Name
Description
RECEIPT DATE
System generated.
OSCAR
Online Survey Certification and Reporting System (OSCAR). No longer applicable.
DATE OF SERV
Date vaccine was administered. MMDDYY
TYPE OF BILL
Type of bill. Enter only the first 2 positions of the type of bill. HHAs enter 34 in this field.
NPI
National Provider Identifier.
TAXO. CD
Taxonomy code. Not required for home health and hospice providers.
FAC ZIP
Facility zip code of the provider or the subpart.
REVENUE CODE
Enter the appropriate revenue code(s).
HCPC
Enter the appropriate Healthcare Common Procedure Code System (HCPCS) code(s).
CHARGES PER BENEFICIARY
Total charge per patient for the revenue codes indicated.
MID NUMBER
Beneficiary's Medicare ID number.
LAST NAME
Beneficiary's last name.
FIRST NAME
Beneficiary's first name.
INIT
Beneficiary's middle initial. (optional)
BIRTH DATE
Beneficiary's date of birth. MMDDCCYY
SEX
Beneficiary's sex.
ADMIT DATE
Date of the admission (MMDDYY).
ADMIT TYPE
Admission type. Required for claims received on/after April 1, 2011. Valid type of admission codes include:
1 – Emergency
2 – Urgent
3 – Elective
4 – Newborn
5 – Trauma
9 – Information not available
Note: FISS does not allow access to the ADMIT TYPE field, until you press the Enter key. Therefore, enter the roster bill information for one beneficiary, and then press ENTER to allow access to the ADMIT TYPE field.
ADMIT DIAG
Admission diagnosis.
PAT STATUS
Patient status code.
ADMIT SRCE
Admission source code.
Chapter 5 – Claims Correction Menu Options
The Claims Correction Menu (FISS Main Menu option 03) allows you to:
Correct claims in the return to provider (RTP) status/location (T B9997)
Adjust paid or rejected claims
Cancel paid claims
All FISS direct data entry (DDE) screens display information in the top right corner that identifies the region (ACPFA052), the current date, release number (e.g., C20112WS) and the time of day. This information is for internal purposes only and is used to assist CGS staff in researching issues when screen prints are provided.
Access the Claims Correction Menu
From the FISS Main Menu, type 03 in the Enter Menu Selection field and press Enter.
The Claim and Attachments Correction Menu screen (Map 1704) appears:
When a claim is submitted using FISS DDE, it processes through a series of edits to ensure the information submitted on the claim is complete and correct. If the claim has incomplete, incorrect or missing information, it will be sent to your Return to Provider (RTP) file for you to correct. Claims in the RTP file receive a new date of receipt when they are corrected (F9'd) and are subject to the Medicare timely claim filing requirements
Enter the Claims Correction option (21, 23, 25, 27 or 29) that matches your provider type and press Enter. Claims that have been returned to you for correction (RTP) are located in status/location T B9997.
The Claim Summary Inquiry screen (Map 1741) appears. The S/LOC field will default to the status/location T B9997. This is commonly referred to as your Return to Provider (RTP) file. Your cursor will be located at the MID field.
Since Medicare billing transactions may encounter different edits while processing, claims and adjustments may need correction more than one time, and for multiple reasons. Therefore, it is important to verify that all required claim data is present and that the information is complete and correct prior to resubmitting billing transactions.
Type your NPI in the NPI field. To move the cursor to the NPI (National Provider Identifier) field, hold down the Shift key and press the Tab key. You cursor will automatically move to the NPI field.
Only the claims for the NPI entered will appear.
The S/LOC field defaults to T B9997. Because you are accessing Map 1741 from the Claims Correction menu, only claims in a T B9997 status/location will display.
The TOB field automatically displays the first two digits of the default type of bill (TOB) based on the claim correction option that you selected. If you need to correct claims with a different TOB, you will need to change the default TOB. A list of the default TOBs is provided below.
The DDE SORT field on Map 1741 allows you to sort claims for correction. This is especially helpful if you have a large number of claims to correct. If you wish, enter one of the following characters in the DDE SORT field to sort your claims.
Press Enter to see a list of all claims that require correction that match the criteria you entered (TOB and/or DDE SORT). In this example, because an 'H' (Medicare number) sort type was used, the list of claims is sorted by the patient's Medicare number.
If no claims appear after you press Enter, there are no claims with this TOB for your facility that you need to correct today. We recommend that you check the Claims Correction area at least once per week. Checking more often is encouraged.
If your facility submits claims with different bill types (TOB), you may want to leave the TOB field blank. This will ensure that all claims applicable to your provider type display. The Claim Count Summary Inquiry screen (option 56), can be used to view the number of claims that are located in the RTP file (T B9997), and the first two digits of the type of bill. This will ensure you are aware of the various types of bills you have that need correction. Refer to the Inquiry Menu section of this guide for information about option 56.
If claims appear, you will see a two-line summary of each claim's information. Up to five claims can display per page on Map 1741. Use the F6 key to scroll forward (F5 to scroll backward) through the entire list of claims you have to correct. To determine what needs to be corrected, you will need to select each claim. To select a claim, press your Tab key until your cursor moves under the SEL field and is to the left of the Medicare number (MID field) of the claim you want to view.
Type an S in the SEL field and press Enter. You can only select one claim at a time. After you press Enter, Page 01 (Map 1711) of the claim appears. The reason code(s) appears at the bottom left corner of the screen.
Press F1 to access the narrative of the first reason code. The Reason Code Inquiry screen (Map 1881) appears. The narrative provides you with information about what needs to be corrected.
Once you have reviewed the narrative, press F3 one time to return to the claim. Make the correction and press F9. If the system automatically takes you back to the Claim Summary Inquiry screen (Map 1741), the claim has been corrected. You will also notice that the two-line summary for that claim no longer appears on your list of claims to correct. Select the next claim to correct or press F3 to return to the Claims Correction and Attachments Menu.
If you press F9 and are not returned to Map 1741 automatically, one or more errors still exist. Press F1 again to see the narrative for the next reason code. When you have finished reviewing the narrative, press F3 one time to return to the claim. Make your correction and press F9. Repeat this process (F1, F3, F9) until the claim has been corrected, and you are returned to Map 1741.
More than one reason code may appear in the lower left-hand corner of Page 01 of the claim. Pressing F1 displays the narrative for the first reason code. You should correct the reason codes one at a time. Sometimes, by correcting the first code, other related codes will also be corrected. Sometimes, new codes will appear. Continue to work through the reason codes, one at a time, until you are returned to Map 1741 and the claim is eliminated from your claim correction list.
If you need to change information on a revenue code line (HCPCS, modifier, units, charges, or date of service), instead of typing over the incorrect information, you need to delete the incorrect revenue code line and re-key the correct information. The instructions "Deleting Revenue Code Lines" and "Adding Revenue Code Lines" can be found later in this chapter.
If, after reviewing the error(s), you decide that you would rather resubmit the billing transaction than to correct it, you may do so. Duplicate claim editing does not apply to claims in the RTP file. CGS encourages you to suppress the view of any billing transaction that you do not intend to correct. Instructions for suppressing the view of claims are found later in this chapter.
In some situations, you will need to work other claims (e.g., submit a prior claim, correct a prior claim, etc.) before being able to correct a claim in the RTP file. For example, before being able to correct a hospice claim with a sequential billing error, a prior claim may need to be submitted or corrected. Home health providers may need to resubmit and wait for the episode's RAP to finalize before being able to correct the episode's final claim out of the RTP file. If you realize once you are in a claim that you will be unable to correct it, press F3 to return to Map 1741. Access the claim at a later time once you have fixed other claim issues related to this particular claim.
In some situations, CGS staff may add information in the REMARKS field on Page 04 of the claim to assist you in correcting the claim. Check Page 04 of the claim when you are correcting the claim to see if additional information has been entered.
Note: Claims are available in your RTP file for up to 36 months (see the "Note" below regarding timely filing). After 36 months, the claim will purge off of FISS. If you choose not to correct the claim in RTP, we strongly encourage you to suppress the view of the claim, which will remove the claim from your RTP file sooner. This will help to limit the number of claims that are viewable in your RTP file, and will assist you in avoiding duplicate claim submission errors. Refer to the "Suppress View" information later in this chapter. As a Medicare provider, you are accountable to ensure the information you submit on your claim is correct, and according to Medicare regulations.
When claims are corrected from the RTP file, a new receipt date is assigned. Therefore, it is important to remember that Medicare timely claim filing requirements apply. Correct your claims as soon as possible. The "#DAYS" field on Map 1741 tells you how long the claim has been in your RTP file. If the #DAYS field is blank, the claim just went to the RTP file during the nightly system cycle.
In the example below, the claim has been in the RTP file for 11 days.
If you need to change information on a revenue code line (HCPCS, modifier, units, charges, or date of service), instead of typing over the incorrect information, you need to delete the incorrect revenue code line and re-key the correct information. To delete a revenue code line:
Key the letter "D " in the first position of the revenue code on the line that you wish to delete. If there are multiple lines to delete, key the letter "D" on each line you wish to delete.
Press the HOME key on your keyboard so that your cursor is placed in the upper right hand corner of the screen (the "Page" field).
Press Enter. The revenue code line(s) with the letter "D" will be removed, and FISS will automatically reorder the remaining revenue code lines.
If the claim's total charges are changing due to the deletion of revenue code line(s), update the total charge amount on the 0001 revenue code line to reflect the correct amount.
If you need to add a revenue code line to a claim in the RTP file, key the new revenue code line under the 0001 line, and then press the HOME key on your keyboard so that your cursor is placed in the "Page" field (in the upper left hand corner of the screen). Press Enter. You do not need to re-key the revenue codes that were already entered. FISS will automatically reorder the revenue code line that you added. If the claim's total charges are changing due to the addition of revenue codes lines, update the total charge amount on the 0001 revenue code line to reflect the correct amount.
Occasionally, you may have claims in RTP that you do not need to correct. Although FISS does not allow you to delete a claim in RTP, we strongly recommend that you suppress the view of a claim you choose not to correct to avoid duplicate billing errors. Suppressed claims will move to the status/location I B9997 (I=inactivated), and will no longer appear on your list of claims in your RTP file. The following steps explain how to suppress the view of a claim.
This action cannot be reversed. Please make sure that you want to suppress the view of the claim before following the steps below. Suppressed claims (I B9997 status/location) will still appear when viewing claims in option 12 (Claim Summary Inquiry screen).
Select the claim from your RTP list on the Claim Summary Inquiry screen (Map 1741).
Using your Tab key, move to the SV field in the upper right-hand corner on Page 01 of the claim.
Type Y in the SV field and press F9.
The system will automatically return you to Map 1741 and the claim will no longer appear on your RTP list.
After suppressing the view of a claim, it will no longer display in the RTP file; however, when viewing the Claim Inquiry (option 12) or Claim Count Summary (option 56) screens, the claim may still appear in status/location T B9997 for several weeks, until FISS purges suppressed claims to the "I" status.
At times, you may need to adjust a claim after it has been processed to make changes (e.g., add or remove services). Claim adjustments can be made to paid or rejected claims (i.e., status/location P B9997 or R B9997). However, adjustments cannot be made to:
a line item that has been denied by Medical Review;
claims in status/location R B7501 or R B7516 (post-pay MSP review); and
claims in status/location R B9997 for the following reasons:
If the original claim information did not post to the Common Working File (CWF), the claim cannot be adjusted. Instead, a new claim must be resubmitted with the correct information. You can verify whether a claim posted to CWF by reviewing the TPE-TO-TPE (tape-to-tape) field, which is found on FISS screen Map 171D. For more information about using Inquiry option 12 to access this screen, refer to the TPE-TO-TPE field information under the Map 171D Field Descriptions found in the Inquiry Menu section of this guide.
To adjust paid or rejected claims, enter the Claims Adjustments option (30, 31, 32, 33 or 35) that matches your provider type and press Enter.
The Claim Summary Inquiry screen (Map 1741) appears.
Your cursor will be located at the MID field.
Type your NPI in the NPI field. To move the cursor to the NPI (National Provider Identifier) field, hold down the Shift key and press the Tab key. Your cursor will automatically move to the NPI field.
After typing your NPI, your cursor will move to the MID field. Type the beneficiary's Medicare number.
After typing the Medicare number, press the tab key to place your cursor after the "P" in the S/LOC field. The S/LOC field defaults to P to display claims in P (Paid) status/location. Type B9997 after the P. Or, if the claim you want to adjust was rejected, change the "P" to an "R" and type B9997.
The TOB field automatically displays the first two digits of the default type of bill based on the adjustment option that you selected.
You may also enter the 'From Date' and 'To Date' of the claim, but that is optional.
Press Enter. Any claims matching the criteria you entered (MID, S/LOC, TOB, and/or FROM/TO DATE fields) will appear.
Note: Not all claims that are accessible using this function are appropriate to adjust.
A two-line summary of each claim's information will display. Up to five claims can display on Map 1741. You may need to use your F5 and F6 keys to scroll through the entire list of claims to find the beneficiary's claim you want to adjust. To select the claim, press your Tab key until your cursor moves under the SEL field and is to the left of the Medicare number of the claim you want to adjust.
Type an S in the SEL field and press Enter. You can only select one claim at a time. After you press Enter, Page 01 (Map 1711) of the claim appears.
If no information appears when the claim is selected, look for a message at the bottom of the page that states "ADJUSTMENT CLAIM IS ALREADY CANCELED". When this occurs, the claim cannot be adjusted; instead, a new claim should be resubmitted to Medicare with the changed information.
Once the claim is selected, the third digit of the type of bill will automatically change to a 7 to signify that this is an adjustment claim. The status/location will display S B0100 identifying the adjustment as a new claim record to be processed. In addition, the Document Control Number (DCN) will be inserted automatically by the system on Page 01 of the adjustment.
If you are wanting to submit a Reopening, the third digit of the type of bill must be changed to a Q. For additional information about reopenings, refer to the Medicare Claims Processing Manual (Pub. 100-04, Ch. 34).
Adjustments are a four-step process. You must:
Enter a Claim Change Reason Code on Page 01 of the claim;
Enter an Adjustment Reason Code on Page 03 of the claim;
Make your adjustment on the applicable page(s) and add remarks on Page 04 of the claim, if necessary; and
NOTE: If you are adjusting a rejected claim, your charges have been moved to the noncovered charge field. As a result, you must also delete and re-enter each revenue code line so that the charges are in the covered charge column before pressing F9. Please see the "Deleting Revenue Code Lines" and "Adding Revenue Code Lines" instructions earlier in this section.
Press F9 to submit the adjustment.
The following provides more details of this four-step process.
Enter the Claim Change Reason Code in the first available COND CODES field on Page 01 of the claim. Choose the one code that best describes the adjustment request. Only one is allowed per claim. If you are making multiple changes, use claim change reason code D9. If you use D9, you must include remarks on Page 04 of the claim that explains what type of changes are being made to the claim. Valid claim change reason codes are:
Claim Change Reason Code
Description
D0
Change in Service Dates (do not use for adjusting line item dates of services, use D9 instead)
D1
Change in Charges (do not use for adjusting units, use D9 instead)
D2
Change in Revenue Codes/HCPCS/HIPPS (use D9 to change a revenue code or HCPCS)
D7
Change to make Medicare secondary
D8
Change to make Medicare primary
D9
Any other change or multiple changes (requires remarks)
E0
Change in patient status
Enter the Adjustment Reason Code on Page 03 of the claim in the ADJUSTMENT REASON CODE field. The Adjustment Reason Code that you select should match the Claim Change Reason in terms of description. For example, if using D1 (change in charges) as the Claim Change Reason Code, use RG as the Adjustment Reason Code.
The most common adjustment reason codes are:
Adjustment Reason Codes
Description
RF
Changes in Service Dates (use with Claim Change Reason Code D0)
RG
Change in Charges (use with Claim Change Reason Code D1)
RH
Change in Revenue Codes/HCPCS/HIPPS (use with Claim Change Reason Code D2)
RM
Any other change (requires remarks) (use with Claim Change Reason Code D9)
RN
Change in patient status (use with Claim Change Reason Code E0)
You can inquire about additional Adjustment Reason Codes by typing 16 in the SC field on any of the FISS claim pages and pressing Enter. Refer to the Inquiry Menu section for information about the Adjustment Reason Codes (option 16).
The Adjustment Reason Code field is only a 2-digit field. If a code already appears in this field, type the appropriate Adjustment Reason Code over the existing code.
Make your adjustment on the applicable page(s). If you are using Claim Change Reason Code D9, you must include information in the REMARKS field on Page 04 of the claim that explains what type of changes are being made to the claim.
When adjusting a rejected claim, please be aware that FISS places charges into the noncovered (NCOV CHARGE) field on Page 02 of the claim. Therefore, providers must first delete all revenue lines containing noncovered charges and re-enter the revenue code information in new detail lines. This will allow charges to only appear in the TOT CHARGE field. Please see the "Deleting Revenue Code Lines" and "Adding Revenue Code Lines" instructions earlier in this chapter.
We suggest that you enter comments in the REMARKS field for all of your adjustments. Comments are often helpful in determining what is being adjusted and why.
PressF9. If the system automatically takes you back to Map 1741, you have successfully submitted the adjustment for processing. Select the next claim to adjust or press F3 to return to the Claims Correction menu.
If you press F9 and are not returned to Map 1741, one or more errors exist. Press F1 to see the narrative for the reason code that displays in the lower left corner of the screen. When you have finished reviewing the narrative, press F3 one time to return to the claim. Make your correction and press F9. If another reason code displays, repeat this process (F1, F3, F9) until you are returned to Map 1741.
More than one reason code may appear at the bottom of your screen. Pressing F1 displays the narrative to the first reason code. You should correct the reason codes one at a time. Sometimes, by correcting the first code, other related codes will also be corrected. Sometimes, new codes will appear. Continue to work through the reason codes until you are returned to Map 1741. If you are having difficulty adjusting a claim, contact a Customer Service Representative (CSR) at the telephone number listed on the CGS website.
The original paid or rejected claim will remain in FISS. After the adjustment is processed, both original claim and the adjusted claim will appear when viewing the claims in option 12, from the Inquiry Menu. Below is an example of an outpatient claim/adjustment. The original claim is an 131 type of bill and the adjustment is listed as an 137. In addition, the CAN DT of the original claim will match the PD DT of the adjusted (817) claim.
Occasionally, the Common Working File will automatically adjust claims. CGS may also initiate claim adjustments. These types of adjustments are identified with a "G", or "I" as the third digit of the type of bill (TOB) (e.g., XXG, XXI). A cancel should not be made to an adjustment initiated by CGS or CWF. Instead, an adjustment should be submitted if the 13G or 13I claim has finalized in FISS status/location P B9997 or R B9997, and the claim information needs to be modified (i.e., remove visits, add charges, etc.).
Cancellations can only be made to paid claims (i.e., status/location P B9997). If a claim is partially denied, a cancellation cannot be done. Providers should also not attempt to cancel RAPs/claims that are rejected (S/LOC R B9997).
To cancel paid claims, enter the Claim Cancels option (50, 51, 52, 53 or 55) that matches your provider type and press Enter.
The Claim Summary Inquiry screen (Map 1741) appears.
Type your NPI in the NPI field. To move the cursor to the NPI (National Provider Identifier) field, hold down the Shift key and press the Tab key. Your cursor will automatically move to the NPI field.
After typing your NPI, the cursor will move to the MID field. Type the beneficiary's Medicare number.
Tab to the S/LOC field and type B9997 after the P.
The S/LOC field defaults to P. Because you are accessing MAP 1741 from the Claim Cancels option, only claims in a P (Paid) status/location will be displayed.
The TOB field automatically displays the first two digits of the default type of bill (TOB) based on the cancel option that you selected. If you need to cancel a claim with a different type of bill, you will need to change the default TOB, or you may remove the values from the TOB field to search claims with all TOBs. The table below identifies the claim cancel options and the default TOB:
Claim Cancels Option
Default TOB
50
11
51
13
52
21
53
33
55
81
You may also enter a From Date and To Date, but that is optional.
Press Enter. Any claims matching the criteria you entered (MID, S/LOC, TOB, and/or FROM/TO DATE fields) will appear.
A two-line summary of each claim's information will display. Up to five claims can display on Map 1741. You may need to use your F5 and F6 keys to scroll through the entire list of paid claims for this particular beneficiary. To select a claim, press your Tab key until your cursor moves under the SEL field and is to the left of the Medicare number of the claim you want to cancel.
Occasionally, the Common Working File will automatically adjust claims. CGS may also initiate claim adjustments. These types of adjustments are identified with a "G", or "I" as the third digit of the type of bill (TOB) (e.g., XXG, XXI). A cancel should not be made to an adjustment initiated by CGS or CWF. Instead, an adjustment should be submitted if the 13G or 13I claim has finalized in FISS status/location P B9997 or R B9997, and the claim information needs to be modified (i.e., remove visits, add charges, etc.).
Type an S in the SEL field and press Enter. You can only select one claim at a time. After you press Enter, Page 01 (Map 1711) of the claim appears. The type of bill will automatically change the third digit to an 8 to signify that this is a cancel claim. In addition, the Document Control Number (DCN) will be automatically inserted by the system.
Cancellations are a three-step process. You must:
Enter a Claim Change Reason Code on Page 01 of the claim;
Enter an Adjustment Reason Code on Page 03 of the claim; and
Press F9 to submit the cancellation.
The following provides more details of this three-step process.
Enter the Claim Change Reason Code in the first available COND CODES field on Page 01 of the claim. Only one code is allowed per claim. Valid claim change reason codes for cancellations are:
Claim Change Reason Code
Description
D5
Cancel only to correct Medicare number or provider number
D6
Cancel only to repay duplicate payment or correct error (all other reasons)
Enter the Adjustment Reason Code on Page 03 of the claim in the ADJUSTMENT REASON CODE field. The Adjustment Reason Code that you select should match the Claim Change Reason in terms of description. For example, if using D5 (cancel to correct Medicare number or provider number) as the Claim Change Reason Code, use RI as the Adjustment Reason Code.
The most common adjustment reason codes for cancellations are:
Adjustment Reason Codes
RI – Cancel to correct Medicare number or provider number
RJ – Cancel duplicate or OIG overpayment (all other reasons)
You can access additional Adjustment Reason Codes by typing 16 in the SC field on any of the FISS claim pages and pressing Enter.
The Adjustment Reason Code is only a 2-digit field. If a code already appears in this field, type the appropriate Adjustment Reason Code over the existing code.
PressF9. If the system automatically takes you back to Map 1741, you have successfully submitted the cancellation for processing. Select the next claim to cancel or press F3 to return to the Claims Correction menu.
If you press F9 and are not returned to Map 1741 automatically, one or more errors exist. Press F1 to see the narrative for the reason code that displays in the lower left corner of the screen. When you have finished reviewing the narrative, press F3 one time to return to the claim. Make your correction and press F9. Repeat this process (F1, F3, F9) until you are returned to Map 1741.
More than one reason code may appear at the bottom of your screen. Pressing F1 displays the first reason code. You should correct the reason codes one at a time. Sometimes, by correcting the first code, other related codes will also be corrected. Sometimes, new codes will appear. Continue to work through the reason codes until you are returned to Map 1741. If you are having difficulty cancelling a claim, contact a Customer Service Representative (CSR) at the telephone number listed on our Web site.
The original paid claim will remain in FISS. After the cancel is processed, both the original claim and the cancelled claim will appear when viewing the claims in option 12, from the Inquiry Menu. The example below is a home health claim/cancel. The original claim is a 322 type of bill and the cancellation is listed as a 328. In addition, the CAN DT of the original claim will match the PD DT of the cancel (328) claim.
To avoid billing errors, ensure that the "cancel" claim (XX8 type of bill) is in FISS S/LOC P B9997 prior to submitting a new claim with the corrected information.
FISS will archive claim data on processed claims after 18 months from the date the claim is processed. Because the timely filing requirement is one calendar year after the date of service, adjustments or claim cancellations should not be done after a claim has been archived. However, FISS allows the ability for you to retrieve an archived claim to inquire into how it was submitted and processed.
Archived claims can be identified by status/location P O9998 or R O9998. Please note that the location begins with the letter "O" as in "offline" and not a "0" (zero). These claims can be accessed by selecting 12 (Claims) from the Inquiry Menu; type your NPI in the NPI field, type the beneficiary's Medicare number in the MID field. Then tab to the S/LOC field and enter P O9998 or R O9998. Press Enter. Archived claims do not display the beneficiary's name or the provider reimbursement amount.
To retrieve an archived claim, access the Claim and Attachments Correction Menu (option 03 from the FISS Maim Menu), then access the appropriate Claims Adjustment option or the Claims Cancel option. Follow the instructions outlined earlier in this section for accessing the billing transaction you want to view. Type an S in the SEL field and press Enter. After you press Enter, Page 01 (Map 1711) of the claim displays; however, because the claim data is archived, all claim pages appear blank. The message "ADJUSTMENT CLAIM IS PRESENTLY OFFLINE PF10 TO RETRIEVE" will display.
Press the F10 key. FISS will retrieve the claim data from the archive. This is done during the weekly system cycle. Therefore, the claim information for which the retrieval was requested will appear the following Monday in status/location P B9997 (if claim was originally paid), or R B9997 (if claim was originally rejected). At that time, you are able to view the claim data.
From the FISS Main Menu, type 03 in the Enter Menu Selection field and press Enter.
The Claim and Attachments Correction Menu screen (Map 1704) appears:
Correcting Claims
When a claim is submitted using FISS DDE, it processes through a series of edits to ensure the information submitted on the claim is complete and correct. If the claim has incomplete, incorrect or missing information, it will be sent to your Return to Provider (RTP) file for you to correct. Claims in the RTP file receive a new date of receipt when they are corrected (F9'd) and are subject to the Medicare timely claim filing requirements
Enter the Claims Correction option (21, 23, 25, 27 or 29) that matches your provider type and press Enter. Claims that have been returned to you for correction (RTP) are located in status/location T B9997.
The Claim Summary Inquiry screen (Map 1741) appears. The S/LOC field will default to the status/location T B9997. This is commonly referred to as your Return to Provider (RTP) file. Your cursor will be located at the MID field.
Since Medicare billing transactions may encounter different edits while processing, claims and adjustments may need correction more than one time, and for multiple reasons. Therefore, it is important to verify that all required claim data is present and that the information is complete and correct prior to resubmitting billing transactions.
Type your NPI in the NPI field. To move the cursor to the NPI (National Provider Identifier) field, hold down the Shift key and press the Tab key. You cursor will automatically move to the NPI field.
Only the claims for the NPI entered will appear.
The S/LOC field defaults to T B9997. Because you are accessing Map 1741 from the Claims Correction menu, only claims in a T B9997 status/location will display.
The TOB field automatically displays the first two digits of the default type of bill (TOB) based on the claim correction option that you selected. If you need to correct claims with a different TOB, you will need to change the default TOB. A list of the default TOBs is provided below.
The DDE SORT field on Map 1741 allows you to sort claims for correction. This is especially helpful if you have a large number of claims to correct. If you wish, enter one of the following characters in the DDE SORT field to sort your claims.
Press Enter to see a list of all claims that require correction that match the criteria you entered (TOB and/or DDE SORT). In this example, because an 'H' (Medicare number) sort type was used, the list of claims is sorted by the patient's Medicare number.
If no claims appear after you press Enter, there are no claims with this TOB for your facility that you need to correct today. We recommend that you check the Claims Correction area at least once per week. Checking more often is encouraged.
If your facility submits claims with different bill types (TOB), you may want to leave the TOB field blank. This will ensure that all claims applicable to your provider type display. The Claim Count Summary Inquiry screen (option 56), can be used to view the number of claims that are located in the RTP file (T B9997), and the first two digits of the type of bill. This will ensure you are aware of the various types of bills you have that need correction. Refer to the Inquiry Menu section of this guide for information about option 56.
If claims appear, you will see a two-line summary of each claim's information. Up to five claims can display per page on Map 1741. Use the F6 key to scroll forward (F5 to scroll backward) through the entire list of claims you have to correct. To determine what needs to be corrected, you will need to select each claim. To select a claim, press your Tab key until your cursor moves under the SEL field and is to the left of the Medicare number (MID field) of the claim you want to view.
Type an S in the SEL field and press Enter. You can only select one claim at a time. After you press Enter, Page 01 (Map 1711) of the claim appears. The reason code(s) appears at the bottom left corner of the screen.
Press F1 to access the narrative of the first reason code. The Reason Code Inquiry screen (Map 1881) appears. The narrative provides you with information about what needs to be corrected.
Once you have reviewed the narrative, press F3 one time to return to the claim. Make the correction and press F9. If the system automatically takes you back to the Claim Summary Inquiry screen (Map 1741), the claim has been corrected. You will also notice that the two-line summary for that claim no longer appears on your list of claims to correct. Select the next claim to correct or press F3 to return to the Claims Correction and Attachments Menu.
If you press F9 and are not returned to Map 1741 automatically, one or more errors still exist. Press F1 again to see the narrative for the next reason code. When you have finished reviewing the narrative, press F3 one time to return to the claim. Make your correction and press F9. Repeat this process (F1, F3, F9) until the claim has been corrected, and you are returned to Map 1741.
More than one reason code may appear in the lower left-hand corner of Page 01 of the claim. Pressing F1 displays the narrative for the first reason code. You should correct the reason codes one at a time. Sometimes, by correcting the first code, other related codes will also be corrected. Sometimes, new codes will appear. Continue to work through the reason codes, one at a time, until you are returned to Map 1741 and the claim is eliminated from your claim correction list.
If you need to change information on a revenue code line (HCPCS, modifier, units, charges, or date of service), instead of typing over the incorrect information, you need to delete the incorrect revenue code line and re-key the correct information. The instructions "Deleting Revenue Code Lines" and "Adding Revenue Code Lines" can be found later in this chapter.
If, after reviewing the error(s), you decide that you would rather resubmit the billing transaction than to correct it, you may do so. Duplicate claim editing does not apply to claims in the RTP file. CGS encourages you to suppress the view of any billing transaction that you do not intend to correct. Instructions for suppressing the view of claims are found later in this chapter.
In some situations, you will need to work other claims (e.g., submit a prior claim, correct a prior claim, etc.) before being able to correct a claim in the RTP file. For example, before being able to correct a hospice claim with a sequential billing error, a prior claim may need to be submitted or corrected. Home health providers may need to resubmit and wait for the episode's RAP to finalize before being able to correct the episode's final claim out of the RTP file. If you realize once you are in a claim that you will be unable to correct it, press F3 to return to Map 1741. Access the claim at a later time once you have fixed other claim issues related to this particular claim.
In some situations, CGS staff may add information in the REMARKS field on Page 04 of the claim to assist you in correcting the claim. Check Page 04 of the claim when you are correcting the claim to see if additional information has been entered.
Note: Claims are available in your RTP file for up to 36 months (see the "Note" below regarding timely filing). After 36 months, the claim will purge off of FISS. If you choose not to correct the claim in RTP, we strongly encourage you to suppress the view of the claim, which will remove the claim from your RTP file sooner. This will help to limit the number of claims that are viewable in your RTP file, and will assist you in avoiding duplicate claim submission errors. Refer to the "Suppress View" information later in this chapter. As a Medicare provider, you are accountable to ensure the information you submit on your claim is correct, and according to Medicare regulations.
When claims are corrected from the RTP file, a new receipt date is assigned. Therefore, it is important to remember that Medicare timely claim filing requirements apply. Correct your claims as soon as possible. The "#DAYS" field on Map 1741 tells you how long the claim has been in your RTP file. If the #DAYS field is blank, the claim just went to the RTP file during the nightly system cycle.
In the example below, the claim has been in the RTP file for 11 days.
Deleting Revenue Code Lines
If you need to change information on a revenue code line (HCPCS, modifier, units, charges, or date of service), instead of typing over the incorrect information, you need to delete the incorrect revenue code line and re-key the correct information. To delete a revenue code line:
Key the letter "D " in the first position of the revenue code on the line that you wish to delete. If there are multiple lines to delete, key the letter "D" on each line you wish to delete.
Press the HOME key on your keyboard so that your cursor is placed in the upper right hand corner of the screen (the "Page" field).
Press Enter. The revenue code line(s) with the letter "D" will be removed, and FISS will automatically reorder the remaining revenue code lines.
If the claim's total charges are changing due to the deletion of revenue code line(s), update the total charge amount on the 0001 revenue code line to reflect the correct amount.
Adding Revenue Code Lines
If you need to add a revenue code line to a claim in the RTP file, key the new revenue code line under the 0001 line, and then press the HOME key on your keyboard so that your cursor is placed in the "Page" field (in the upper left hand corner of the screen). Press Enter. You do not need to re-key the revenue codes that were already entered. FISS will automatically reorder the revenue code line that you added. If the claim's total charges are changing due to the addition of revenue codes lines, update the total charge amount on the 0001 revenue code line to reflect the correct amount.
Suppress View
Occasionally, you may have claims in RTP that you do not need to correct. Although FISS does not allow you to delete a claim in RTP, we strongly recommend that you suppress the view of a claim you choose not to correct to avoid duplicate billing errors. Suppressed claims will move to the status/location I B9997 (I=inactivated), and will no longer appear on your list of claims in your RTP file. The following steps explain how to suppress the view of a claim.
This action cannot be reversed. Please make sure that you want to suppress the view of the claim before following the steps below. Suppressed claims (I B9997 status/location) will still appear when viewing claims in option 12 (Claim Summary Inquiry screen).
Select the claim from your RTP list on the Claim Summary Inquiry screen (Map 1741).
Using your Tab key, move to the SV field in the upper right-hand corner on Page 01 of the claim.
Type Y in the SV field and press F9.
The system will automatically return you to Map 1741 and the claim will no longer appear on your RTP list.
After suppressing the view of a claim, it will no longer display in the RTP file; however, when viewing the Claim Inquiry (option 12) or Claim Count Summary (option 56) screens, the claim may still appear in status/location T B9997 for several weeks, until FISS purges suppressed claims to the "I" status.
Adjusting Claims
At times, you may need to adjust a claim after it has been processed to make changes (e.g., add or remove services). Claim adjustments can be made to paid or rejected claims (i.e., status/location P B9997 or R B9997). However, adjustments cannot be made to:
a line item that has been denied by Medical Review;
claims in status/location R B7501 or R B7516 (post-pay MSP review); and
claims in status/location R B9997 for the following reasons:
If the original claim information did not post to the Common Working File (CWF), the claim cannot be adjusted. Instead, a new claim must be resubmitted with the correct information. You can verify whether a claim posted to CWF by reviewing the TPE-TO-TPE (tape-to-tape) field, which is found on FISS screen Map 171D. For more information about using Inquiry option 12 to access this screen, refer to the TPE-TO-TPE field information under the Map 171D Field Descriptions found in the Inquiry Menu section of this guide.
To adjust paid or rejected claims, enter the Claims Adjustments option (30, 31, 32, 33 or 35) that matches your provider type and press Enter.
The Claim Summary Inquiry screen (Map 1741) appears.
Your cursor will be located at the MID field.
Type your NPI in the NPI field. To move the cursor to the NPI (National Provider Identifier) field, hold down the Shift key and press the Tab key. Your cursor will automatically move to the NPI field.
After typing your NPI, your cursor will move to the MID field. Type the beneficiary's Medicare number.
After typing the Medicare number, press the tab key to place your cursor after the "P" in the S/LOC field. The S/LOC field defaults to P to display claims in P (Paid) status/location. Type B9997 after the P. Or, if the claim you want to adjust was rejected, change the "P" to an "R" and type B9997.
The TOB field automatically displays the first two digits of the default type of bill based on the adjustment option that you selected.
You may also enter the 'From Date' and 'To Date' of the claim, but that is optional.
Press Enter. Any claims matching the criteria you entered (MID, S/LOC, TOB, and/or FROM/TO DATE fields) will appear.
Note: Not all claims that are accessible using this function are appropriate to adjust.
A two-line summary of each claim's information will display. Up to five claims can display on Map 1741. You may need to use your F5 and F6 keys to scroll through the entire list of claims to find the beneficiary's claim you want to adjust. To select the claim, press your Tab key until your cursor moves under the SEL field and is to the left of the Medicare number of the claim you want to adjust.
Type an S in the SEL field and press Enter. You can only select one claim at a time. After you press Enter, Page 01 (Map 1711) of the claim appears.
If no information appears when the claim is selected, look for a message at the bottom of the page that states "ADJUSTMENT CLAIM IS ALREADY CANCELED". When this occurs, the claim cannot be adjusted; instead, a new claim should be resubmitted to Medicare with the changed information.
Once the claim is selected, the third digit of the type of bill will automatically change to a 7 to signify that this is an adjustment claim. The status/location will display S B0100 identifying the adjustment as a new claim record to be processed. In addition, the Document Control Number (DCN) will be inserted automatically by the system on Page 01 of the adjustment.
If you are wanting to submit a Reopening, the third digit of the type of bill must be changed to a Q. For additional information about reopenings, refer to the Medicare Claims Processing Manual (Pub. 100-04, Ch. 34).
Adjustments are a four-step process. You must:
Enter a Claim Change Reason Code on Page 01 of the claim;
Enter an Adjustment Reason Code on Page 03 of the claim;
Make your adjustment on the applicable page(s) and add remarks on Page 04 of the claim, if necessary; and
NOTE: If you are adjusting a rejected claim, your charges have been moved to the noncovered charge field. As a result, you must also delete and re-enter each revenue code line so that the charges are in the covered charge column before pressing F9. Please see the "Deleting Revenue Code Lines" and "Adding Revenue Code Lines" instructions earlier in this section.
Press F9 to submit the adjustment.
The following provides more details of this four-step process.
Enter the Claim Change Reason Code in the first available COND CODES field on Page 01 of the claim. Choose the one code that best describes the adjustment request. Only one is allowed per claim. If you are making multiple changes, use claim change reason code D9. If you use D9, you must include remarks on Page 04 of the claim that explains what type of changes are being made to the claim. Valid claim change reason codes are:
Claim Change Reason Code
Description
D0
Change in Service Dates (do not use for adjusting line item dates of services, use D9 instead)
D1
Change in Charges (do not use for adjusting units, use D9 instead)
D2
Change in Revenue Codes/HCPCS/HIPPS (use D9 to change a revenue code or HCPCS)
D7
Change to make Medicare secondary
D8
Change to make Medicare primary
D9
Any other change or multiple changes (requires remarks)
E0
Change in patient status
Enter the Adjustment Reason Code on Page 03 of the claim in the ADJUSTMENT REASON CODE field. The Adjustment Reason Code that you select should match the Claim Change Reason in terms of description. For example, if using D1 (change in charges) as the Claim Change Reason Code, use RG as the Adjustment Reason Code.
The most common adjustment reason codes are:
Adjustment Reason Codes
Description
RF
Changes in Service Dates (use with Claim Change Reason Code D0)
RG
Change in Charges (use with Claim Change Reason Code D1)
RH
Change in Revenue Codes/HCPCS/HIPPS (use with Claim Change Reason Code D2)
RM
Any other change (requires remarks) (use with Claim Change Reason Code D9)
RN
Change in patient status (use with Claim Change Reason Code E0)
You can inquire about additional Adjustment Reason Codes by typing 16 in the SC field on any of the FISS claim pages and pressing Enter. Refer to the Inquiry Menu section for information about the Adjustment Reason Codes (option 16).
The Adjustment Reason Code field is only a 2-digit field. If a code already appears in this field, type the appropriate Adjustment Reason Code over the existing code.
Make your adjustment on the applicable page(s). If you are using Claim Change Reason Code D9, you must include information in the REMARKS field on Page 04 of the claim that explains what type of changes are being made to the claim.
When adjusting a rejected claim, please be aware that FISS places charges into the noncovered (NCOV CHARGE) field on Page 02 of the claim. Therefore, providers must first delete all revenue lines containing noncovered charges and re-enter the revenue code information in new detail lines. This will allow charges to only appear in the TOT CHARGE field. Please see the "Deleting Revenue Code Lines" and "Adding Revenue Code Lines" instructions earlier in this chapter.
We suggest that you enter comments in the REMARKS field for all of your adjustments. Comments are often helpful in determining what is being adjusted and why.
PressF9. If the system automatically takes you back to Map 1741, you have successfully submitted the adjustment for processing. Select the next claim to adjust or press F3 to return to the Claims Correction menu.
If you press F9 and are not returned to Map 1741, one or more errors exist. Press F1 to see the narrative for the reason code that displays in the lower left corner of the screen. When you have finished reviewing the narrative, press F3 one time to return to the claim. Make your correction and press F9. If another reason code displays, repeat this process (F1, F3, F9) until you are returned to Map 1741.
More than one reason code may appear at the bottom of your screen. Pressing F1 displays the narrative to the first reason code. You should correct the reason codes one at a time. Sometimes, by correcting the first code, other related codes will also be corrected. Sometimes, new codes will appear. Continue to work through the reason codes until you are returned to Map 1741. If you are having difficulty adjusting a claim, contact a Customer Service Representative (CSR) at the telephone number listed on the CGS website.
The original paid or rejected claim will remain in FISS. After the adjustment is processed, both original claim and the adjusted claim will appear when viewing the claims in option 12, from the Inquiry Menu. Below is an example of an outpatient claim/adjustment. The original claim is an 131 type of bill and the adjustment is listed as an 137. In addition, the CAN DT of the original claim will match the PD DT of the adjusted (817) claim.
Occasionally, the Common Working File will automatically adjust claims. CGS may also initiate claim adjustments. These types of adjustments are identified with a "G", or "I" as the third digit of the type of bill (TOB) (e.g., XXG, XXI). A cancel should not be made to an adjustment initiated by CGS or CWF. Instead, an adjustment should be submitted if the 13G or 13I claim has finalized in FISS status/location P B9997 or R B9997, and the claim information needs to be modified (i.e., remove visits, add charges, etc.).
Canceling a Claim
Cancellations can only be made to paid claims (i.e., status/location P B9997). If a claim is partially denied, a cancellation cannot be done. Providers should also not attempt to cancel RAPs/claims that are rejected (S/LOC R B9997).
To cancel paid claims, enter the Claim Cancels option (50, 51, 52, 53 or 55) that matches your provider type and press Enter.
The Claim Summary Inquiry screen (Map 1741) appears.
Type your NPI in the NPI field. To move the cursor to the NPI (National Provider Identifier) field, hold down the Shift key and press the Tab key. Your cursor will automatically move to the NPI field.
After typing your NPI, the cursor will move to the MID field. Type the beneficiary's Medicare number.
Tab to the S/LOC field and type B9997 after the P.
The S/LOC field defaults to P. Because you are accessing MAP 1741 from the Claim Cancels option, only claims in a P (Paid) status/location will be displayed.
The TOB field automatically displays the first two digits of the default type of bill (TOB) based on the cancel option that you selected. If you need to cancel a claim with a different type of bill, you will need to change the default TOB, or you may remove the values from the TOB field to search claims with all TOBs. The table below identifies the claim cancel options and the default TOB:
Claim Cancels Option
Default TOB
50
11
51
13
52
21
53
33
55
81
You may also enter a From Date and To Date, but that is optional.
Press Enter. Any claims matching the criteria you entered (MID, S/LOC, TOB, and/or FROM/TO DATE fields) will appear.
A two-line summary of each claim's information will display. Up to five claims can display on Map 1741. You may need to use your F5 and F6 keys to scroll through the entire list of paid claims for this particular beneficiary. To select a claim, press your Tab key until your cursor moves under the SEL field and is to the left of the Medicare number of the claim you want to cancel.
Occasionally, the Common Working File will automatically adjust claims. CGS may also initiate claim adjustments. These types of adjustments are identified with a "G", or "I" as the third digit of the type of bill (TOB) (e.g., XXG, XXI). A cancel should not be made to an adjustment initiated by CGS or CWF. Instead, an adjustment should be submitted if the 13G or 13I claim has finalized in FISS status/location P B9997 or R B9997, and the claim information needs to be modified (i.e., remove visits, add charges, etc.).
Type an S in the SEL field and press Enter. You can only select one claim at a time. After you press Enter, Page 01 (Map 1711) of the claim appears. The type of bill will automatically change the third digit to an 8 to signify that this is a cancel claim. In addition, the Document Control Number (DCN) will be automatically inserted by the system.
Cancellations are a three-step process. You must:
Enter a Claim Change Reason Code on Page 01 of the claim;
Enter an Adjustment Reason Code on Page 03 of the claim; and
Press F9 to submit the cancellation.
The following provides more details of this three-step process.
Enter the Claim Change Reason Code in the first available COND CODES field on Page 01 of the claim. Only one code is allowed per claim. Valid claim change reason codes for cancellations are:
Claim Change Reason Code
Description
D5
Cancel only to correct Medicare number or provider number
D6
Cancel only to repay duplicate payment or correct error (all other reasons)
Enter the Adjustment Reason Code on Page 03 of the claim in the ADJUSTMENT REASON CODE field. The Adjustment Reason Code that you select should match the Claim Change Reason in terms of description. For example, if using D5 (cancel to correct Medicare number or provider number) as the Claim Change Reason Code, use RI as the Adjustment Reason Code.
The most common adjustment reason codes for cancellations are:
Adjustment Reason Codes
RI – Cancel to correct Medicare number or provider number
RJ – Cancel duplicate or OIG overpayment (all other reasons)
You can access additional Adjustment Reason Codes by typing 16 in the SC field on any of the FISS claim pages and pressing Enter.
The Adjustment Reason Code is only a 2-digit field. If a code already appears in this field, type the appropriate Adjustment Reason Code over the existing code.
PressF9. If the system automatically takes you back to Map 1741, you have successfully submitted the cancellation for processing. Select the next claim to cancel or press F3 to return to the Claims Correction menu.
If you press F9 and are not returned to Map 1741 automatically, one or more errors exist. Press F1 to see the narrative for the reason code that displays in the lower left corner of the screen. When you have finished reviewing the narrative, press F3 one time to return to the claim. Make your correction and press F9. Repeat this process (F1, F3, F9) until you are returned to Map 1741.
More than one reason code may appear at the bottom of your screen. Pressing F1 displays the first reason code. You should correct the reason codes one at a time. Sometimes, by correcting the first code, other related codes will also be corrected. Sometimes, new codes will appear. Continue to work through the reason codes until you are returned to Map 1741. If you are having difficulty cancelling a claim, contact a Customer Service Representative (CSR) at the telephone number listed on our Web site.
The original paid claim will remain in FISS. After the cancel is processed, both the original claim and the cancelled claim will appear when viewing the claims in option 12, from the Inquiry Menu. The example below is a home health claim/cancel. The original claim is a 322 type of bill and the cancellation is listed as a 328. In addition, the CAN DT of the original claim will match the PD DT of the cancel (328) claim.
To avoid billing errors, ensure that the "cancel" claim (XX8 type of bill) is in FISS S/LOC P B9997 prior to submitting a new claim with the corrected information.
Archived Claims
FISS will archive claim data on processed claims after 18 months from the date the claim is processed. Because the timely filing requirement is one calendar year after the date of service, adjustments or claim cancellations should not be done after a claim has been archived. However, FISS allows the ability for you to retrieve an archived claim to inquire into how it was submitted and processed.
Archived claims can be identified by status/location P O9998 or R O9998. Please note that the location begins with the letter "O" as in "offline" and not a "0" (zero). These claims can be accessed by selecting 12 (Claims) from the Inquiry Menu; type your NPI in the NPI field, type the beneficiary's Medicare number in the MID field. Then tab to the S/LOC field and enter P O9998 or R O9998. Press Enter. Archived claims do not display the beneficiary's name or the provider reimbursement amount.
To retrieve an archived claim, access the Claim and Attachments Correction Menu (option 03 from the FISS Maim Menu), then access the appropriate Claims Adjustment option or the Claims Cancel option. Follow the instructions outlined earlier in this section for accessing the billing transaction you want to view. Type an S in the SEL field and press Enter. After you press Enter, Page 01 (Map 1711) of the claim displays; however, because the claim data is archived, all claim pages appear blank. The message "ADJUSTMENT CLAIM IS PRESENTLY OFFLINE PF10 TO RETRIEVE" will display.
Press the F10 key. FISS will retrieve the claim data from the archive. This is done during the weekly system cycle. Therefore, the claim information for which the retrieval was requested will appear the following Monday in status/location P B9997 (if claim was originally paid), or R B9997 (if claim was originally rejected). At that time, you are able to view the claim data.
Chapter 6 – How to…
Checking the Status of Your Claims / Beneficiary Claim History
Access the Claim Summary Inquiry screen from the Inquiry Menu by selecting option 12. Your cursor will be located in the MID field. To check the status of claims, you must first enter your facility's NPI. Therefore, to move the cursor to the NPI field, hold down the Shift key and press the Tab key. You cursor will automatically move to the NPI field.
There are two primary ways that you can view the status of your claims using option 12: by the beneficiary's Medicare number, or by status/location within FISS.
To view information using a beneficiary Medicare number, follow these instructions:
Type your facility's NPI number in the NPI field.
Type the beneficiary's Medicare ID number in the MID field. Press Enter.
Note: Only the billing transactions that your facility submitted under the beneficiary's Medicare ID number and NPI will display. You will not have access to claims submitted by other providers.
After you press Enter, FISS will search and display all claims submitted by your facility for that specific beneficiary. A maximum of 5 claims will display. If 5 claims display, press your F6 key to scroll forward to see if there are additional claims.
Note: If no claims appear after you press Enter, check the Medicare number to ensure it is entered correctly. You may need to verify whether the Medicare number was changed by accessing the beneficiary's eligibility information.
When the information appears, you will see a two-line summary of each claim's information. To see more detail, you can select a specific claim, which will provide six pages of complete claim information. Additional pages (7 and 8) display when a claim requires additional information be submitted via the ADR process.
To select a claim, press your Tab key until your cursor moves under the SEL field and is to the left of the Medicare number of the claim detail you want to view. Type Sin the SEL field and press Enter. You can only select one claim at a time.
Note: In the above example the cursor is one space away from (or to the left of) the Medicare number of the claim detail you want to select. If the cursor is immediately next to the Medicare number (_XXX… instead of _ XXX), the cursor is not in the correct position.
Page 01 of the "Inst Claim Inquiry" screen appears. You may view all pages of the claim by pressing the F7 and F8 function keys to page back and page forward through the claim. Refer to the following page for an example of page 01 of the claim.
Claim Example
After reviewing the claim, press F3to return to the claim list (Map 1741). You can select a different claim, start a new search, or press F3 to return to the Inquiry Menu.
Note: When you view claims within option 12, it is an "inquiry-only" option. You cannot enter, correct, adjust or cancel claims within option 12. You can only view the claim information. To enter, correct, adjust, and cancel claims, you must use other options in FISS. Refer to the "Claims and Attachments" and the "Claims Corrections" section of this manual.
To view claims by a status code or by a status and location, follow these steps.
On Map 1741, type your facility's NPI number in the NPI field. To move the cursor from the MID field to the NPI field, hold down the Shift key and press the Tab key.
Tab to the S/LOC field and type the status code or the status/location that you wish to view and press Enter. You may, for example, want to view claims that are on the payment floor (P B9996). Note that FISS automatically inserts one space between the status and the location codes.
When you view claims by status/location code, you will most likely be inquiring about claims in the following status/locations:
Status/Location
Description
P B9996
Payment floor
P B9997
Processed or paid claim
D B9997
Denied claim
R B9997
Rejected claim
T B9997
Claim needing correction
S B6001
Claim selected for an additional development request (ADR)
Any status/location code that appears on a claim can be entered into the S/LOC field. Entering the status/location in the S/LOC field enables you to see all the claims in that particular area of FISS.
Note: For information about FISS status and location codes, refer to "About Status/Location Codes" found in the "FISS Overview" section of this manual. If there are claims in the status/location that you entered, they will appear on Map 1741 after you press Enter. There may be multiple beneficiaries listed. This is normal since the common element you are inquiring about is the status code or status/location code. When you search by a beneficiary's Medicare number, you are inquiring about that particular beneficiary; therefore, multiple beneficiaries will not be listed; however, multiple claims may display.
You can view individual claims by typing S in the SEL field next to the Medicare number of the individual claim.
Note: Map 1741 will display a maximum of 5 claims at any given time. To see if there are additional claims, press your F6 key to scroll forward.
When you are inquiring about specific information, whether it is claim history for a specific beneficiary or specific status/location code information, you can tailor your search using one or more additional fields. In addition to entering your NPI, a Medicare number and S/LOC, you can enter data in the TOB (type of bill), FROM DATE, and TO DATE fields (circled and bolded below) to further narrow your search.
Type of Bill (TOB)
You can narrow the search of a beneficiary's claims by entering a type of bill (TOB). For example, to review claims submitted for a beneficiary, type your facility's NPI in the NPI field; the beneficiary's Medicare number in the MID field; and the claim's type of bill code (e.g., 131, 329, 111) in the TOB field.
To search for a beneficiary's claims for specific dates of service and specific type of bill, type your facility's NPI, the beneficiary's Medicare number, the type of bill, and the "from" and "to" dates. (See example below.) Entering a status code or status/location will further narrow your search.
It is a good idea to "refresh" your screen between different searches. Do this by pressing F3 to exit option 12. Then type 12in the Enter Menu Selection field and press Enter.
From/To Date
If the beneficiary has an extensive claim history, you can narrow your search by adding from and to dates. These dates reflect the "from" and "to" dates of service billed on the claim. You may search by only using a "from" date, or both a "from" and "to" date. The "to" date can only be used if a "from" date is also entered. For example, to find claims with dates of service between August 1, 20XX, to September 30, 20XX, (XX denotes the year) for a particular beneficiary, type your facility's NPI in the NPI field, the Medicare number in the MID field, and type 0801XXin the FROM DATE field and 0930XXin the TO DATE field and press Enter.
Below is an example of how this would appear before pressing Enter.
You may also use the FROM DATE field when searching for claims in a specific status/location. The example below shows how to access claims that were fully denied (D B9997) with dates of service on and after October 1, 2017. Type the status/location D B9997in the S/LOC field, type 100117in the FROM DATE field and leave the TO DATE field blank.
Accessing Additional Development Request (ADR) Information
When claims are selected by Medical Review, CGS will request additional documentation from the provider to support the services being billed to Medicare. This request is called a medical review Additional Development Request (MR ADR).
Note: For home health and hospice providers, a non-medical review ADR (non-MR ADR) may be generated when a ‘KX' modifier is reported on the claim and information in the REMARKS field is not present, or does not include a clear explanation for the exception request.
The CMS Medicare Program Integrity Manual, Pub. 100-08, Ch. 3, Section 3.2.3.3 requires providers to submit MR ADR documentation to CGS within 45 calendar days of the request. If the documentation is not received by day 46, the claim will be denied; therefore, please allow enough time for CGS to receive the documentation.
The following pages explain how you can identify claims for which CGS has requested an MR ADR, or non-MR ADR, what documentation is being requested, and most importantly, the due date for when the ADR information must be received.
Please refer to the "Key ADR Information" that follows these instructions. This information will help you avoid claim denials.
You can easily see if claims are selected for ADR by accessing the Inquiry Menu and selecting option 12 (Claim Summary). All claims selected for an ADR will appear in status/location S B6001.
CGS recommends that you check the ADR status/location (S B6001) at least once per week to help ensure timely responses.
On Map 1741, type your facility's NPI number in the NPI field. To move the cursor to the NPI field, hold down the Shift key and press the Tab key.
Tab to the S/LOC field and type S B6001. Press Enter. If there are claims in the S B6001 status/location, they will appear after you press Enter.
To identify the additional information being requested for each claim, you must select the claim by typing an S in the SEL field next to the Medicare number of the claim. Press Enter. You can only select one claim at a time.
Page 01 of the claim appears (Map 1711).
ADR information is electronically attached to the end of the claim, as pages 07 and 08. To view the ADR information, type 07in the PAGE field (if your cursor is not already in this field, press the HOME button found on your keyboard) and press Enter.
The ORIG REQ DT field on Page 07 indicates the date CGS requested the additional information. Page 07 also identifies the address to which your documentation can be mailed. The DUE DATE field is 45 days from the original request date. Documentation not received by day 46 will result in the claim being denied.
Example: FISS Page 07
Press F6 to view the entire message. Press F5 to scroll backward.
To determine what documentation is being requested, press your F8 key to review the reason code narrative on FISS Page 08. The edit that the claim was selected for will appear in the upper left hand corner in the REASONS: field.
Note: You may need to press F6 to see the remaining reason code narrative that identifies the documentation that you need to submit. Press F5 to go back.
Example: FISS Page 08
Press F6 to see the remaining reason code narrative that identifies the documentation that you need to submit.
NOTE: Because other CMS contractors (e.g., Unified Program Integrity Contractor (UPIC), Recovery Auditors (RAs), Supplemental Medical Review Contractor (SMRC)), may also request additional information, it is important that you scroll through the reason code narrative on FISS Page 08. If a different address appears in the narrative, send the documentation to that address, instead of the CGS Nashville, TN address.
To go back to FISS Page 07, press your F7 key.
Make a copy of Page 07 and attach it to the top page of your medical record documentation. This ensures that the documentation will be matched with the correct claim. Mail it to the address listed on Page 07 as soon as possible. Another option is to submit your ADR documentation by using the myCGS Portal. Refer to the Forms section of the myCGS User Manual for additional information
Note: You may also want to keep a printed copy of pages 07 and 08 (reason code narrative) as a reference of what was requested and to document when you submitted the information. Pages 07 and 08 will no longer display after the documentation is received and the claim is moved from status/location S B6001 to S M50MR. For information on how to screen print FISS claim pages, refer to the FISS Overview section of this manual.
Press F3 to exit back to Map 1741 or press F7 to move back through the claim pages. If you have additional claims in the ADR status/location, you must select each claim individually to determine what documentation needs to be submitted to CGS and by what date.
You may want to "refresh" your screen to ensure accurate information displays. Press F3 to exit option 12. Then type 12in the Enter Menu Selection field and press Enter. Retype your NPI and the status/location S B6001in the S/LOC field.
You are responsible for checking your claims to see if they are in the ADR status/location, as this is the only notification you will receive regarding your claims that have been selected for Medical Review by CGS. In addition, you should keep track of the claims for which you have submitted ADR documentation.
Key ADR Information:
CMS requires providers to submit ADR documentation to CGS within 45 calendar days of the request. Therefore, it is important to send the documentation as soon as possible to allow time for CGS to process the additional information by the 45th day after the date of request (Orig Req Dt) shown on FISS Page 07.
Make a copy of Page 07 and/or Page 08 and attach it to the top page of your medical record documentation. If you mail your documentation, send it to the address that appears on FISS Page 07. If an address displays in the narrative on FISS Page 08, mail the documentation to that address.
Once received by CGS, the documentation is scanned into the Optical Character Recognition (OCR) software, and CGS staff will move the claim from status/location S B6001 into status/location S M50MR pending review of the documentation.
If CGS does not receive the information by day 45, the claim will automatically deny on day 46 and move to status/location D B9997 with reason code 56900 and your only recourse for Medicare payment is to request a Reopening. For Home Health and Hospice providers, refer to the Reopenings web page for detailed information. For Part A providers, refer to the Part A Reopenings web page.
NOTE: If the documentation was received timely (by day 45), but the claim automatically denied on day 46, CGS will proceed with reviewing the documentation, and there is no need to request a Reopening.
CGS's review of your documentation can take up to 60 days from when the documentation was received.
Missing or Illegible Signature Documentation: If, during review of your documentation, it is determined that a signature is missing or illegible, the claim will be re-ADRd to status/location S B6001. Page 08 will show the Reasons field with 5ADR2, and the narrative will indicate that additional documentation is required to support the signatures. The Remarks field on FISS Page 04 will specify the documentation being requested. The additional signature documentation must be sent to CGS within 15 days of the request.
You may choose to submit documentation electronically. See the Electronic Submission of Medical Documentation (esMD) Web page for more information about electronic submission of documentation. Documentation can also be submitted through the CGS Web Portal, myCGS. Refer to the Forms section of the myCGS User Manual for additional information. CGS will also accept documentation submitted via Fax (615-660-5981 for MR ADRs, or 615-660-5982 for non-MR ADRs), or CD/DVD.
If your claim was partially (P B9997) or fully (D B9997) noncovered/denied, you can view the noncovered/denied revenue code line(s) and the reason charges were noncovered/denied. Follow the steps below:
Fully noncovered/denied
Within the Claim Summary, option 12, type your NPI in the NPI field, and the beneficiary's Medicare number in the MID field. Press Enter. Type an Sin the SEL field in front of the claim you wish to view and press Enter. Page 01 of the claim appears (Map 1711). Press F8 to go to Page 02.
Fully noncovered/partially denied claims will display the noncovered charges in the "NCOV CHARGE" field on Map 1712 (Page 02). In the above example, the reason code 56900 appears in the lower left corner. Press F1 to display the reason code narrative indicating why the claim was denied.
Partially noncovered/denied
If the claim is partially noncovered/denied the reason code in the lower left corner may not explain why a specific revenue code line was denied. To find the reason a revenue code was denied, follow the steps below.
Within option 12, type your NPI in the NPI field, and the beneficiary's Medicare number in the MID field. Press Enter. Type an S in the SEL field in front of the claim you wish to view andpress Enter. Page 01 of the claim appears (Map 1711). Press F8 to go to Page 02.
The screen example below shows revenue code line 5 with charges in the NCOV CHARGE field. Place your cursor anywhere on the revenue code line 5. Press F2. Map 171D appears and will display the line item information for revenue code line 5.
If you press F2, without putting your cursor on a specific revenue code line, Map 171D will appear with information from claim line (CL) 1. The F5 and F6 keys can then be used to scroll up and down through all revenue code lines.
From Page 02 of the claim, you can also press F11, without putting your cursor on a specific revenue code line. Map 171E appears. Press F11 again to display Map 171A with information from CL 1. Press F11 again and Map 171D will appear.
In the following Map 171D screen example, the denial reason code 5HC01 (certification was invalid), displays in the DENIAL REAS field, while the reason code in the lower left corner is 37186 indicating the claim was approved for payment.
Make a note of the reason code shown in the DENIAL REAS field, and press F1 to access the Reason Code Inquiry screen. Type the noted reason code, and press Enter to view the reason code narrative. Press F3 to return to the claim.
Upcoding and downcoding information is available to view on Home Health Prospective Payment System (HH PPS) claims that have completed processing (P B9997).
Within option 12, type your NPI in the NPI field, and the beneficiary's Medicare number in the MID field. Press Enter. Type an S in the SEL field in front of the claim you wish to view and press Enter. Page 01 of the claim appears (Map 1711). Press F8 to go to Page 02.
If you press F2, without putting your cursor on a specific revenue code line, Map 171D will appear with information from claim line (CL) 1. The F5 and F6 keys can then be used to scroll up and down through all revenue code lines.
From Page 02 of the claim, you can also press F11, without putting your cursor on a specific revenue code line. Map 171E appears. Press F11 again to display Map 171A with information from CL 1. Press F11 again and Map 171D will appear.
In the screen example above, the fields that appear in bold type are fields that you will want to review closely to identify upcoding/downcoding information.
MED REV RSNS – This field identifies medical review reason code(s). These may explain why the Health Insurance Prospective Payment System (HIPPS) code submitted on the claim was changed by Medical Review. Make a note of the reason code shown in the DENIAL REAS field, and press F1 to access the Reason Code Inquiry screen. Type the noted reason code, and press Enter to view the reason code narrative. Press F3 to return to the claim.
HCPC/MOD IN – This field identifies whether the HIPPS code (for HH PPS), or HCPCS code was changed by Medical Review. The valid values are:
U = Upcoding
D = Downcoding
" " = blank.
HCPC – This identifies the HIPPS or HCPCS codes on the 0023 revenue line used for processing/paying the claim.
ORIG – This HCPC field on this line indicates the original HIPPS billed. A value will only show in this field if the code submitted on the claim was changed by Medical Review. In the above example, the home health HIPPS code 3BHKS was originally submitted. The claim was downcoded ("D" in the HCPC/MOD IN field) using the HIPPS code 3AHKS.
ANSI REMARKS – ANSI remark code N72 will display when Medical Review downcodes the HIPPS code because the documentation submitted for review did not support payment for the HIPPS code originally submitted on the claim.
In the screen example above, the fields that appear in bold type are fields that will identify the amount of noncovered hospice charges and the applicable reason code. Make a note of the reason code shown in the DENIAL REAS field, and press F1 to access the Reason Code Inquiry screen. Type the noted reason code, and press Enter to view the reason code narrative. Press F3 to return to the claim.
To view upcoding/downcoding/line item denial information for another line item revenue code on Map 171D, use your F5 and F6 keys to scroll up or down until you see the appropriate line item displayed in the REV field.
Press F2 to return directly to Map 1712 or press F3to return to the listing of claims, Map 1741.
Viewing Pricer Upcode and Downcode Information (Home health providers only)
If you have submitted a claim under the Home Health Prospective Payment System (HH PPS), and the Medicare payment is not what you anticipated, access Map 171A to view if the claim includes Pricer upcode or downcode payment information.
Within option 12, type your NPI in the NPI field, and the beneficiary's Medicare number in the MID field and press Enter. Type an S in the SEL field in front of the claim you wish to view and press Enter. Page 01 of the claim appears. Press F8 to go to Page 02.
View Pricer information for an individual line item by placing your cursor anywhere on the specific revenue code line item that you want to see. Press F2 and then press F10 (or press F11 twice). Map 171A appears and will display the line item information specific to the revenue code line in which you placed your cursor.
You can also press F2, without putting your cursor on a specific revenue code line, and Map 171D will display. Then press F10 to view the Pricer information for claim line (CL) 1. The F5 and F6 keys can then be used to scroll up and down through all revenue code lines.
In the screen example above, the fields that appear in bold type are fields that you will want to review to identify Pricer downcoding/upcoding information.
REV – This field identifies the revenue code line that displays. The detail includes the revenue code, HIPPS (HCPC) code, service date (SERV DATE), total units (TOT-UNT) and covered units (COV-UNT).
APC CD – This field displays a HIPPS code, if different from what is billed.
OCE FLAGS – This field will display a "P" indicating that the Pricer program changed the HIPPS code to "early" or "late" based on the beneficiary's adjacent episode history, and/or the claim contains more or less therapy revenue codes than indicated by the HIPPS code originally submitted on the claim.
To view Pricer information for another line item revenue code, use your F5 and F6 keys to scroll up or down until you see the appropriate line item displayed in the REV field.
Press F2 (or F10 twice) to return to Map 1712. Press F3 to return to the Claim Summary Inquiry screen (Map 1741).
Viewing Outcome and Assessment Information Set (OASIS) Information for Patient-Driven Groupings Model (PDGM) Claims (Home health providers only)
For home health claims submitted on or after January 1, 2020, under PDGM, the OASIS items used to determine the PDGM payment group will display in MAP 171G. This allows providers to easily access the data used to calculate the payment groups.
Within option 12, type your NPI in the NPI field, and the beneficiary's Medicare number in the MID field and press Enter. Type an S in the SEL field in front of the claim you wish to view and press Enter. Page 01 of the claim appears. Press F8 to go to Page 03.
From the claim Page 03, press F11, MAP 171G will display.
There are 8 OASIS items that will be sent back to the claims system and displayed in the OA (OASIS Assessment) field. The OA field information will never be changed. The MR (Medical Review) field will be used by the CGS Medical Review staff to enter corrections when, based on their review of the full medical record, they find OASIS data is not supported. Review the MAP171G Field Description information later in this document for valid values.
Checking the Status of Your Claims / Beneficiary Claim History
Access the Claim Summary Inquiry screen from the Inquiry Menu by selecting option 12. Your cursor will be located in the MID field. To check the status of claims, you must first enter your facility's NPI. Therefore, to move the cursor to the NPI field, hold down the Shift key and press the Tab key. You cursor will automatically move to the NPI field.
There are two primary ways that you can view the status of your claims using option 12: by the beneficiary's Medicare number, or by status/location within FISS.
To view information using a beneficiary Medicare number, follow these instructions:
Type your facility's NPI number in the NPI field.
Type the beneficiary's Medicare ID number in the MID field. Press Enter.
Note: Only the billing transactions that your facility submitted under the beneficiary's Medicare ID number and NPI will display. You will not have access to claims submitted by other providers.
After you press Enter, FISS will search and display all claims submitted by your facility for that specific beneficiary. A maximum of 5 claims will display. If 5 claims display, press your F6 key to scroll forward to see if there are additional claims.
Note: If no claims appear after you press Enter, check the Medicare number to ensure it is entered correctly. You may need to verify whether the Medicare number was changed by accessing the beneficiary's eligibility information.
When the information appears, you will see a two-line summary of each claim's information. To see more detail, you can select a specific claim, which will provide six pages of complete claim information. Additional pages (7 and 8) display when a claim requires additional information be submitted via the ADR process.
To select a claim, press your Tab key until your cursor moves under the SEL field and is to the left of the Medicare number of the claim detail you want to view. Type Sin the SEL field and press Enter. You can only select one claim at a time.
Note: In the above example the cursor is one space away from (or to the left of) the Medicare number of the claim detail you want to select. If the cursor is immediately next to the Medicare number (_XXX… instead of _ XXX), the cursor is not in the correct position.
Page 01 of the "Inst Claim Inquiry" screen appears. You may view all pages of the claim by pressing the F7 and F8 function keys to page back and page forward through the claim. Refer to the following page for an example of page 01 of the claim.
Claim Example
After reviewing the claim, press F3to return to the claim list (Map 1741). You can select a different claim, start a new search, or press F3 to return to the Inquiry Menu.
Note: When you view claims within option 12, it is an "inquiry-only" option. You cannot enter, correct, adjust or cancel claims within option 12. You can only view the claim information. To enter, correct, adjust, and cancel claims, you must use other options in FISS. Refer to the "Claims and Attachments" and the "Claims Corrections" section of this manual.
To view claims by a status code or by a status and location, follow these steps.
On Map 1741, type your facility's NPI number in the NPI field. To move the cursor from the MID field to the NPI field, hold down the Shift key and press the Tab key.
Tab to the S/LOC field and type the status code or the status/location that you wish to view and press Enter. You may, for example, want to view claims that are on the payment floor (P B9996). Note that FISS automatically inserts one space between the status and the location codes.
When you view claims by status/location code, you will most likely be inquiring about claims in the following status/locations:
Status/Location
Description
P B9996
Payment floor
P B9997
Processed or paid claim
D B9997
Denied claim
R B9997
Rejected claim
T B9997
Claim needing correction
S B6001
Claim selected for an additional development request (ADR)
Any status/location code that appears on a claim can be entered into the S/LOC field. Entering the status/location in the S/LOC field enables you to see all the claims in that particular area of FISS.
Note: For information about FISS status and location codes, refer to "About Status/Location Codes" found in the "FISS Overview" section of this manual. If there are claims in the status/location that you entered, they will appear on Map 1741 after you press Enter. There may be multiple beneficiaries listed. This is normal since the common element you are inquiring about is the status code or status/location code. When you search by a beneficiary's Medicare number, you are inquiring about that particular beneficiary; therefore, multiple beneficiaries will not be listed; however, multiple claims may display.
You can view individual claims by typing S in the SEL field next to the Medicare number of the individual claim.
Note: Map 1741 will display a maximum of 5 claims at any given time. To see if there are additional claims, press your F6 key to scroll forward.
Claim Status Inquiry Examples
When you are inquiring about specific information, whether it is claim history for a specific beneficiary or specific status/location code information, you can tailor your search using one or more additional fields. In addition to entering your NPI, a Medicare number and S/LOC, you can enter data in the TOB (type of bill), FROM DATE, and TO DATE fields (circled and bolded below) to further narrow your search.
Type of Bill (TOB)
You can narrow the search of a beneficiary's claims by entering a type of bill (TOB). For example, to review claims submitted for a beneficiary, type your facility's NPI in the NPI field; the beneficiary's Medicare number in the MID field; and the claim's type of bill code (e.g., 131, 329, 111) in the TOB field.
To search for a beneficiary's claims for specific dates of service and specific type of bill, type your facility's NPI, the beneficiary's Medicare number, the type of bill, and the "from" and "to" dates. (See example below.) Entering a status code or status/location will further narrow your search.
It is a good idea to "refresh" your screen between different searches. Do this by pressing F3 to exit option 12. Then type 12in the Enter Menu Selection field and press Enter.
From/To Date
If the beneficiary has an extensive claim history, you can narrow your search by adding from and to dates. These dates reflect the "from" and "to" dates of service billed on the claim. You may search by only using a "from" date, or both a "from" and "to" date. The "to" date can only be used if a "from" date is also entered. For example, to find claims with dates of service between August 1, 20XX, to September 30, 20XX, (XX denotes the year) for a particular beneficiary, type your facility's NPI in the NPI field, the Medicare number in the MID field, and type 0801XXin the FROM DATE field and 0930XXin the TO DATE field and press Enter.
Below is an example of how this would appear before pressing Enter.
You may also use the FROM DATE field when searching for claims in a specific status/location. The example below shows how to access claims that were fully denied (D B9997) with dates of service on and after October 1, 2017. Type the status/location D B9997in the S/LOC field, type 100117in the FROM DATE field and leave the TO DATE field blank.
Accessing Additional Development Request (ADR) Information
When claims are selected by Medical Review, CGS will request additional documentation from the provider to support the services being billed to Medicare. This request is called a medical review Additional Development Request (MR ADR).
Note: For home health and hospice providers, a non-medical review ADR (non-MR ADR) may be generated when a ‘KX' modifier is reported on the claim and information in the REMARKS field is not present, or does not include a clear explanation for the exception request.
The CMS Medicare Program Integrity Manual, Pub. 100-08, Ch. 3, Section 3.2.3.3 requires providers to submit MR ADR documentation to CGS within 45 calendar days of the request. If the documentation is not received by day 46, the claim will be denied; therefore, please allow enough time for CGS to receive the documentation.
The following pages explain how you can identify claims for which CGS has requested an MR ADR, or non-MR ADR, what documentation is being requested, and most importantly, the due date for when the ADR information must be received.
Please refer to the "Key ADR Information" that follows these instructions. This information will help you avoid claim denials.
Identifying Claims Selected for ADR
You can easily see if claims are selected for ADR by accessing the Inquiry Menu and selecting option 12 (Claim Summary). All claims selected for an ADR will appear in status/location S B6001.
CGS recommends that you check the ADR status/location (S B6001) at least once per week to help ensure timely responses.
On Map 1741, type your facility's NPI number in the NPI field. To move the cursor to the NPI field, hold down the Shift key and press the Tab key.
Tab to the S/LOC field and type S B6001. Press Enter. If there are claims in the S B6001 status/location, they will appear after you press Enter.
To identify the additional information being requested for each claim, you must select the claim by typing an S in the SEL field next to the Medicare number of the claim. Press Enter. You can only select one claim at a time.
Page 01 of the claim appears (Map 1711).
ADR information is electronically attached to the end of the claim, as pages 07 and 08. To view the ADR information, type 07in the PAGE field (if your cursor is not already in this field, press the HOME button found on your keyboard) and press Enter.
The ORIG REQ DT field on Page 07 indicates the date CGS requested the additional information. Page 07 also identifies the address to which your documentation can be mailed. The DUE DATE field is 45 days from the original request date. Documentation not received by day 46 will result in the claim being denied.
Example: FISS Page 07
Press F6 to view the entire message. Press F5 to scroll backward.
To determine what documentation is being requested, press your F8 key to review the reason code narrative on FISS Page 08. The edit that the claim was selected for will appear in the upper left hand corner in the REASONS: field.
Note: You may need to press F6 to see the remaining reason code narrative that identifies the documentation that you need to submit. Press F5 to go back.
Example: FISS Page 08
Press F6 to see the remaining reason code narrative that identifies the documentation that you need to submit.
NOTE: Because other CMS contractors (e.g., Unified Program Integrity Contractor (UPIC), Recovery Auditors (RAs), Supplemental Medical Review Contractor (SMRC)), may also request additional information, it is important that you scroll through the reason code narrative on FISS Page 08. If a different address appears in the narrative, send the documentation to that address, instead of the CGS Nashville, TN address.
To go back to FISS Page 07, press your F7 key.
Make a copy of Page 07 and attach it to the top page of your medical record documentation. This ensures that the documentation will be matched with the correct claim. Mail it to the address listed on Page 07 as soon as possible. Another option is to submit your ADR documentation by using the myCGS Portal. Refer to the Forms section of the myCGS User Manual for additional information
Note: You may also want to keep a printed copy of pages 07 and 08 (reason code narrative) as a reference of what was requested and to document when you submitted the information. Pages 07 and 08 will no longer display after the documentation is received and the claim is moved from status/location S B6001 to S M50MR. For information on how to screen print FISS claim pages, refer to the FISS Overview section of this manual.
Press F3 to exit back to Map 1741 or press F7 to move back through the claim pages. If you have additional claims in the ADR status/location, you must select each claim individually to determine what documentation needs to be submitted to CGS and by what date.
You may want to "refresh" your screen to ensure accurate information displays. Press F3 to exit option 12. Then type 12in the Enter Menu Selection field and press Enter. Retype your NPI and the status/location S B6001in the S/LOC field.
You are responsible for checking your claims to see if they are in the ADR status/location, as this is the only notification you will receive regarding your claims that have been selected for Medical Review by CGS. In addition, you should keep track of the claims for which you have submitted ADR documentation.
Key ADR Information:
CMS requires providers to submit ADR documentation to CGS within 45 calendar days of the request. Therefore, it is important to send the documentation as soon as possible to allow time for CGS to process the additional information by the 45th day after the date of request (Orig Req Dt) shown on FISS Page 07.
Make a copy of Page 07 and/or Page 08 and attach it to the top page of your medical record documentation. If you mail your documentation, send it to the address that appears on FISS Page 07. If an address displays in the narrative on FISS Page 08, mail the documentation to that address.
Once received by CGS, the documentation is scanned into the Optical Character Recognition (OCR) software, and CGS staff will move the claim from status/location S B6001 into status/location S M50MR pending review of the documentation.
If CGS does not receive the information by day 45, the claim will automatically deny on day 46 and move to status/location D B9997 with reason code 56900 and your only recourse for Medicare payment is to request a Reopening. For Home Health and Hospice providers, refer to the Reopenings web page for detailed information. For Part A providers, refer to the Part A Reopenings web page.
NOTE: If the documentation was received timely (by day 45), but the claim automatically denied on day 46, CGS will proceed with reviewing the documentation, and there is no need to request a Reopening.
CGS's review of your documentation can take up to 60 days from when the documentation was received.
Missing or Illegible Signature Documentation: If, during review of your documentation, it is determined that a signature is missing or illegible, the claim will be re-ADRd to status/location S B6001. Page 08 will show the Reasons field with 5ADR2, and the narrative will indicate that additional documentation is required to support the signatures. The Remarks field on FISS Page 04 will specify the documentation being requested. The additional signature documentation must be sent to CGS within 15 days of the request.
You may choose to submit documentation electronically. See the Electronic Submission of Medical Documentation (esMD) Web page for more information about electronic submission of documentation. Documentation can also be submitted through the CGS Web Portal, myCGS. Refer to the Forms section of the myCGS User Manual for additional information. CGS will also accept documentation submitted via Fax (615-660-5981 for MR ADRs, or 615-660-5982 for non-MR ADRs), or CD/DVD.
Viewing Noncovered/Denied Services
If your claim was partially (P B9997) or fully (D B9997) noncovered/denied, you can view the noncovered/denied revenue code line(s) and the reason charges were noncovered/denied. Follow the steps below:
Fully noncovered/denied
Within the Claim Summary, option 12, type your NPI in the NPI field, and the beneficiary's Medicare number in the MID field. Press Enter. Type an Sin the SEL field in front of the claim you wish to view and press Enter. Page 01 of the claim appears (Map 1711). Press F8 to go to Page 02.
Fully noncovered/partially denied claims will display the noncovered charges in the "NCOV CHARGE" field on Map 1712 (Page 02). In the above example, the reason code 56900 appears in the lower left corner. Press F1 to display the reason code narrative indicating why the claim was denied.
Partially noncovered/denied
If the claim is partially noncovered/denied the reason code in the lower left corner may not explain why a specific revenue code line was denied. To find the reason a revenue code was denied, follow the steps below.
Within option 12, type your NPI in the NPI field, and the beneficiary's Medicare number in the MID field. Press Enter. Type an S in the SEL field in front of the claim you wish to view andpress Enter. Page 01 of the claim appears (Map 1711). Press F8 to go to Page 02.
The screen example below shows revenue code line 5 with charges in the NCOV CHARGE field. Place your cursor anywhere on the revenue code line 5. Press F2. Map 171D appears and will display the line item information for revenue code line 5.
If you press F2, without putting your cursor on a specific revenue code line, Map 171D will appear with information from claim line (CL) 1. The F5 and F6 keys can then be used to scroll up and down through all revenue code lines.
From Page 02 of the claim, you can also press F11, without putting your cursor on a specific revenue code line. Map 171E appears. Press F11 again to display Map 171A with information from CL 1. Press F11 again and Map 171D will appear.
In the following Map 171D screen example, the denial reason code 5HC01 (certification was invalid), displays in the DENIAL REAS field, while the reason code in the lower left corner is 37186 indicating the claim was approved for payment.
Make a note of the reason code shown in the DENIAL REAS field, and press F1 to access the Reason Code Inquiry screen. Type the noted reason code, and press Enter to view the reason code narrative. Press F3 to return to the claim.
Viewing Upcoding and Downcoding Information
Upcoding and downcoding information is available to view on Home Health Prospective Payment System (HH PPS) claims that have completed processing (P B9997).
Within option 12, type your NPI in the NPI field, and the beneficiary's Medicare number in the MID field. Press Enter. Type an S in the SEL field in front of the claim you wish to view and press Enter. Page 01 of the claim appears (Map 1711). Press F8 to go to Page 02.
If you press F2, without putting your cursor on a specific revenue code line, Map 171D will appear with information from claim line (CL) 1. The F5 and F6 keys can then be used to scroll up and down through all revenue code lines.
From Page 02 of the claim, you can also press F11, without putting your cursor on a specific revenue code line. Map 171E appears. Press F11 again to display Map 171A with information from CL 1. Press F11 again and Map 171D will appear.
In the screen example above, the fields that appear in bold type are fields that you will want to review closely to identify upcoding/downcoding information.
MED REV RSNS – This field identifies medical review reason code(s). These may explain why the Health Insurance Prospective Payment System (HIPPS) code submitted on the claim was changed by Medical Review. Make a note of the reason code shown in the DENIAL REAS field, and press F1 to access the Reason Code Inquiry screen. Type the noted reason code, and press Enter to view the reason code narrative. Press F3 to return to the claim.
HCPC/MOD IN – This field identifies whether the HIPPS code (for HH PPS), or HCPCS code was changed by Medical Review. The valid values are:
U = Upcoding
D = Downcoding
" " = blank.
HCPC – This identifies the HIPPS or HCPCS codes on the 0023 revenue line used for processing/paying the claim.
ORIG – This HCPC field on this line indicates the original HIPPS billed. A value will only show in this field if the code submitted on the claim was changed by Medical Review. In the above example, the home health HIPPS code 3BHKS was originally submitted. The claim was downcoded ("D" in the HCPC/MOD IN field) using the HIPPS code 3AHKS.
ANSI REMARKS – ANSI remark code N72 will display when Medical Review downcodes the HIPPS code because the documentation submitted for review did not support payment for the HIPPS code originally submitted on the claim.
In the screen example above, the fields that appear in bold type are fields that will identify the amount of noncovered hospice charges and the applicable reason code. Make a note of the reason code shown in the DENIAL REAS field, and press F1 to access the Reason Code Inquiry screen. Type the noted reason code, and press Enter to view the reason code narrative. Press F3 to return to the claim.
To view upcoding/downcoding/line item denial information for another line item revenue code on Map 171D, use your F5 and F6 keys to scroll up or down until you see the appropriate line item displayed in the REV field.
Press F2 to return directly to Map 1712 or press F3to return to the listing of claims, Map 1741.
Viewing Pricer Upcode and Downcode Information (Home health providers only)
If you have submitted a claim under the Home Health Prospective Payment System (HH PPS), and the Medicare payment is not what you anticipated, access Map 171A to view if the claim includes Pricer upcode or downcode payment information.
Within option 12, type your NPI in the NPI field, and the beneficiary's Medicare number in the MID field and press Enter. Type an S in the SEL field in front of the claim you wish to view and press Enter. Page 01 of the claim appears. Press F8 to go to Page 02.
View Pricer information for an individual line item by placing your cursor anywhere on the specific revenue code line item that you want to see. Press F2 and then press F10 (or press F11 twice). Map 171A appears and will display the line item information specific to the revenue code line in which you placed your cursor.
You can also press F2, without putting your cursor on a specific revenue code line, and Map 171D will display. Then press F10 to view the Pricer information for claim line (CL) 1. The F5 and F6 keys can then be used to scroll up and down through all revenue code lines.
In the screen example above, the fields that appear in bold type are fields that you will want to review to identify Pricer downcoding/upcoding information.
REV – This field identifies the revenue code line that displays. The detail includes the revenue code, HIPPS (HCPC) code, service date (SERV DATE), total units (TOT-UNT) and covered units (COV-UNT).
APC CD – This field displays a HIPPS code, if different from what is billed.
OCE FLAGS – This field will display a "P" indicating that the Pricer program changed the HIPPS code to "early" or "late" based on the beneficiary's adjacent episode history, and/or the claim contains more or less therapy revenue codes than indicated by the HIPPS code originally submitted on the claim.
To view Pricer information for another line item revenue code, use your F5 and F6 keys to scroll up or down until you see the appropriate line item displayed in the REV field.
Press F2 (or F10 twice) to return to Map 1712. Press F3 to return to the Claim Summary Inquiry screen (Map 1741).
Viewing Outcome and Assessment Information Set (OASIS) Information for Patient-Driven Groupings Model (PDGM) Claims (Home health providers only)
For home health claims submitted on or after January 1, 2020, under PDGM, the OASIS items used to determine the PDGM payment group will display in MAP 171G. This allows providers to easily access the data used to calculate the payment groups.
Within option 12, type your NPI in the NPI field, and the beneficiary's Medicare number in the MID field and press Enter. Type an S in the SEL field in front of the claim you wish to view and press Enter. Page 01 of the claim appears. Press F8 to go to Page 03.
From the claim Page 03, press F11, MAP 171G will display.
There are 8 OASIS items that will be sent back to the claims system and displayed in the OA (OASIS Assessment) field. The OA field information will never be changed. The MR (Medical Review) field will be used by the CGS Medical Review staff to enter corrections when, based on their review of the full medical record, they find OASIS data is not supported. Review the MAP171G Field Description information later in this document for valid values.
 .
.