


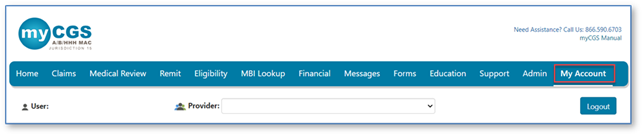
All users have access to the “My Account” tab. This tab is used to manage information specific to your account, such as passwords, security questions, contact information, linking accounts, and Multi-Factor Authentication (MFA) settings.
The "My Account" Tab
Select the "My Account" tab to access your myCGS information.
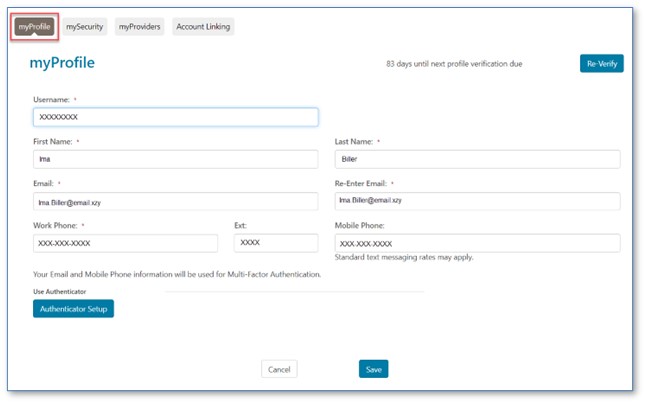
myProfile
After clicking on the tab, myCGS defaults to the “myProfile”sub-tab, which includes your Username and contact information. There is also a section to set up Multi-factor Authentication (MFA). (See below for more on MFA.)
Be sure to save changes made to your myProfile sub-tab.
Profile Verification
To meet CMS security guidelines, all users must verify that the information on his/her profile is accurate and current. This process is required every 250 days. myCGS tracks this timeframe to ensure this task is completed.
NOTE: If you have multiple accounts and IDs and selected one as your Super ID (see Account Linking), Profile Verification is performed on just the Super ID and not the accounts linked to the Super ID.
- As the verification period approaches, upon login, myCGS will notify you to verify your account. The pop-up message provides instructions on how to complete this task.
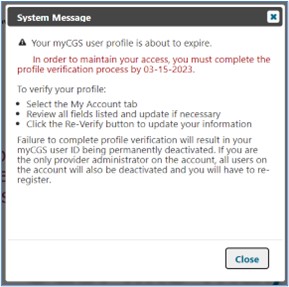
- From the “My Account”tab, review the information on your “myProfile”sub-tab to ensure all is accurate and current. Make changes as needed.
- Click "Re-Verify"to confirm all is correct.

- You will be prompted to review and accept the myCGS Terms of Use.
- Once accepted, the counter will restart at 250 days.

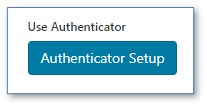
Authenticator Setup
You may also link the Google Authenticator app to myCGS under the myProfile sub-tab.
Google Authenticator allows you INSTANT access into myCGS, giving you an alternative to receiving your Multi-factor Authentication (MFA) code via text or email, which can take up to 15min to receive. To install this SPEEDY option, please refer to the “Google Authenticator” section below.
mySecurity
During the registration process, you were prompted to select six questions and provide answers to those questions. The purpose of the questions is to validate your identity should you forget your password and need to reset and choose a new one.
Under the "mySecurity"sub-tab, you may change the questions you selected originally and provide new answers.
- Click the drop-down box for any question you would like to change. Once you find a question that applies to you, select it. Enter the answer in the "Answer" field.
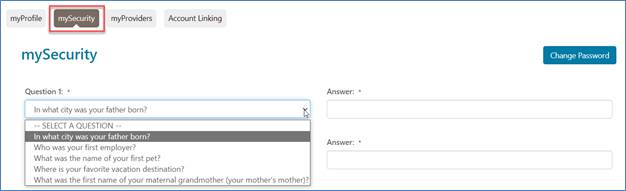
NOTE: There are a total of six validation questions, so be sure to complete all six question and answer fields. Click "Save" when finished.
Change Password
myCGS requires that you change your password at least once every 60 days. You will receive reminders as the date nears. If your password is compromised, you are encouraged to change your password immediately instead of waiting for the 60-day notification.
To change your password:
- Select the "Change Password" button from the "mySecurity" sub-tab.

- For your convenience, the password requirements are provided on the screen.
- Enter your current password.
- Enter and re-enter your new password according to the password requirements. Click on the eye icon if you are in a secure environment and would like to see what you type in these fields.
- Click "Save."
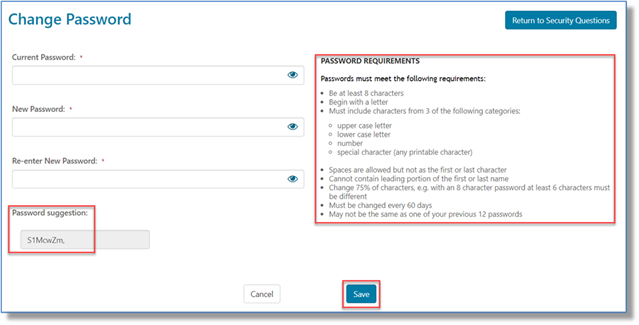
NOTE: To help you meet security requirements, myCGS will suggest a password for you. You are welcome to use that password or one of your own choosing.
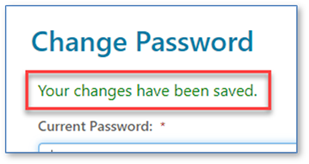
- A confirmation message will display.
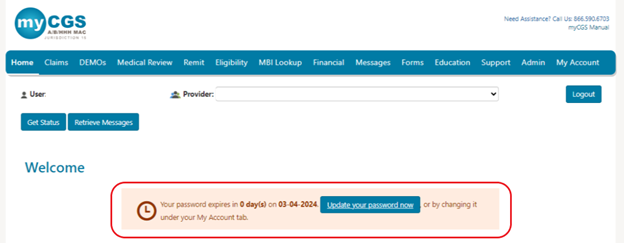
myCGS Password Expiration Notice
A new message with a countdown will now display when your password is set to expire within 10 days. There will also be a “Update your password now” link to take the user directly to the change password screen.
To change your password:
myProviders
The accounts you have access to are all identified under the "myProviders" sub-tab. You will see the PTAN, NPI, Provider Name, and the status of that account.
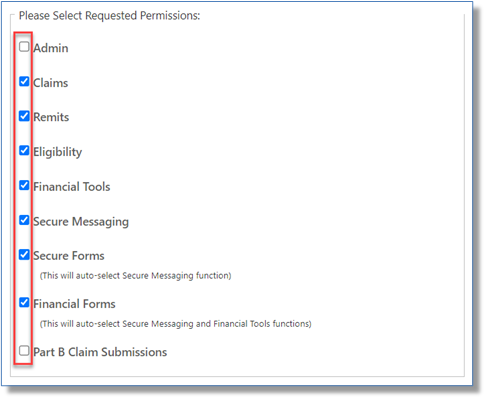
You also have access to view the myCGS tabs and permissions you have been granted for each account by clicking on the gear icon and selecting the "Edit Permissions" link.
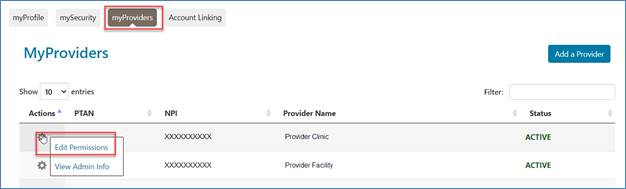
If there is a myCGS function or tab that you cannot access but would like to, you may send a request to your Provider Administrator.
- Select the function from the "Requested Permissions" column and click "Submit" to send your request.
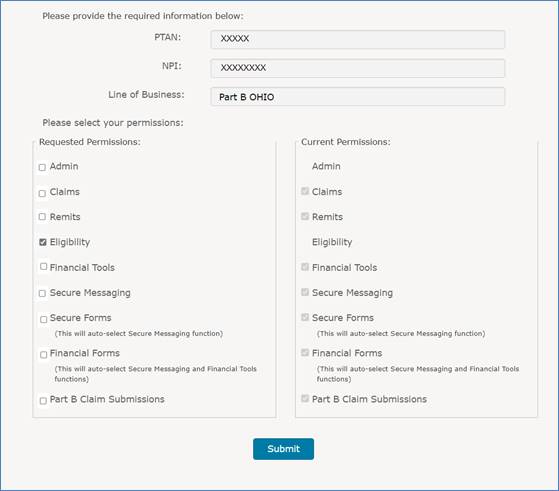
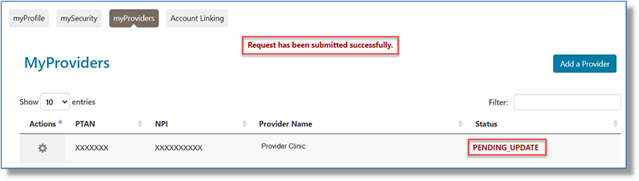
- You will receive a message letting you know the request has been sent. Your Provider Administrator will either approve or deny the request.
Add a Provider
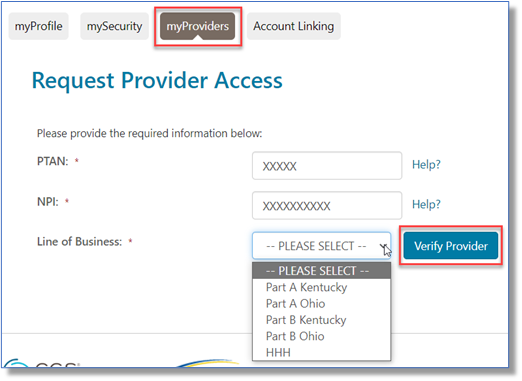
You may submit a request to add a new provider to your listing by clicking the "Add a Provider" button.

- Enter the PTAN of the provider account you would like to add.
- Enter the NPI of the provider you would like to add.
- Select the Line of Business of the provider you would like to add from the drop-down box then click the "Verify Provider" button.
- If the provider information entered is verified to be for a provider that is already established in myCGS, you will then select the permissions you would like to have for that provider account.
- If the provider entered is not verified, you may contact your Provider Administrator or enter additional provider information to register the provider.
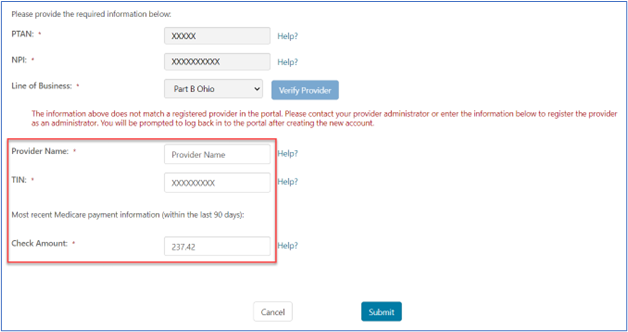
- This includes the provider's name, Tax ID Number (TIN) (without dashes), and the amount of the most recent Medicare payment. Note that this is the same information required in the registration process. Also note that the provider must have an EDI Enrollment Agreement
 on file with us.
- This includes the provider's name, Tax ID Number (TIN) (without dashes), and the amount of the most recent Medicare payment. Note that this is the same information required in the registration process. Also note that the provider must have an EDI Enrollment Agreement
If you need assistance with this step, please contact the EDI Help Desk.
Account Linking
myCGS requires users to maintain separate User IDs for each PTAN/NPI combination. If you manage multiple accounts, you have multiple User IDs.
Account Linking allows you to combine multiple User IDs under one Super ID. From your new Super ID, you can select one of your linked accounts to perform functions available under that PTAN/NPI.
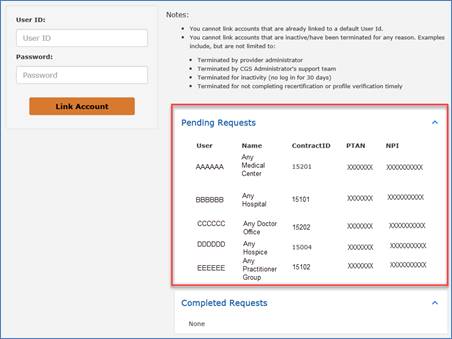
NOTE: User IDs linked to your selected Super ID must be active. If, for example, the User ID has been terminated due to inactivity, was not recertified by your Provider Administrator, did not receive timely profile verification, or was terminated by your Provider Administrator, it cannot be linked to your Super ID.
To link an account:
- Log in to myCGS under the User ID you would like to set up as your Super ID.
- Select the My Account tab, then select the Account Linking sub-tab.
- In the User ID field, enter a User ID you would like to link to your Super ID. Enter the password for that User ID.
- Click the Link Account button.
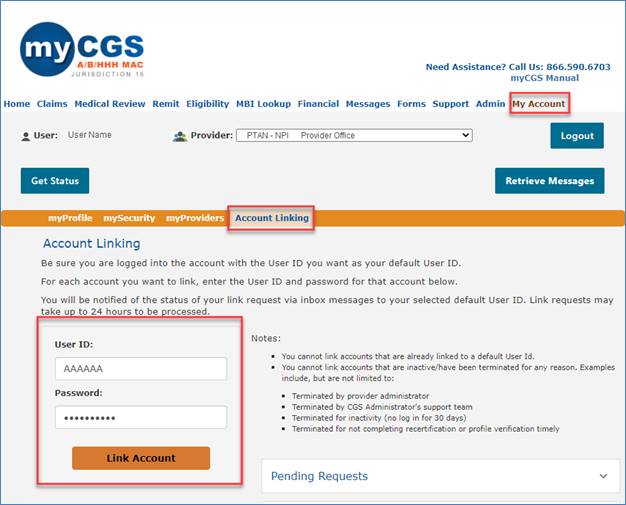
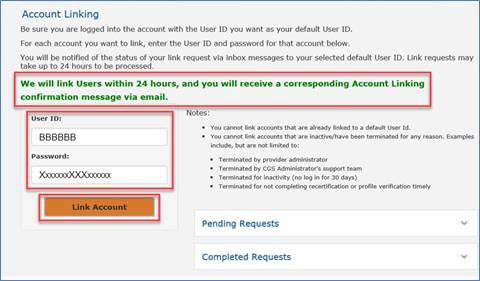
- If the account you are attempting to link is active, a confirmation message will display to let you know the account will be linked within 24 hours.
- If you have other User IDs that you would like to link under your new Super ID, repeat steps 1-4 above.
- In the User ID field, enter additional User ID and the password for that User ID.
- Click the Link Account button.
- As requests are submitted, confirmation that the requests were received are delivered to the myCGS inbox of the Super ID.
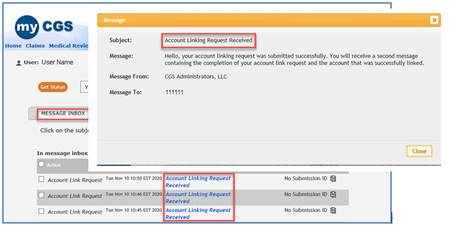
- You may select the Pending Requestsdrop-down to verify the User IDs you requested to link to your Master ID.
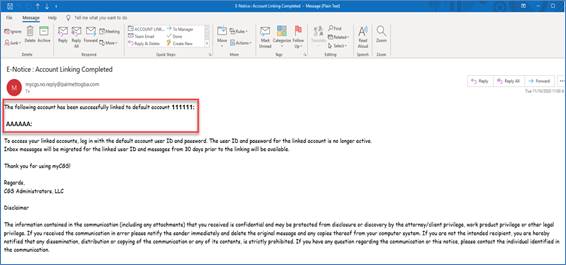
- Once the linking process for each request is complete, separate confirmation emails will be sent to you at your registered email address.
- Confirmation will also be delivered to the myCGS inbox of the Super ID.
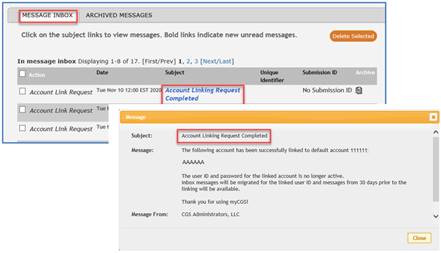
- You may select the Completed Requests drop-down to verify the User IDs you requested to link to your Super ID were linked.

- Once complete, when logged in with your Super ID, you will select the account you would like to access by clicking on the drop-down at the top of the screen.

- The drop-down is accessible from all tabs in myCGS, allowing you to easily switch between accounts.
Account Linking Tips!
- Once a User ID is linked to a Super ID, that User ID becomes inactive on the date it is linked. You can no longer log into that account. You must log in with your Super ID.
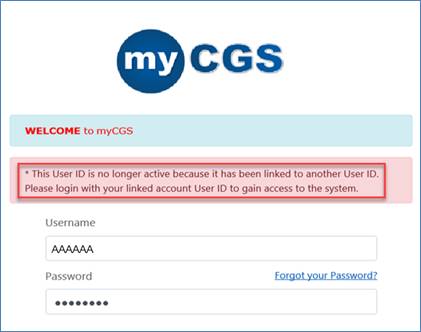
- This error message will also display when you attempt to link a User ID to a Super ID that has already been linked.
- Inactive User IDs cannot be linked to a Super ID.

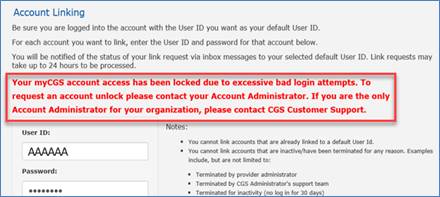
- When attempting to link a User ID to a Super ID, please be sure to enter the password correctly. Three unsuccessful log-in attempts will cause that User ID to be locked. Your Provider Administrator must unlock the account.
- Your Provider Administrator will continue to have control of the account even after a Super ID is established.
- The 30-day log in requirement will apply to Super IDs.
- The Provider Administrator will still be required to complete the recertification process for each User ID every 90 days. The Profile Verification process completed by each user every 250 days will only be required for the Super ID.
- If a tab is grayed, check with your Provider Administrator to grant you access.

- When changing your email address, you will be prompted to enter it twice to ensure what you've entered is correct.

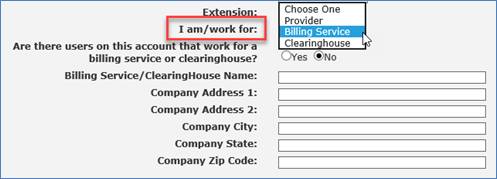
- When updating the field showing you work for a billing service or clearinghouse, note that the billing service/clearinghouse address fields will display for you to complete.
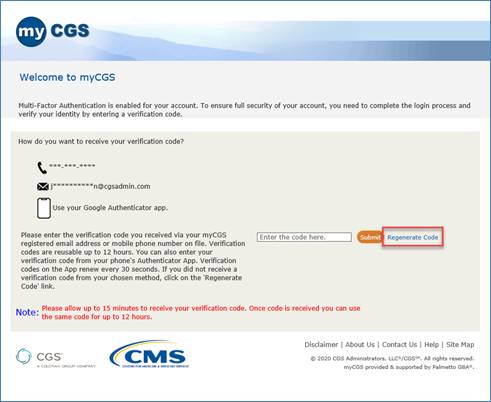
Multi-Factor Authentication (MFA)
CMS requires us to implement an additional level of security when accessing myCGS due to the amount of sensitive information accessible through the web portal. The MFA process meets that requirement, as users are required to enter an eight-digit code before gaining access to myCGS.
During the registration process, you identified whether you wanted to receive your MFA code via e-mail, text, or both. This option can be changed under the "Account Information"sub-tab.
If you want to add the text option, complete the "Mobile Phone"and "Carrier" fields located at the bottom of the page.

Google Authenticator (GA)
Instead of receiving your MFA code via text or email, you may use the Google Authenticator (GA) app. The app is available for download on your desktop computer/laptop or mobile devices. For mobile devices (i.e., cell phones, tablets) you may download the app from the App Store (Apple) and Android Play Store (Android).
To install GA onto your desktop computer/laptop:
- Go to the My Account tab / myProfile sub-tab. There you will see an option to set up Google Authenticator app.
- Select the Authenticator Setupbutton located at the bottom of the page.

- Once the page expands, click on the Direct Link link to access the extension.

- A new window will open. Select the type of browser you use on your desktop computer/laptop, either Chrome, Firefox, or Edge. Be sure you are using the actual browser you select.
- Instructions will display based upon the browser selected.
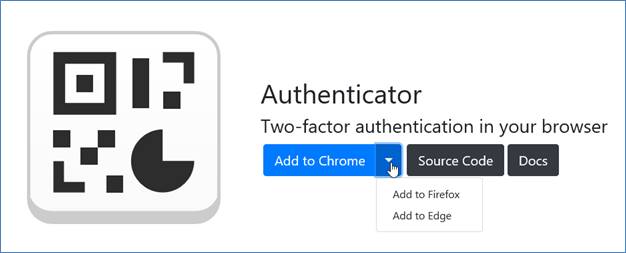
- When Chrome is used, click on the blue box, "Add to Chrome."
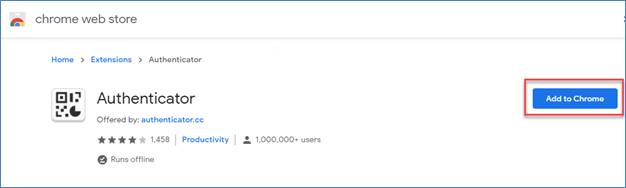
- When Chrome is used, click on the blue box, "Add to Chrome."
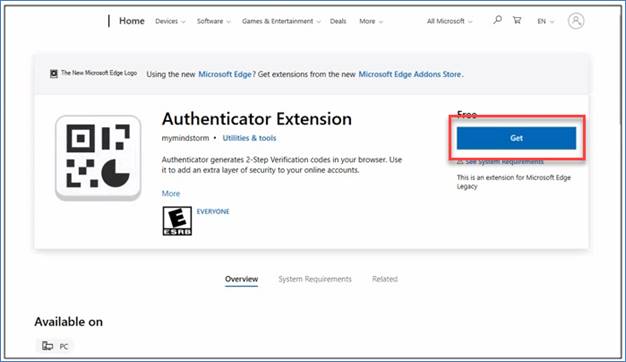
- When Edge is used, click on the blue box, "Get."
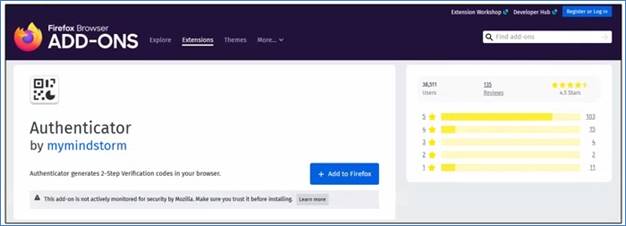
- When Firefox is used, click on the blue box, "Add to Firefox."
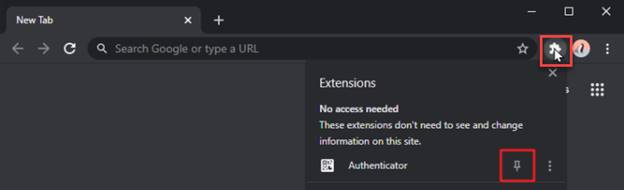
For instant access, we suggest you pin the GA icon to the toolbar.
Log into myCGS, go to the "My Account" tab, and complete the steps based on the browser you use.
To install the Google Authenticator mobile app and link it to myCGS:
- Once logged into myCGS, go to your My Account tab and the myProfilesub-tab.

- After clicking the Authenticator Setup button, the window will expand to display the setup instructions.
- Select the instructions that coincide with the device you are using.
- If using an iPhone or iPad, select the iOS link. Instructions will display specific to Apple devices. (NOTE: The screen defaults to iOS instructions.)
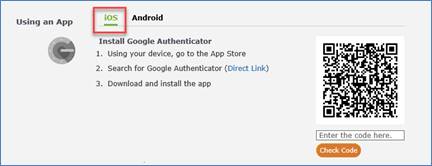
- If using an iPhone or iPad, select the iOS link. Instructions will display specific to Apple devices. (NOTE: The screen defaults to iOS instructions.)
- If using an Android phone or device, select the Android link. Instructions will display specific to Android devices.
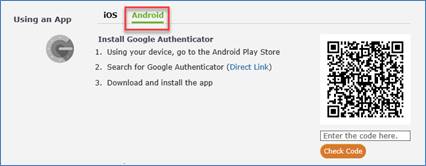
- Find the Google Authenticator app in your app store. Download and install the app directly onto your device.
- Follow the remaining instructions for your type of device:
iOS Android - In the app, tap BEGIN SETUP
- Tap Scan Barcode
- Choose OK when Google Authenticator asks for access to your camera
- Use your device's camera to scan the barcode located in myCGS
- Enter the 6-digit code that appears in the Google Authenticator app into the field below the barcode
- Click the Check Code button
- In the app, tap the + sign located on the bottom right
- Tap Scan a QR Code
- Use your device's camera to scan the barcode located in myCGS
- Enter the 6-digit code that appears in the Google Authenticator app into the field below the barcode
- Click the Check Code button
- If entered correctly and the app links to your myCGS account, a message will display at the top and a green check will appear over the barcode.
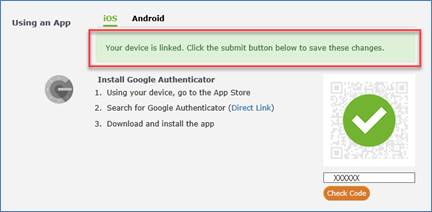
- Click SUBMIT to save your changes.
- Next, a message box will display asking you to confirm you scanned the code. Click Yes.
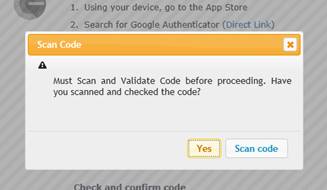
- You will be logged out of myCGS.
TIPS
- If you have multiple myCGS accounts, you may set up Google Authenticator separately for each log in ID.
- Be sure to select the 6-digit code that is assigned to the account for which you are logging in.
- If the icons are not available on the MFA screen, please click Regenerate Code.
Confirm/Verify Changes
When changes (such as those noted above) are made to any of the sub-tabs, you must save your changes.
- Click "Submit"to save your updates.
- In some cases, a simple message will display confirming the changes requested.
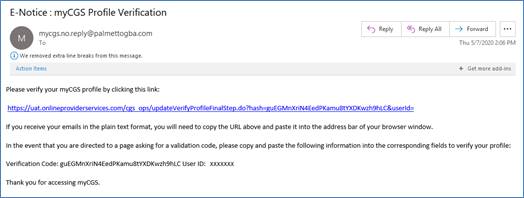
- In other cases, myCGS will default to the login screen, displaying a message to confirm an update was made to your information. You will be directed to your e-mail to click on a verification link.
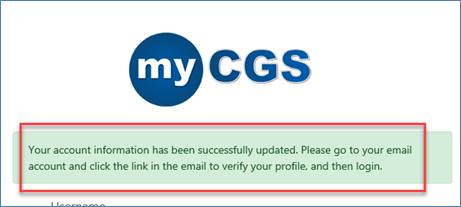
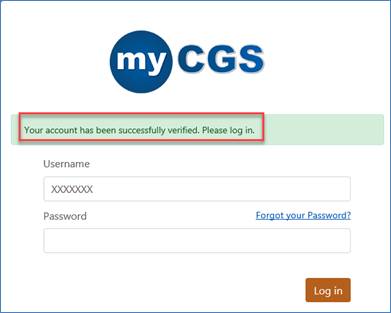
- Click the link in your e-mail.
- A new browser window will open, displaying a message confirming verification. You may log back in from this screen.
 Join Electronic Mailing List
 Print
Print Bookmark
 Email
Email Facebook
 YouTube
 LinkedIn