SECCIÓN 2: MANEJO DE USUARIOS
Cuando usted ingresa a myCGS como Aprobador Designado o DA "Designated Approver" usted va a ser llevado inmediatamente a la sección de Manejo de Usuarios "User Management" en donde usted puede realizar cualquiera de las siguientes tareas:
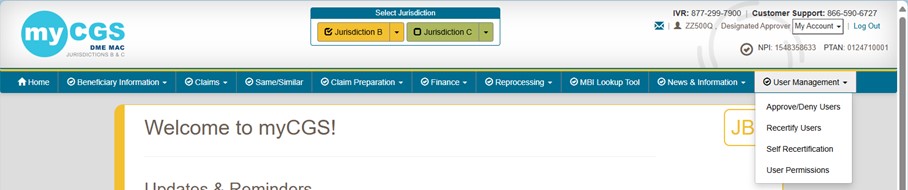
Si usted está en la sección Manejo de Usuarios "User Management" de myCGS, usted verá las siguientes opciones en el menú.
![]()
Home "Inicio": El botón de inicio "Home" lo llevará a la porción de Usuarios Finales "End Users" de myCGS, en donde usted puede encontrar la elegibilidad, estatus de las reclamaciones y todas las demás estupendas opciones que myCGS ofrece. Para instrucciones revise el Manual del Usuario de myCGS. Con el fin de poder regresar a la sección de Manejo de Usuarios "User Management" de myCGS seleccione el menú de Mi Cuenta "My Account" y entonces elija Manejo de Usuarios "User Management".
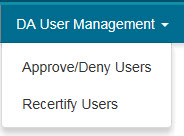
DA User Management "Manejo del Usuario DA": Venga aquí para aprobar/denegar y recertificar Usuarios Finales "End Users".
User Management "Manejo de Usuarios": Venga aquí para manejar los permisos de su usuario final "End User" para una combinación de NPI/PTAN específica.
Self Recertification "AutoRecertificación": Venga aquí para completar su auto-recertificación anual.
Si usted está usando la sección de Usuario Final "End User" de myCGS y necesita regresar a la sección de Manejo de Usuarios "User Management", elija la pantalla adecuada del menú de Manejo de Usuarios "User Management" el cual se encuentra al extremo derecho de su barra de navegación.
Cuando un Usuario Final "End User" envía una solicitud para registrarse en myCGS, la solicitud debe ser aprobada por el Aprobador Designado o DA "Designated Approver" dentro de un plazo de cinco días. Si usted es un Aprobador Designado o DA "Designated Approver" usted recibirá un correo electrónico informándole que se ha enviado una nueva solicitud y necesita de su aprobación. Usted (u otro DA de su compañía) debe ingresar a myCGS y aprobar la solicitud antes de que el usuario tenga el acceso garantizado a myCGS.
NOTA: Usted debe aprobar (o denegar) las solicitudes de los Usuarios Finales "End Users" dentro de un plazo de cinco días. Si usted no toma acción dentro del plazo de cinco días, la solicitud será removida y el usuario final "End User" necesitará registrarse de nuevo.
Para aprobar una solicitud de un usuario, siga los pasos descritos a continuación:
1. Ingrese a myCGS en https://mycgsportal.com
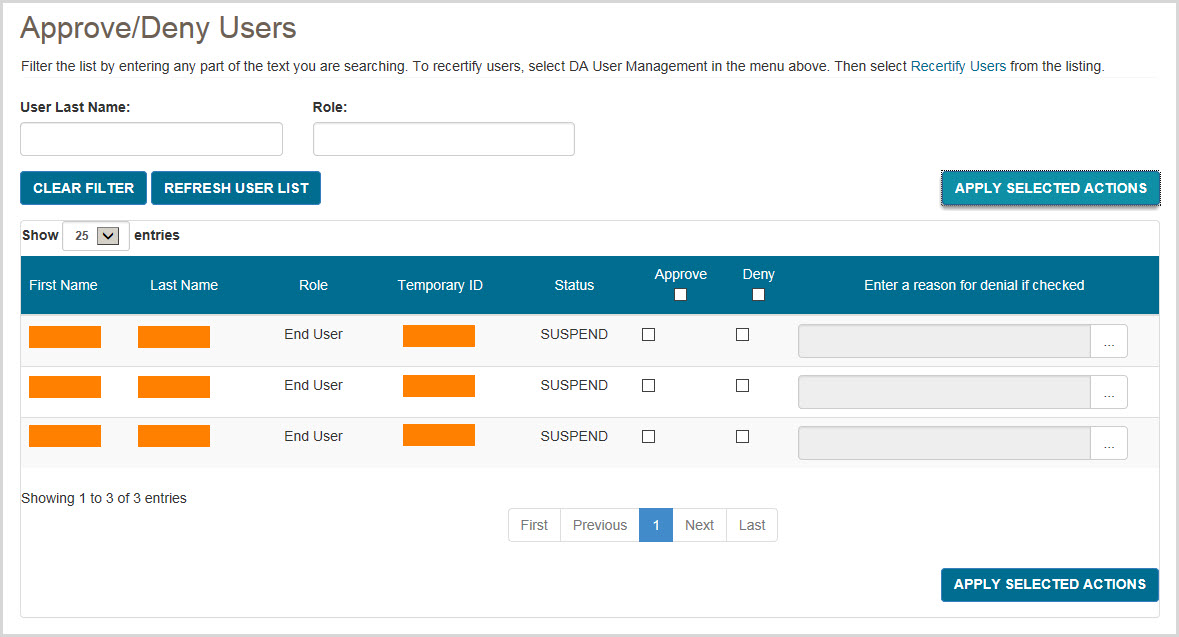
2. Como Aprobador Designado o DA "Designated Approver" la primera pantalla que usted verá cuando ingresa es la opción Aprobar/Denegar Usuarios "Approve/Deny Users" en la pantalla de Manejo de Usuarios DA "DA User Management," en donde se mostrará cualquier solicitud de inscripción pendiente bajo su Número de Impuestos o TIN "Tax ID". Si quiere buscar a un usuario específico que necesita ser aprobado/denegado, ingrese el apellido del usuario en el espacio Apellido del Usuario "User Last Name". Se mostrará cualquier usuario que coincida con su búsqueda de apellido.
La opción de Aprobar/Denegar Usuarios "Approver/Deny Users" mostrará el nombre "Name", rol "Role," identificación temporal "Temporary ID" y estatus "Status" de los Usuarios Finales "End Users" que tengan pendiente una solicitud de inscripción. Asegúrese de revisar cuidadosamente la información de todas las solicitudes de Usuario Final "End User" antes de aprobar/denegar. Cuando usted aprueba a un Usuario Final "End User", este tendrá acceso a la información de su compañía en myCGS (Número de Impuestos o TIN "Tax ID", NPI, PTAN) tal como reclamaciones enviadas, cantidad de los cheques y más. Solamente apruebe a los empleados válidos de su compañía que tienen la necesidad de usar myCGS debido su trabajo.
Para aprobar un Usuario Final "End User":
Para denegar un Usuario Final "End User":
Una vez que usted ha aprobado o denegado a un Usuario Final "End User", un correo electrónico será generado automáticamente por el sistema y este será enviado al Usuario Final "End User" informándole su aprobación/denegación. Si es aprobado, el Usuario Final "End User" puede ingresar y usar myCGS inmediatamente.
Todos los usuarios de myCGS deben ser recertificados cada 365 días. El proceso de recertificación asegura que el acceso a myCGS sea limitado solamente a aquellos individuos quienes actualmente tengan la necesidad de usar myCGS debido su trabajo.
Usted recibirá una notificación a través del correo electrónico de parte de myCGS cuando la recertificación de un usuario (el cual está registrado bajo el número de impuestos o Número de Impuestos o TIN "Tax ID" de su empresa) esté próxima a expirar. Si usted no recertifica a ese usuario antes de que la certificación expire, el usuario será suspendido y el acceso a myCGS será revocado.

Para recertificar a los usuarios siga los pasos descritos a continuación:
1. Ingrese a myCGS en https://mycgsportal.com
2. Desde el menú de manejo de usuarios "DA User Management" seleccione Recertificar Usuarios "Recertify Users".
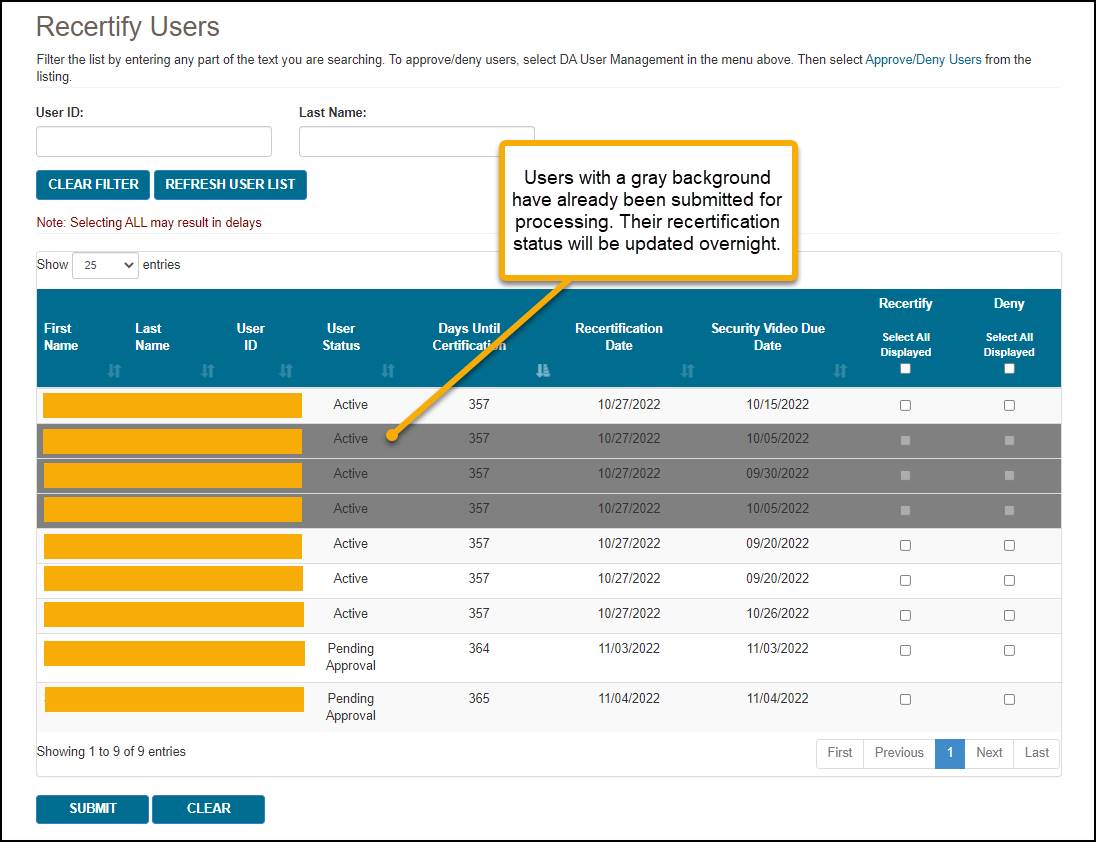
3. En la pantalla de Recertificar Usuarios "Recertify Users" sus usuarios se mostrarán en orden de los más cercanos a la fecha de vencimiento de la recertificación junto con la siguiente información.
Puede utilizar los filtros de búsqueda (ID de Usuario "User ID" y Apellido "Last Name") para buscar un usuario específico. También puede cambiar el orden de los usuarios que se muestran en la pantalla presionando el encabezado de la columna de cualquier columna. Al presionar el encabezado de la columna por segunda vez, se invierte el orden (ejemplo de A-Z a Z-A, etc.).
De forma predeterminada, myCGS muestra 25 usuarios por página. Puede cambiar el número de usuarios que se muestran por página utilizando el menú desplegable Mostrar XX entradas "Show XX entries".
4. Verifique si los usuarios siguen siendo miembros activos de su organización y requieren acceso a myCGS.
Para aprobar usuarios para el acceso continuo a myCGS, marque la casilla de verificación en la columna Recertificar "Recertify" en la fila de cada usuario. Continúe verificando la recertificación de tantos usuarios como desee. Para seleccionar todos los usuarios en la página, puede utilizar la casilla de verificación Seleccionar Todos los que se Muestran "Select All Displayed". Tenga en cuenta que la casilla de verificación Seleccionar Todo "Select All Displayed", solo seleccionará a los usuarios que se muestran en la página actual.
Para los usuarios que ya no son miembros de su organización, marque la casilla de verificación en la columna Denegar "Deny" en la fila de cada usuario. Continúe marcando la denegación de tantos usuarios como desee. Para seleccionar todos los usuarios en la página, puede utilizar la casilla de verificación Seleccionar Todos los Mostrados "Select All Displayed". Tenga en cuenta que la casilla de verificación Seleccionar Todo "Select All Displayed" solo seleccionará a los usuarios que se muestran en la página actual. NOTA: Esta acción deshabilitará permanentemente la identificación de usuario de myCGS de esa persona. Esta acción no se puede revertir. Si niega a un usuario por error, el usuario deberá volver a registrarse en myCGS y recibir una nueva identificación de usuario "User ID".
Después de seleccionar los usuarios apropiados para recertificación o denegación, presione el botón SUBMIT. Tenga en cuenta que puede enviar usuarios para recertificación y denegación al mismo tiempo. Cuando presione enviar, todos los usuarios que haya seleccionado se enviarán para su procesamiento, incluso si ha seleccionado usuarios en varias páginas. Una vez enviada, su solicitud se procesará durante la noche. Todos los usuarios que haya enviado para su procesamiento aparecerán atenuados en la pantalla, como se muestra en la imagen a continuación.
Una vez recertificado, la fecha de vencimiento de la recertificación del usuario se restablecerá a los 365 días.
NOTA: Si no recertifica a un usuario antes de la fecha de vencimiento de la recertificación, la cuenta del usuario se suspenderá y su acceso a myCGS se desactivará hasta que usted apruebe la recertificación de ese usuario.

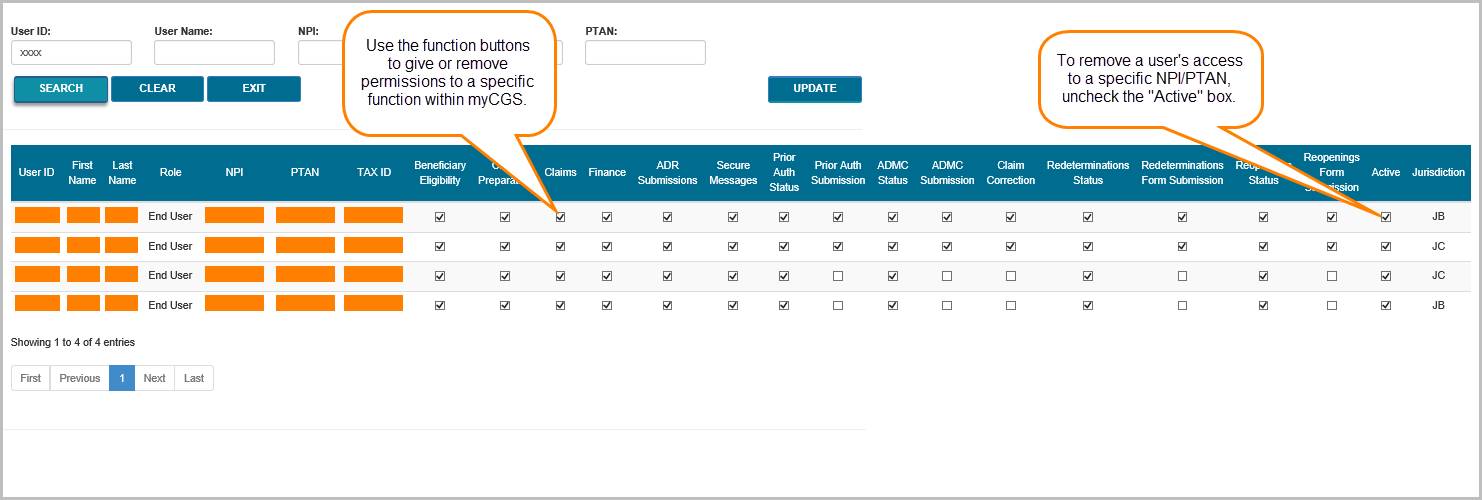
La pantalla de Permisos de los Usuarios "User Permissions" le permite hacer cambios en las cuentas de usuario de aquellos individuos registrados en myCGS bajo el Número de Impuestos "Número de Impuestos o TIN "Tax ID" " de su compañía. Cuando un nuevo usuario se registra por primera vez en myCGS, automáticamente tiene acceso completo a todo lo relacionado con el NPI/PTAN asociado con su Número de Impuestos o TIN "Tax ID" aprobado. Si por alguna razón usted desea limitar el acceso de los usuarios a ciertas funciones o NPI/PTAN específicos, usted puede hacerlo en la pantalla de Permisos de los Usuarios "User Permissions". Puede también en esta pantalla desactivar usuarios que ya no son empleados de su compañía.
NOTA: El acceso del Usuario Final "End User" a ciertas funciones que implican envíos (tal como Redeterminaciones, Reaperturas, ADR y otras) ha sido automáticamente apagado. Usted debe específicamente garantizar el acceso a estas funciones con el fin de que sus Usuarios Finales "End Users" pueden usar estas opciones. Revise el Manual del Usuario de myCGS para información adicional.
Para tener acceso a la pantalla de Permisos de los Usuarios "User Permissions" desde la pantalla de Manejo de Usuarios "User Management" de myCGS, presione el botón Manejo de Usuarios "User Management".
![]()
Para tener acceso a la pantalla de Permisos de los Usuarios "User Permissions" desde la sección de funcionalidad de myCGS, seleccione el menú de Manejo de usuarios "User Management" y entonces elija Manejo de Usuario "User Management".
Para modificar un usuario, primero necesita buscar el usuario. myCGS le permite buscar usuarios ingresando cualquiera de las siguientes cinco piezas de información del usuario:
ID del Usuario "User ID", Nombre del Usuario "User Name", NPI, Número de Impuestos o TIN "Tax ID" o PTAN. Puede usar tantos espacios de criterios de búsqueda como desee.
En el espacio de ID del Usuario "User ID" y Nombre del Usuario "User Name", usted puede ingresar tantos caracteres como desee. Por ejemplo, si usted ingresa "Smith" en el espacio de Nombre del Usuario "User Name" (dejando los demás espacios en blanco) myCGS le mostrará cualquier usuario que tenga "Smith" dentro de su nombre, como Jill Smith, Stan Smith, Karen Smithson o Smith Jones.

Una vez usted haya ingresado el criterio de búsqueda apropiado, presione el botón "SEARCH".
Después de realizar su búsqueda, myCGS le mostrará la información del perfil de cada usuario que coincida con sus criterios de búsqueda. Tenga en cuenta que si usted tiene más de un NPI/PTAN pueden existir múltiples filas para un solo usuario que comparta la misma información múltiple de NPI/PTAN. Los cambios hechos a los permisos del usuario se hacen individualmente para cada NPI/PTAN.
Para agregar o remover permisos de acceso a la pantalla de una función dentro de myCGS, escriba o remueva la marca de chequeo "√" en la casilla apropiada (una marca de chequeo "√" significa que el usuario tiene permiso para usar esa pantalla de la función, la ausencia de la marca de chequeo "√" significa que no le está permitido usar esa pantalla de la función).
Para desactivar completamente a un usuario de myCGS, ponga una marca de chequeo "√" en la casilla de Denegar "Deny" e ingrese la razón del rechazo en la casilla de texto.

Una vez que usted haya hacho los cambios apropiados en el perfil del usuario, presione el botón "UPDATE".
Todos los usuarios de myCGS deben recertificarse cada 365 días. El proceso de recertificación asegura que el acceso a myCGS esté limitado solo a aquellas personas que actualmente tienen una necesidad comercial de utilizar myCGS. Como DA, usted es responsable de recertificar a sus Usuarios Finales "End Users" (Consulte la sección Recertificar Usuarios más arriba). Para su propia recertificación, debe completar una auto recertificación en myCGS usando la pantalla de Auto Recertificación "Self Recertification".
Cuando su auto recertificación "Self Recertification" esté próxima a vencer, recibirá notificaciones por correo electrónico para informarle cuándo debe completarse su auto-recertificación. También recibirá mensajes cuando inicie sesión en myCGS pidiéndole que complete su auto-recertificación.
Para tener acceso a la pantalla de Auto Recertificación "Self Recertification" desde la pantalla de Manejo de Usuarios "User Management" de myCGS, presione la opción Auto Recertificación "Self Recertification".
![]()
Para ingresar a la pantalla de Auto Recertificación "Self Recertification" desde la sección de funcionalidad de myCGS, seleccione Auto Recertificación "Self Recertification" en el menú de Manejo de Usuarios "User Management".
Para completar su auto recertificación, ingrese el número de cheque/EFT o el número del estado de cuenta y el monto en dólares de uno de los 50 cheques más recientes emitidos a su compañía por CGS DME MAC Jurisdicción B o C en los espacios Número de Cheque o de Estado de Cuenta "Check or Statement Number" y Monto de Pago Asociado al Número de Cheque o de Estado de Cuenta "Payment amount associated to the check or statement number". También seleccione la Jurisdicción (JB o JC) del cheque. El cheque debe coincidir con el PTAN que se muestra en la página. Si tiene más de un PTAN, puede seleccionar cualquiera de sus PTAN en el menú desplegable de PTAN y luego ingresar la información de verificación correspondiente. Una vez que haya ingresado la información de su cheque, complete el espacio reCAPTCHA y luego presione el botón SUBMIT para completar su recertificación.
NOTA: Una vez que haya completado el espacio reCAPTCHA, debe presionar el botón SUBMIT dentro de un minuto o de lo contrario, la verificación caducará. Si la verificación reCAPTCHA expiró, simplemente complete el espacio nuevamente y luego presione SUBMIT.

La inscripción en myCGS se basa en el Número de Impuestos o TIN "Tax ID" del proveedor. Todas las combinaciones de NPI/PTAN que estén asociadas con su Número de Impuestos o TIN "Tax ID" serán agregadas automáticamente a su cuenta de myCGS después de que se haya registrado exitosamente. Algunos proveedores, sin embargo, pueden tener múltiples Números de Impuestos o TIN "Tax ID" con diferentes combinaciones de NPI/PTAN bajo cada Número de Impuestos o TIN "Tax ID". Si su compañía tiene más de un Número de Impuestos o TIN "Tax ID", su Oficial Autorizado o AO "Authorized Official o su Oficial Delegado o DO "Delegated Officer" necesitará asignar el Número de Impuestos o TIN "Tax ID" adicional al Aprobador Designado o DA "Designated Approver". Para hacerlo, el AO/DO debe completar el formulario para solicitar que se agregue un Número de Impuestos o TIN "Tax ID" adicional en myCGS o "myCGS Additional Tax ID Request Form" que se encuentra en nuestra página de internet en https://www.cgsmedicare.com/jc/forms/pdf/mycgs_additional_tax_id.pdf. El formulario llenado completamente y firmado debe ser enviado por fax al 1.615.664.5994.
NOTA: Si usted no tiene la posibilidad de enviarlo por fax, puede enviar el formulario por correo a CGS, ATTN: myCGS Registration, PO Box 20010, Nashville, TN 37202.
Una vez que hayamos procesado el formulario, nosotros agregaremos el número de "Número de Impuestos o TIN "Tax ID" adicional al perfil del DA en myCGS y estará disponible dentro de un plazo de 5 a 10 días laborables. Al hacerlo, los Usuarios Finales "End Users" que han sido previamente aprobados por el DA, también recibirán acceso automáticamente al "Número de Impuestos o TIN "Tax ID" adicional (y a todas las combinaciones de NPI/PTAN asociadas).
When you log in to myCGS as a Designated Approver, you are immediately taken to the User Management section of myCGS. Within User Management, you can perform the following tasks:
Navigation
If you are in the User Management section of myCGS, you will see the following menu choices:
![]()
Home – The Home button will take you to the End User portion of myCGS, where you can find Eligibility, Claim Status, and all the other great features myCGS offers. For instructions, refer to the myCGS User Manual. In order to return to the User Management section of myCGS, select the My Account menu, and then choose User Management.
DA User Management – Go here to approve/deny and recertify End Users.
User Management – Go here to manage the permissions of your End Users by specific NPI/PTAN combination.
Self Recertification – Go here to complete your annual self-recertification.
If you are using the End User portion of myCGS and need to return to the User Management section, choose the appropriate screen from the User Management menu, which will be the right-most menu option on your navigation bar.
When a new End User submits a request to register for myCGS, the request must be approved by a Designated Approver within five days. If you are a Designated Approver (DA), you will receive an email informing you that a new request has been submitted that needs your approval. You (or another DA at your company) must log in to myCGS and approve the request before the user is granted access to myCGS.
NOTE: You must approve (or deny) End User requests within five days. If you do not take action within five days, the request will be removed and the End User will need to re-register.
To approve a user request, follow the steps below:
The Approver/Deny Users tab will show the name, role, temporary ID, and status of End Users who have a pending registration request. Be sure to review the information of all End User request carefully before approving/denying. When you approve an End User, they will have access to your company's information (Tax ID, NPI, PTAN), such as claims submitted, check amounts, and more, in myCGS. Only approve valid employees of your company who have a business need to use myCGS.
To approve an End User:
To deny an End User:
Once you have approved or denied an End User, an email will be automatically generated and sent to the End User informing them of your approval/denial. If approved, the End User can log in and use myCGS immediately.
All myCGS users must be recertified every 365 days. The recertification process ensures that myCGS access is limited to only those individuals who currently have a business need to use myCGS.
You will receive a notification email from myCGS when recertification for a user (who is registered under your company's Tax ID) is coming due. If you do not recertify the user before their certification due date, then the user will be suspended and their access to myCGS will be revoked.
To recertify users, follow these steps:
You can use the search filters (User ID and Last Name) to search for a specific user. You can also change the order of the users displayed on screen by pressing the column header of any column. Pressing the column header a second time reverses the order (i.e., from A-Z to Z-A, etc.).
By default, myCGS displays 25 users per page. You can change the number of users displayed per page using the "Show XX entries" drop-down menu.
To approve users for continued myCGS access, check the checkbox in the Recertify column in each user's row. Continue to check as many users for recertification as you wish. To select all users on the page, you can use the "Select All Displayed" checkbox. Note that the select all checkbox will only select the users displayed on the current page.
For users who are no longer members of your organization, check the checkbox in the Deny column in each user's row. Continue to check as many users for denial as you wish. To select all users on the page, you can use the "Select All Displayed" checkbox. Note that the select all checkbox will only select the users displayed on the current page. NOTE: This action will permanently disable the individual's myCGS User ID. This action cannot be overturned. If you deny a user in error, they will need to re-register for myCGS and receive a new User ID.
After selecting the appropriate users for recertification or denial, press the SUBMIT button. Note that you can submit users for both recertification and denial at the same time. When you press submit, all users who you've selected will be submitted for processing, even if you've selected users over multiple pages. Once submitted, your request will be processed overnight. Any users who you've submitted for processing will then be grayed out on the screen, as shown in the image below.
Once recertified, the user's recertification due date will reset to 365 days.
NOTE: If you do not recertify a user before their recertification due date, the user's account will be suspended and their access to myCGS will be disabled until you approve their recertification.
The User Permissions screen allows you to make changes to the user accounts of the individuals who are registered in myCGS under your company's Tax ID. When a new user first registers for myCGS, they automatically have access to all of the NPI/PTANs associated with their approved Tax ID. If for any reason you wish to change a user's access to certain functions or specific NPI/PTANs, then you can do so on the User Permissions screen. You can also use this screen to de-activate users who are no longer employed by your company.
NOTE: The default End User access to certain submission functions (such as Redeterminations, Reopenings, ADR, and others) is set to off. You must specifically grant access to these functions in order for your End Users to be able to use such features. Refer to the myCGS User Manual for additional information.
To access the User Permissions screen from the User Management screen of myCGS, press the User Management tab.
![]()
To access the User Permissions screen from the functionality section of myCGS, choose User Management from the User Management menu.
Searching for Users
To modify a user, first you need to search for the user. myCGS allows you to search for users by entering any of the following five pieces of user information: User ID, User Name, NPI, Tax ID, or PTAN. You can use as many of the search criterion fields as you wish.
In the User ID and User Name field, you can enter as few or as many characters as you want. For instance, if you enter "smith" in the User Name field (leaving the other fields blank), myCGS will return any user who has "smith" in their name, be it Jill Smith, Stan Smith, Karen Smithson, or Smith Jones.

Once you have entered the appropriate search criteria, press the SEARCH button.
After performing your search, myCGS will display the profile information for any users who match your search criteria. Note that if you have more than one NPI/PTAN, multiple rows may exist for a single user who shares the same multiple NPI/PTAN information. Changes made to user permissions are made on an individual NPI/PTAN basis.
To add or remove permissions to a function screen within myCGS, check or uncheck the appropriate checkbox (a check means the user has permission to use the function screen; unchecked means they are not permitted to use the screen).
To de-activate a user entirely from myCGS, check the Deny checkbox and enter a rejection reason in the text field.
Once you have made the appropriate changes to the user's profile, press the UPDATE button.
All myCGS users must be recertified every 365 days. The recertification process ensures that myCGS access is limited to only those individuals who currently have a business need to use myCGS. As a DA, you are responsible for recertifying your End Users (see the Recertify Users section above). For your own recertification, you must complete a self-recertification in myCGS using the Self Recertification screen.
When your self-recertification is coming due, you will receive email notifications to let you know when your self-recertification must be completed by. You will also receive messages when you log in to myCGS asking you to complete your self-recertification.
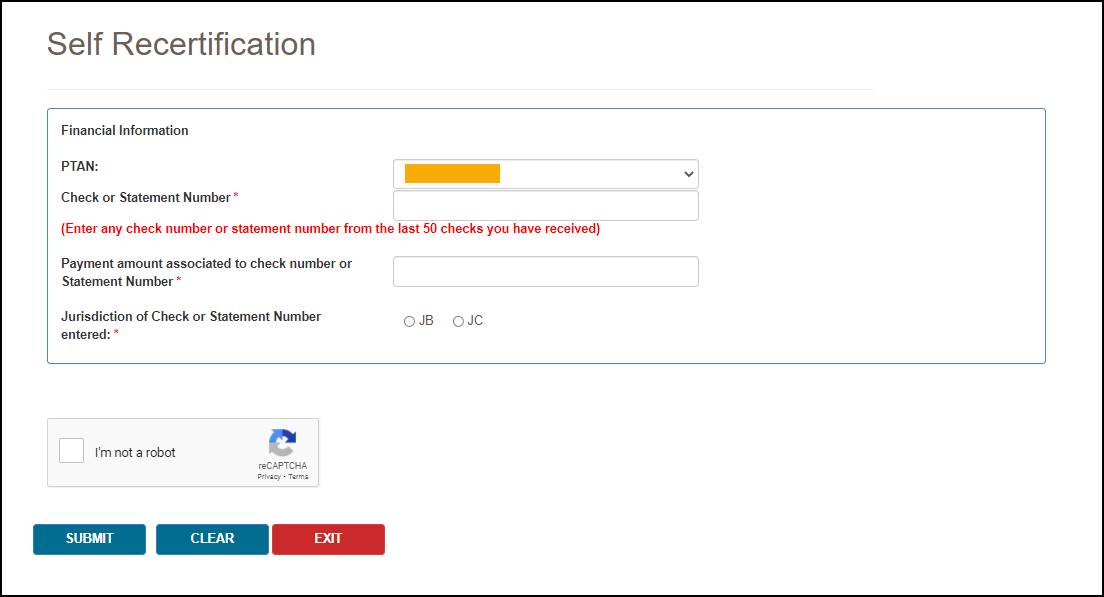
To access the Self Recertification screen from the User Management screen of myCGS, press the Self Recertification tab.
![]()
To access the Self Recertification screen from the functionality section of myCGS, choose Self Recertification from the User Management menu.
To complete your self-recertification, enter the check/EFT number or statement number and dollar amount of one the 50 most recent checks issued to your company by CGS DME MAC Jurisdiction B or C in the "Check or Statement Number" and "Payment amount associated to check number or statement number" fields. Also select the Jurisdiction (JB or JC) of the check. The check must match the PTAN displayed on the page. If you have more than one PTAN, you can select any of your PTANs from the PTAN drop-down menu, and then enter matching check information. Once you've entered your check information, complete the reCAPTCHA field, and then press the SUBMIT button to complete your recertification.
NOTE: Once you've completed the reCAPTCHA field, you must press the SUBMIT button within one minute or else the verification will expire. If the reCAPTCHA verification does expire, simply complete the field again and then press SUBMIT.
myCGS registration is based around a supplier's Tax ID. All NPI/PTAN combinations that are associated with your Tax ID are automatically added to your myCGS account upon successful registration. Some suppliers, however, may have multiple Tax IDs, with different NPI/PTAN combinations under each Tax ID. If your company has more than one Tax ID, then your Authorized Official (AO) or Delegated Official (DO) will need to assign the additional Tax ID to the existing Designated Approver (DA). To do so, the AO/DO must complete the myCGS Additional Tax ID Request Form![]() . The completed and signed form must be faxed to us at 1.615.664.5994.
. The completed and signed form must be faxed to us at 1.615.664.5994.
NOTE: If you do not have the ability to fax, you can mail your form to CGS, ATTN: myCGS Registration, PO Box 20010, Nashville, TN 37202
Once we have processed the form, we will add the additional Tax ID to the DA's myCGS profile and will be available within 5 to 10 business days. In doing so, all End Users who have previously been approved by the DA will also receive access to the additional Tax ID (and all associated NPI/PTAN combinations) automatically.